
User's Manual


The LevelMatePRO has a security feature that records the unique serial number
of the device to your smartphone or tablet so that when you are in close proximity
to other vehicles with LevelMatePRO installed, your smartphone or tablet will
only recognize your LevelMatePRO. So during this step you need to start the
app on each smartphone or tablet so the serial number for your LevelMatePRO
will be recorded on your devices.
NOTE: You will have 10 minutes from the time you switched the LevelMatePRO
on to allow new smartphones or tablets to “learn” your LevelMatePRO. If this
time expires, you can restart the 10 minute “learning” window by sliding the
LevelMatePRO on/off switch to the OFF and then to the ON position. If you want
to add another smartphone or tablet at a later time, simply turn the on/off switch
to the OFF and then to the ON position to start a new 10 minute “learning”
window.
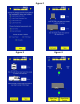
Start the app on each smartphone or tablet and once the app connects to the
LevelMatePRO, minimize the app and start the app on the next smartphone or
tablet. Continue this process until each smartphone or tablet has connected to
the LevelMatePRO. Once a smartphone or tablet has connected to the
LevelMatePRO it will always remember and only connect to that LevelMatePRO.
8) Install the LevelMatePRO.
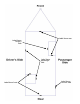
The LevelMatePRO must be installed on a wall or other vertical surface on the
interior of your vehicle. The top cover of the product must face the side, front or
rear of the vehicle when installed.
NOTE: Installing the LevelMatePRO on a side wall or a wall that is parallel
to a side wall is recommended for highest possible accuracy.
The arrows on the product label should point upward toward the ceiling of the
vehicle. Attempt to install the product as straight as possible both horizontally
and vertically. There is no need to install the product perfectly level or
perpendicular as the product is designed to compensate for imperfect installation
orientation. Using the 2 provided mounting screws, mount the product on a wall
or any vertical surface. Again, insure that the arrows on the label are pointing up.
If you installed the top cover properly in step 5, the on/off switch should be on the
bottom edge of the unit.