
User's Manual


NOTE: When installing the LevelMatePRO in a towable vehicle, it is
recommended that the unit be mounted as close to the front of the vehicle
as possible for the best wireless connection from the driver seat of the tow
vehicle.
9) Level the vehicle.
Level the vehicle using your normal leveling method. Take time during this
process to insure that the vehicle is perfectly level as your LevelMatePRO will
record this position and use it as a reference each time you level the vehicle.
NOTE: If your vehicle has power slideout rooms, the vehicle should be
leveled with the slides out during this step of the setup process.
10) Start the app on your smartphone or tablet
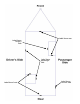
11) Select the installation orientation
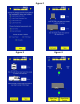
The app will display the Orientation Select screen (figure 3). Figure 2 gives a
graphic example of mounting locations within the vehicle and the corresponding
orientation assignment. Tap on the selection that corresponds to the orientation
of your installation.
NOTE: If you have already setup another smartphone or tablet and
selected the installation orientation, the Orientation Select screen will not
be displayed and you will proceed directly to step 13.
12) Select units of measure
Select the desired units of measure at the bottom of the Orientation Select
screen (figure 3).
13) Select the vehicle type
At the bottom of the Orientation Select screen (figure 3), select either the towable
or driveable option that corresponds to your vehicle type. Tap the Save button at
the bottom of this screen to save your selections.