User Manual Upright Freezer MODEL: CCUL5W, CCUL5B CCUL5WV, CCUL5BV CCUL65W, CCUL65B CCUL65WV, CCUL65BV
Page 2
CONTENTS SAFETY INFORMATION Important Safety Instructions 4-5 Refrigerant 5 Grounding Instructions 6 SET UP & USE Installation Guide 7-11 Parts & Features 12-13 Operation Instructions 14 CLEANING & CARE 15-16 TROUBLE SHOOTING & WARRANTY Before You Call For Service 17 Customer Service 17 Troubleshooting 18 Limited Warranty 19 PRODUCT REGISTRATION Thank you for purchasing our W Appliance product. This easy-touse manual will guide you in getting the best use of your freezer.
SAFETY INFORMATION DANGER DANGER - Immediate hazards which WILL result in severe personal injury or death WARNING WARNING - Hazards or unsafe practices which COULD result in severe personal injury or death CAUTION CAUTION - Hazards or unsafe practices which COULD result in minor personal injury IMPORTANT SAFETY INSTRUCTIONS WARNING When using electrical appliances, basic safety precautions should be followed, including the following NOTE: If the freezer has been placed in a horizontal or tilted position
SAFETY INFORMATION 9. Do not refreeze foods that have been thawed completely. The United States Department of Agriculture in Home and Garden Bulletin No. 69 reads: “…You may safely refreeze frozen foods that have thawed if they still contain ice crystals or if they are still coldbelow 40˚F. “…Thawed ground meats, poultry, or fish that have any off-odor or off-color should not be refrozen and should not be eaten. Thawed ice cream should be discarded.
SAFETY INFORMATION GROUNDING INSTRUCTIONS ELECTRICAL REQUIREMENTS The electrical requirements are a 115 volt 60 Hz, AC only, 15 amp. It is recommended that a separate circuit serving only the product be provided. The product is equipped with a 3-wire cord having a 3-prong grounding plug. It must be plugged into a wall receptacle that is properly installed and grounded. This appliance must be grounded.
SET UP & USE INSTALLATION GUIDE 1. Unpack your freezer by removing all packaging materials like carton, base, foams, adhesive tape, etc. 2. Remove all accessories, internal packaging material used to hold shelves, ice tray, etc. in place. 3. Clean the remains of all adhesive tap used and remove all printed material supplied. 4. Install the freezer in a convenient location away from extreme heat and cold.
SET UP & USE PROTECTION FROM HEAT AND MOISTURE •D o not install your freezer in any location where heavy moisture is present or if the location is not properly insulated. This freezer is not designed to operate in temperature setting below 55° Fahrenheit. • L ocation for the freezer should be on a hard surface and away from direct sunlight and heat source, e.g., radiators, baseboard heaters, cooking appliances, etc.
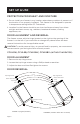
SET UP & USE 1. Remove any loose items in the freezer and carefully place it on its back. 2. U sing a Philips head screwdriver remove the 4 screws and bottom door hinge. Set them aside. 3. Remove the top hinge cover. 4. Loosen and remove the 4 screws holding the top hinge in place. 5. Remove the top hinge and carefully remove the door. 6.
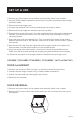
SET UP & USE 3. Lift the top and remove the 2 screws and the hinge from the right side. 4. G ently lift the door away from the hinge pin and remove the door. Re-insert the 2 screws and hinge on the opposite side. 5. Remove the adjustable leveling leg from the bottom left of the unit. 6. R emove the leg and then the 4 screws from the bottom hinge bracket on the right of the unit. Remove the hinge pin, nut and washer from the bottom right of the unit. 7.
SET UP & USE 8. A lign the door to the cabinet and secure it with the bottom hinge pin and bracket by inserting the 4 screws into the holes. Tighten the screws. Make sure the leg is tightened in the front hole of the bracket. 9. On the right side of the unit, reinstall the previously removed leveling leg. 10. Make sure the top of the door is aligned with the cabinet and insert the top hinge pin into the top of the door. 11. Secure the worktop with the 3 previously removed screws.
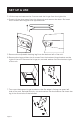
SET UP & USE PARTS & FEATURES CCUL5W, CCUL5B,CCUL5WV, CCUL5BV Temperature Control Freezer Door (4) Shelves Leveling Legs Page 12
SET UP & USE PARTS & FEATURES CCUL65W, CCUL65B,CCUL65WV, CCUL65BV Temperature Control Freezer Door (5) Shelves Leveling Legs Page 13
SET UP & USE OPERATION INSTRUCTIONS TEMPERATURE CONTROL NOTE: · If the freezer has been placed in a horizontal or tilted position for any period of time wait 24 hours before plugging the unit in. • The settings of the temperature control are OFF, 1 (warmest), 2, 3 (coldest). Adjust the temperature control to the setting that best suits your needs. . • Turning the temperature to “OFF” position will shut off the cooling cycle, but does not turn off the electrical power to the unit.
CLEANING & CARE CLEANING AND MAINTAINING The freezer should be cleaned and maintained once a month. Before doing so, you must unplug the freezer. POWER INTERRUPTION In case of a power interruption/outage, unplug the power cord from the wall outlet. Replug the power cord to the wall outlet once the power has been restored. For long period of power outage, inspect and discard the spoiled or thawed foods from the freezer compartments. Clean the freezer thoroughly before using again.
CLEANING & CARE DOOR GASKET Clean door gaskets every three months according to general instructions. Gasket must be kept clean and pliable to assure a proper seal. • Petroleum jelly applied lightly on the hinge sides of gaskets will keep the gasket pliable and ensure a good seal. VACATION AND MOVING CARE • When going on vacation, it is best that you empty all the food from your freezer. Set the temperature dial to “OFF” and unplug the freezer.
TROUBLESHOOTING & WARRANTY BEFORE YOU CALL FOR SERVICE IF THE FREEZER FAILS TO OPERATE: A) Check to make sure that the freezer is plugged in securely. If it is not, remove the plug from the outlet, wait 10 seconds and plug it in again securely. B) Check for a blown circuit fuse or a tripped main circuit breaker. If these seem to be operating properly, test the outlet with another appliance. IF NONE OF THE ABOVE SOLVES THE PROBLEM, CONTACT A QUALIFIED TECHNICIAN.
TROUBLESHOOTING & WARRANTY TROUBLESHOOTING Troubleshoot your problem by using the chart below. If the freezer still does not work properly, contact W Appliance Co. customer service center or the nearest authorized service center. Customers must never troubleshoot internal components. TROUBLE POSSIBLE CAUSE POSSIBLE REMEDY Freezer does not work A. Freezer is not switched on B. Unit is not plugged in or is loose C. Fuse has blown or is defective D. There is a problem with the wall outlet. A.
TROUBLESHOOTING & WARRANTY LIMITED WARRANTY Any repair, replacement, or warranty service, and all questions about this product should be directed to W Appliance Co. at 1 (855) 855-0294 from the USA or Puerto Rico. W Appliance Co. warrants to the original purchaser that the product will be free from defects in material, parts and workmanship for the period designated for this product.
© 2020 W Appliance Company LLC. All Rights Reserved.