Item # 1002 959 145 Model # 17898 USE AND CARE GUIDE 12" RGBW LED Strip Kit (4-Pack) +12V +12V R R G B W G B W B W R G B W G R +12V +12V +12V +12V R G R G B W B W G B W R G B W R +12V +12V R G OFF ON B WW Flash Strobe Fade Smooth Questions, problems, missing parts? Before returning to the store, call Commercial Electric Customer Service 8 a.m. - 7 p.m., EST, Monday - Friday, 9 a.m. - 6 p.m., EST, Saturday 1-877-527-0313 HOMEDEPOT.
Table of Contents Table of Contents .......................................................... 2 Safety Information ......................................................... 2 Warranty ......................................................................... 3 Three (3) Year Warranty..............................................................3 What is Covered .........................................................................3 What is Not Covered .....................................................
Warranty THREE (3) YEAR WARRANTY WHAT IS COVERED date of purchase. This warranty applies only to the original consumer purchaser and only to products used in normal use and service. If this product is found to be defective, the manufacturer’s only obligation, and your exclusive remedy, is the repair or replacement of the product at the manufacturer’s or mishandling.
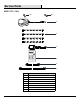
Pre-Installation (continued) PACKAGE CONTENTS A +12V +12V R R G G B B W W +12V +12V R R G G B B B W W +12V +12V R R G G B B W W +12V +12V R R G G B B W W C R G OFF ON B WW Flash Strobe Fade D Smooth E F C Description Adaptor 12” LED strip Infrared receiver (Assembled to the adaptor (A)) D Remote 1 E Connector wire (3.
Installation 1 Installation considerations □ □ How will you run and conceal the wires to your LED tape lighting? □ Temporarily mounting the LED light strip using painter’s tape allows you to experiment with tape light positioning before permanent installation. IMPORTANT: Using painter’s tape or masking tape, temporarily place the LED light strip into your desired mounting position.
Installation (continued) 3 Preparing the assembly location □ Power the LED tape lighting and temporarily hold or tape into position with painter's tape or masking tape - do not remove the 3M paper backing. □ Adjust the lighting to various angles and positions to get the desired level of illumination and lighting appearance. If the try a different mounting angle. erly. □ IMPORTANT: Before removing the 3M paper backing, it is important to test the LED strip in the space you intend to light.
Installation (continued) 5 Installing the Infrared receiver B A □ There are two options for you choose: A: Remove the protective tape from the adhesive back of infrared receiver, then place the infrared receiver onto the position and press to insure proper adhesion to the surface. B: Use the two screws to install the infrared receiver onto the position.
Maintenance Operation 1 Using the remote □ Direct the remote (D) towards the infrared receiver (C) to change RGBW colors of the strip. A B A--- Use to increase or decrease color brightness and to slow R OFF ON B WW G down or accelerate speed. (NOTE: there are 10 light intensity options and 10 speed setting options) C D E F G Flash Strobe Fade Smooth B--- ON/OFF switch. C--- R,G,B,W : Choose color : red, green, blue or warm white. D--- Flash key: 7 color jump change.
Care and Cleaning □ To clean the fixture, disconnect the power by unplugging the adapter. Use a dry or slightly dampened, clean cloth to wipe the exterior surface of the fixture. □ Do not use any cleaners with chemicals, harsh abrasives, or solvents. Use only a dry soft cloth to dust or wipe carefully. Troubleshooting Problem Possible Cause Solution The LED will not light. The LED is burned out. Discontinue use of the lamp. The power is off. Ensure the power supply is turned on.
Service Parts MODEL TYPE : 17898 AA BB A +12V +12V R R G G B B W W +12V +12V R R G G B B B W W +12V +12V R R G G B B W W +12V +12V R R G G B B W W C R G OFF ON B WW Flash Strobe Fade D Smooth E F Part Description AA BB A Screw Clip (type MH1) Adaptor 12” LED strip Infrared receiver (Assembled to the adaptor (A)) B C D E F Remote Connector wire (3.
Questions, problems, missing parts? Before returning to the store, call Commercial Electric Customer Service 8 a.m. - 7 p.m., EST, Monday - Friday, 9 a.m. - 6 p.m., EST, Saturday 1-877-527-0313 HOMEDEPOT.COM Retain this manual for future use.
Artículo núm. 1002 959 145 Modelo núm. 17898 GUÍA DE USO Y MANTENIMIENTO Kit de tiras de LED RGBW 12" (paquete de 4) +12V +12V R R G B W G B W B W R G B W G R +12V +12V +12V +12V R G R G B W G B W R G B W R +12V +12V R G OFF ON B WW B W Flash Strobe Fade Smooth ¿Tiene alguna pregunta o algún problema? ¿Le faltan piezas? Antes de volver a la tienda, llame al Servicio de atención al cliente de Commercial Electric 8 a.m. - 7 p.m., EST, de lunes a viernes; 9 a.m. - 6 p.m.
Tabla de contenidos Tabla de contenidos....................................................... 2 Información de seguridad.............................................. 2 Garantía........................................................................... 3 Garantía de tres (3) años..............................................................3 ¿Qué cubre?................................................................................. 3 ¿Qué no cubre?..........................................................
Garantía GARANTÍA DE TRES (3) AÑOS ¿QUÉ CUBRE? El fabricante garantiza que esta lámpara no presentará defectos de material ni de mano de obra durante un período de tres (3) años a partir de la fecha de compra. Esta garantía se aplica solo al comprador original y únicamente a los productos que se utilicen en condiciones normales y reciban un mantenimiento adecuado.
Preinstalación (continuación) CONTENIDOS DEL PAQUETE A +12V +12V R R G G B B W W +12V +12V R R G G B B B W W +12V +12V R R G G B B W W +12V +12V R R G G B B W W C R G OFF ON B WW Flash Strobe Fade D Smooth E F C Descripción Adaptador Tira de LED 12” Receptor de infrarrojos (instalado en el adaptador [A]) D Control remoto 1 E Cable conector (3,9”) Cable conector (39”) 1 Pieza A B F Cantidad 1 4 1 2 4
Instalación 1 Consideraciones de instalación □ ¿Cuál es la mejor configuración de diseño para su instalación? □ ¿Cómo colocará y ocultará los cables de la cinta de iluminación LED? □ Realizar un montaje provisional de la tira de iluminación LED con cinta adhesiva permite experimentar con el posicionamiento de la cinta de iluminación antes de la instalación definitiva. IMPORTANTE: Con cinta adhesiva, coloque provisionalmente la tira de iluminación LED en la posición de montaje deseada.
Instalación (continuación) 3 Preparación del lugar de montaje □ Encienda la cinta de LED y sujétela por un momento o colóquela en la posición deseada con cinta adhesiva. No retire el papel de respaldo 3M. □ Ajuste la iluminación en varios ángulos y posiciones para obtener la apariencia y el nivel de iluminación que desee. Si los ledes crean reflejos o puntos de luz no deseados en las paredes, cambie la posición de la tira de iluminación de la cinta, de manera que esté más lejos de las superficies.
Instalación (continuación) 5 Instalación del receptor de infrarrojos B A □ Puede elegir entre dos opciones: A: Retire la cinta protectora de la parte trasera adhesiva del receptor de infrarrojos y, a continuación, coloque el receptor de infrarrojos en la posición deseada y presione para asegurarse de que se ha adherido correctamente a la superficie. B: Utilice los dos tornillos para instalar el receptor de infrarrojos en la posición deseada.
Maintenance Funcionamiento 1 Uso del control remoto □ Apunte el control remoto (D) hacia el receptor de infrarrojos (C) para cambiar los colores RGBW de la tira. A B A--- Se utiliza para aumentar o disminuir el brillo del color y para reducir R OFF ON B WW G C D E F G Flash Strobe Fade Smooth o acelerar la velocidad. (OBSERVACIÓN: puede elegir entre 10 opciones de intensidad de la luz y 10 opciones de configuración de velocidad) B--- Interruptor ON/OFF.
Mantenimiento y limpieza □ Para limpiar el dispositivo de iluminación, desconecte la alimentación desenchufando el adaptador. Utilice un paño suave seco o ligeramente mojado para limpiar la superficie exterior del dispositivo. □ No emplee productos de limpieza que contengan químicos, abrasivos fuertes ni disolventes. Utilice únicamente un paño seco para quitar el polvo o limpiar con cuidado. Reparación de averías Problema Posible causa Solución El LED no se enciende. El LED está quemado.
Piezas de repuesto TIPO DE MODELO: 17898 AA BB A +12V +12V R R G G B B W W +12V +12V R R G G B B B W W +12V +12V R R G G B B W W +12V +12V R R G G B B W W C R G OFF ON B WW Flash Strobe Fade D Smooth E F Pieza AA BB A B C D E F Descripción Tornillo Enganche (tipo MH1) Adaptador Tira de LED 12” Receptor de infrarrojos (instalado en el adaptador [A]) Control remoto Cable conector (3,9”) Cable conector (39”) 10
¿Tiene alguna pregunta o algún problema? ¿Le faltan piezas? Antes de volver a la tienda, llame al Servicio de atención al cliente de Commercial Electric 8 a.m. - 7 p.m., EST, de lunes a viernes; 9 a.m. - 6 p.m., EST, sábados 1-877-527-0313 HOMEDEPOT.COM Conserve este manual para futuras consultas.