Item # 1002760845 Model # 50232161 Use and Care Guide 2 FT. LINEAR HIGH BAY LED LIGHT Questions, problems, missing parts? Before returning to the store, call Commercial Electric Customer Service 8 a.m. – 7 p.m., EST, Monday - Friday 9 a.m. - 6 p.m., EST, Saturday 1-877-527-0313 HOMEDEPOT.COM THANK YOU We appreciate the trust and confidence you have placed in Commercial Electric through the purchase of this LED light. We strive to continually create quality products designed to enhance your home.
Table of Contents Table of Contents. . . . . . . . . . . . . . . . . . . . . . . . . . . . . . . . . . . . 2 Safety Information. . . . . . . . . . . . . . . . . . . . . . . . . . . . . . . . . . . 2 Warranty. . . . . . . . . . . . . . . . . . . . . . . . . . . . . . . . . . . . . . . . . . . 2 Pre-Installation. . . . . . . . . . . . . . . . . . . . . . . . . . . . . . . . . . . . . . 3 Planning Installation . . . . . . . . . . . . . . . . . . . . . . . . . . . . . . . . 3 Tools Required. . . . . . . . . . .
Pre-Installation PLANNING INSTALLATION Before beginning assembly, installation or operation of product, make sure all parts are present. Compare parts with the package contents list and hardware included list. If any part is missing or damaged, do not attempt to assemble, install or operate the product. Contact customer service for replacement parts. NOTE: Keep your receipt and these instructions for proof of purchase.
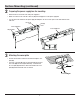
Pre-Installation (continued) HARDWARE INCLUDED NOTE: Hardware not shown to actual size. Part Description Quantity AA Cover Plate 1 BB Cable Set 2 CC Chain with S-Hook 2 DD Electrical Box Screw 2 EE Wire Connector 3 FF Power Tool Hex Bit 1 CC AA EE DD BB FF Installation WARNING: RISK OF ELECTRIC SHOCK. Ensure the electricity to the wires you are working on is shut off.
Suspension Mounting (continued) 2 Preparing the power supply box for wiring □□ Remove the knock-out near the end of the power supply box. □□ Fit a 1/2 in. snap-in bushing into the knock-out hole. Knock-out Hole □□ Feed the wiring out through the bushing and knock-out hole. □□ Reconnect the two ends of the Quick Connect wires. Power Supply Box □□ Align the screw holes in the fixture body (A) with the screw holes in the power supply box.
Suspension Mounting (continued) 5 Preparing the fixture body for mounting □□ Attach the hook on one end of the cable set (BB) to a hanging hole on the fixture body (A) and close the hook with pliers to secure it. □□ Attach the hook on the other end of the cable set (BB) to the other hanging hole on the same end of the fixture body (A) and close the hook with pliers to secure it.
Suspension Mounting (continued) 7 Making the electrical connections □□ Feed the electrical wires from the fixture (A) through the cover plate (AA). □□ Connect the hot and neutral (black and white) wires from the fixture body (A) to the same color wires from the electrical box. □□ Connect the green wire from the fixture body (A) to the grounding wire from the electrical box.
Surface Mounting (continued) 2 Preparing the power supply box for mounting □□ Remove the knock-out near the end of the power supply box. □□ Attach one hook from each of the two cable sets (BB) to the hanging holes on the power supply box. □□ Close the open hooks attached to the power supply box with pliers. Do not close the open S-hooks at the bottoms of the cable sets.
Surface Mounting (continued) 4 Mounting the power supply box □□ Pull the electrical wires from the electrical box through the knock-out hole in the power supply box. □□ Align the large ends of the keyholes in the power supply box with the mounting screws (DD), allowing the heads of the screws (DD) to come through the large ends of the keyholes. □□ Rotate the power supply box until the heads of the mounting screws (DD) slide into the narrow ends of the keyholes.
Surface Mounting (continued) 6 Making the electrical connections □□ Connect the hot and neutral (black and white) wires from the power supply box to the same color wires from the electrical box. Power Supply Box BB □□ Connect the green wire from the power supply box to the grounding wire from the electrical box. □□ If 0-10v dimming circuit is available, connect the purple and gray wires from the power supply box to the same color wires from the electrical box.
Downrod Mounting 1 Removing the power supply box □□ Remove the four screws that attach the power supply box to the LED fixture body (A) using the power tool hex bit (FF). □□ Put the screws aside as they will be needed to reattach the power supply box to the fixture body (A) in a later step. □□ Lift the power supply box from the fixture body (A) and unplug the Quick Connect wires.
Downrod Mounting (continued) 3 Mounting the power supply box Rigid Pipe □□ Attach the rigid pipe (not included) to the ceiling and pull the wiring from the electrical box through the pipe. □□ Place the pipe through the center knock-out hole in the power supply box and secure it with the appropriately sized hardware (not included).
Downrod Mounting (continued) 5 Making the electrical connections □□ Connect the hot and neutral (black and white) wires from the power supply box to the same color wires from the electrical box. □□ Connect the green wire from the power supply box to the grounding wire from the electrical box. Power Supply Box BB □□ If 0-10v dimming circuit is available, connect the purple and gray wires from the power supply box to the same color wires from the electrical box.
Care and Cleaning CAUTION: Before attempting to clean fixture, disconnect the power to the fixture by turning the breaker off or removing the fuse from the fuse box. □□ Clean the fixture with a soft, dry cloth. □□ Do not use cleaners with chemicals, solvents, or harsh abrasives. □□ Do not use liquid cleaner on the LEDs, LED driver, or wiring inside the light fixture. Troubleshooting WARNING: Before doing any work on the fixture, disconnect power to the light fixture.
Notes 15 HomeDepot.cOM Please contact 1-877-527-0313 for further assistance.
Questions, problems, missing parts? Before returning to the store, call Commercial Electric Customer Service 8 a.m. – 7 p.m., EST, Monday - Friday 9 a.m. - 6 p.m., EST, Saturday 1-877-527-0313 HomeDepot.COM Retain this manual for future use.
Artículo # 1002760845 Modelo # 50232161 GUÍA DE USO Y CUIDADO LÁMPARA LINEAL LED DE BAHÍA ALTA DE 2 PIES ¿Preguntas, problemas, piezas faltantes? Antes de devolver el producto a la tienda, llame al Centro de Atención al Cliente de Commercial Electric en el horario de 8 a.m. – 7 p.m., Hora del Este de EE.UU., de lunes a viernes. 9 a.m. – 6 p.m., Hora del Este de EE.UU., el sábado. 1-877-527-0313 HOMEDEPOT.
Contenido Contenido. . . . . . . . . . . . . . . . . . . . . . . . . . . . . . . . . . . . . . . . . 18 Información sobre seguridad. . . . . . . . . . . . . . . . . . . . . . . . . . 18 Garantía. . . . . . . . . . . . . . . . . . . . . . . . . . . . . . . . . . . . . . . . . . 18 Previo a la instalación . . . . . . . . . . . . . . . . . . . . . . . . . . . . . . . 19 Planificacíon de la instalación. . . . . . . . . . . . . . . . . . . . . . . . 19 Herramientas necesarias. . . . . . . . . . . . . . . . . . .
Previo a la instalación PLANIFICACIÓN DE LA INSTALACIÓN Antes de comenzar el armado, la instalación o antes de operar el producto, asegúrese de que tiene todas las piezas. Compare las piezas con la lista del contenido incluyda. Si falta alguna pieza o si está dañada, no comience a armar, instalar, ni operar el producto. Comuníquese con el servicio al cliente para el reemplazo de las piezas. NOTA: Guarde el recibo de compra y estas instrucciones como prueba de compra.
Previo a la instalación (continuación) Piezas incluidas NOTA: Los materiales no se ilustran en tamaño real. Pieza Descripción Cantidad AA Tapa 1 BB Juego de cables 2 CC Cadena con gancho S 2 DD Tornillo de la caja eléctrica 2 EE Conector de cable 3 FF Broca hex para herramienta eléctrica 1 CC AA EE DD BB FF Instalación ADVERTENCIA: RIESGO DE DESCARGA ELÉCTRICA. Asegúrese de cortar el suministro eléctrico en los cables con los que trabajará.
Instalación suspendida (continuación) 2 Preparación de la caja de suministro de energía para cableado □□ Quite el agujero ciego cerca del extremo de la caja de suministro de energía. Agujero ciego □□ Coloque un buje de presión de 1/2 pulgadas en el agujero ciego. □□ Pase los cables a travès del buje y el agujero ciego. Caja de suministro de energía □□ Conecte los dos extremos de los cables de conexión rápida.
Instalación suspendida (continuación) 5 Preparación de la caja de la lámpara para la instalación □□ Fije el gancho en un extremo del juego de cables (BB) a un agujero de suspensión en la caja de la lámpara (A) y cierre el gancho con unos alicates para sujetarlo. □□ Fije el gancho en el otro extremo del juego de cables (BB) al otro agujero de suspensión en el mismo extremo de la caja de la lámpara (A) y cierre el gancho con unos alicates para sujetarlo.
Instalación suspendida (continuación) 7 Hacer las conexiones eléctricas □□ Pase los cables desde la lámpara (A) a través de la tapa (AA). □□ Conecte los cables principal y neutro (negro y blanco) de la caja de la lámpara (A) a los cables del mismo color de la caja eléctrica. □□ Conecte el cable verde de la caja de la l´ámpara (A) al cable de conexión a tierra de la caja eléctrica.
Instalación superficial (continuación) 2 Preparación de la caja de suministro de energía para la instalación □□ Retire el agujero ciego central de la caja de suministro de energía. □□ Conecte un gancho de cada uno de los dos juegos de cables (BB) a los agujeros de suspensión de la caja de suministro de energía. □□ Cierre los ganchos abiertos conectados a la caja de suministro de energía con alicates. No cierre los ganchos S abiertos en la parte inferior de los juegos de cables.
Instalación superficial (continuación) 4 Instalación de la caja de suministro de energía □□ Pase los cables eléctricos de la caja eléctrica a través del agujero ciego en la caja de suministro de energía. □□ Alinee los extremos grandes de los agujeros oblongos de la caja de suministro de energía con los tornillos de montaje (DD), permitiendo que las cabezas de los tornillos (DD) vayan a través de los extremos grandes de los agujeros oblongos.
Instalación superficial (continuación) 6 Hacer las conexiones eléctricas □□ Conecte los cables principal y neutro (negro y blanco) de la caja de suministro de energía a los cables del mismo color de la caja eléctrica. Caja de suministro de energía BB □□ Conecte el cable verde de la caja de suministro de energía al cable de conexión a tierra de la caja eléctrica.
Instalación sobre varilla 1 Extracción de la caja de suministro de energía □□ Con la broca hex para herramienta eléctrica (FF), retire los 4 tornillos que sujetan la caja de suministro de energía a la caja de la lámpara LED (A). □□ Deje de lado los tornillos ya que serán necesarios para volver a colocar la caja de suministro de energía a la caja de la lámpara (A) en un paso posterior. □□ Levante la caja de suministro de energía de la caja de la lámpara (A) y desenchufe los cables de conexión rápida.
Instalación sobre varilla (continuación) 3 Instalación de la caja de suministro de energía Tubo rigido □□ Fije el tubo rígido (no incluido) al techo y pase los cables de la caja eléctrica a través del tubo. □□ Coloque el tubo a través del agujero ciego central en la caja de suministro de energía y asegúrelo con el hardware de tamaño adecuado (no incluido).
Instalación sobre varilla (continuación) 5 Hacer las conexiones eléctricas □□ Conecte los cables principal y neutro (negro y blanco) de la caja de suministro de energía a los cables del mismo color de la caja eléctrica. □□ Conecte el cable verde de la caja de suministro de energía al cable de conexión a tierra de la caja eléctrica.
Cuidado y limpieza PRECAUCIÓN: Antes de limpiar el aparato, desconecte el suministro eléctrico hacia este apagando el cortacircuitos o extrayendo el fusible de la caja de fusibles. □□ Limpie el aparato con un paño suave y seco. □□ No utilice limpiadores con productos químicos, solventes o abrasivos.
Notas 31 HomeDepot.cOM Comuníquese al 1-877-527-0313 para solicitar asistencia.
¿Preguntas, problemas, piezas faltantes? Antes de devolver el producto a la tienda, llame al Centro de Atención al Cliente de Commercial Electric en el horario de 8 a.m. – 7 p.m., Hora del Este de EE.UU., de lunes a viernes. 9 a.m. – 6 p.m., Hora del Este de EE.UU., sábados. 1-877-527-0313 HomeDepot.COM Conserve este manual para uso futuro.