
Installation Guide

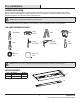


Power Supply Cover Plate
3/4 in. knockout 1/2 in. knockout
Green ground
5 HOMEDEPOT.COM
Please contact 1-877-527-0313 for further assistance.
Suspension Mounting
A
Screw
24.6 in.
1
Making marks on the ceiling
□ Mark two spots on the ceiling 24.6 in. apart for
suspension mounting before the installation.
2
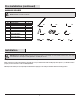
Mounting to a drywall ceiling
□ Drill two holes large enough to clear the closed flaps of the
butterfly nut on a toggle bolt (not included).
□ Fasten the toggle bolt into the butterfly nut before
inserting the flaps into the ceiling.
□ Tighten the toggle bolt.
3
Mounting to a wood ceiling
□ Drill two 1/16 in. diameter holes in the ceiling to
accommodate hook screws (not included).
□ Tighten the hook screw (not included) into the ceiling.
4
Removing the power supply cover plate
□ Remove the screw that attaches the power supply cover plate to the fixture body (A).
□ Put the screw aside as it will be needed to reattach the power supply cover plate to the fixture body (A) in a later step.
□ Remove the knockout hole on the power supply cover plate.
□ Feed the wiring out through the power supply cover plate. Make the conduit (not included) through the knockout hole and tighten
the conduit securely.
NOTE: The user can choose Type 1/2 or Type 3/4 knockout hole for feeding the wiring based on the conduit used.