
Instructions / Assembly


□
□
1
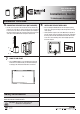
Installation
3
Attach the desired accessory plates (included) inside the box
with the included screws. Use #2 stubby Phillips screwdriver to
install these plates. Note: If you will be running tubing to this
box, choose the cutout size that best suits your needs and cut
the snap-in plate to make the pass-through.
ATTACHING THE DESIRED ACCESSORY PLATES
PREPARING THE WALL FOR INSTALLATION
Installation Guide
TV Multimedia Recessed Box
Item #1001863174
Model #5053-WH
Using the template supplied, trace the opening for the plate on the
wall. Remember, the plate is designed to be mounted centered
between the studs. Using a drywall saw, cut a hole in the drywall
the size of the template.
TEMPLATE
C
D
E
A
B
2
*This product is designed for standard 2x4 framed walls. If your wall does
not have the standard 3.5” spacing between the drywall you will need to
use a kit that mounts on the front of the wall.
□
CUT DRYWALL FOR PLATE
With your template secured to the wall with the tape, using a drywall saw,
cut a hole in the drywall the size of the template.
4
ETL LISTED
CONFORMS TO
UL STD 514C
Scan Me
TIP: Loop a piece of tape with the sticky side outward to form a circle and
apply it to the back of the template to secure it to the wall.
PACKAGE CONTENTS
A - Recessed Media Box
B - Snap-in cover plate with conduit/pipe knockouts
C - Flexible pass-through accessory plate
TOOLS NEEDED
Drywall saw
Stud Finder
Level
#2 Phillips screwdriver
D - 6-port keystone accessory plate
E - Blank accessory plate
CAUTION
Before installing this product, be sure the
electrical power is off at the circuit breaker or
remove fuse(s).
For video information visit homedepot.com and search
SKU 1001863174 or model number 5053-WH
#2 Stubby Phillips
Screwdriver
Pencil
TOOLS NEEDED (Not included)
15 amp electrical receptacle
Use the stud nder to center between the wall framing studs.
□
Be sure to frame your plate both vertically and horizontally.
□
DETERMINE THE TV MULTIMEDIA RECESSED
BOX LOCATION
Tape