Item # 1002057128 1002057117 Model # 53184101 53183101 Use and Care Guide 5 IN./6 IN. RECESSED RETROFIT LED DOWNLIGHT 4 IN. RECESSED RETROFIT LED DOWNLIGHT Questions, problems, missing parts? Before returning to the store, call Commercial Electric Customer Service 8 a.m. – 7 p.m., EST, Monday - Friday 9 a.m. - 6 p.m., EST, Saturday 1-877-527-0313 HomeDepot.COM THANK YOU We appreciate the trust and confidence you have placed in Commercial Electric through the purchase of this recessed retrofit downlight.
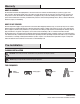
Table of Contents Table of Contents. . . . . . . . . . . . . . . . . . . . . . . . . . . . . . . . . . . . 2 Safety Information. . . . . . . . . . . . . . . . . . . . . . . . . . . . . . . . . . . 2 Warranty. . . . . . . . . . . . . . . . . . . . . . . . . . . . . . . . . . . . . . . . . . . 3 Pre-Installation. . . . . . . . . . . . . . . . . . . . . . . . . . . . . . . . . . . . . . 3 Planning Installation . . . . . . . . . . . . . . . . . . . . . . . . . . . . . . . . 3 Tools Required. . . . . . . . . . .
Warranty WHAT IS COVERED The manufacturer warrants this lighting fixture to be free from defects in materials and workmanship for a period of (5) years from date of purchase. This warranty applies only to the original consumer purchaser and only to products used in normal use and service.
Pre-Installation (continued) Package Contents C Item # 1002057128/Model #53184101 A Part Description Quantity A LED Light Module 1 B Medium Base (E26) Socket Adapter 1 C Friction Clip 2 Part Description Quantity B Item # 1002057117/Model #53183101 D E D LED Light Module 1 E Medium Base (E26) Socket Adapter 1 Installation Before beginning assembly, installation or operation of product, make sure all parts are present. Compare parts with the package contents list.
Mount to 5 in./6 in. Housing with Ears - Item 1002057128/Model # 53184101 1 2 Turning off the power □□ Make sure the power is turned off at the source to the recessed can housing where the fixture will be installed. Remove the existing bulb and trim, revealing the socket. Adjusting the spring clips □□ The factory setting of the spring clips is for 6 in. recessed can housings. To install in 5 in.
Mount to 5 in./6 in. Housing with Ears (continued) 5 6 Inserting the spring clips into the recessed can □□ Compress the spring clips on the LED light module (A) and insert into the ears on the inside of the recessed can housing. Pushing the LED light module into the recessed can □□ Carefully push the LED light module (A) into the recessed can housing until the trim is flush with the ceiling surface. A Spring Clips A Mount to 5 in./6 in.
Mount to 5 in./6 in. Housing without Ears (continued) 3 4 Connecting the socket adapter □□ Screw the medium base (E26) socket adapter (B) into the socket in the recessed housing. Connecting the cables □□ Plug the cable connector on the socket adapter (B) into the connector on the LED light module (A).
Mount to 4 in. Housing - Item 1002057117/Model # 53183101 1 2 Turning off the power □□ Screw the medium base (E26) socket adapter (E) into the socket in the recessed housing. □□ Make sure the power is turned off at the source to the recessed can housing where the fixture will be installed. Remove the existing bulb and trim, revealing the socket. NOTICE: Stick the replacement label on the inner wall of the recessed housing before installation.
Care and Cleaning CAUTION: Before attempting to clean fixture, disconnect the power to the fixture by turning the breaker off or removing the fuse from the fuse box. □□ Clean the fixture with a soft, dry cloth. □□ Do not use cleaners with chemicals, solvents, or harsh abrasives Troubleshooting WARNING: Before doing any work on the fixture, disconnect power to the light fixture. Minor problems often can be fixed without the help of an electrician. Problem The fixture will not light.
Questions, problems, missing parts? Before returning to the store, call Commercial Electric Customer Service 8 a.m. – 7 p.m., EST, Monday - Friday 9 a.m. - 6 p.m., EST, Saturday 1-877-527-0313 HomeDepot.COM Retain this manual for future use.
Artículo # 1002057128 1002057117 Modelo # 53184101 53183101 MANUAL DE USO Y CUIDADO PROYECTOR LED EMPOTRABLE DE RENOVACIÓN DE 5 PUL./6 PULG. PROYECTOR LED EMPOTRABLE DE RENOVACIÓN DE 4 PULG. ¿Preguntas, problemas, piezas faltantes? Antes de devolver el producto a la tienda, llame al Centro de Atención al Cliente de Commercial Electric en el horario de 8 a.m. – 7 p.m., Hora del Este de EE.UU., de lunes a viernes. 9 a.m. – 6 p.m., Hora del Este de EE.UU., sábados. 1-877-527-0313 HomeDepot.
Contenido Contenido. . . . . . . . . . . . . . . . . . . . . . . . . . . . . . . . . . . . . . . . . 12 Información sobre seguridad. . . . . . . . . . . . . . . . . . . . . . . . . . 12 Garantía. . . . . . . . . . . . . . . . . . . . . . . . . . . . . . . . . . . . . . . . . . 13 Previo a la instalación . . . . . . . . . . . . . . . . . . . . . . . . . . . . . . . 13 Planificacíon de la instalación. . . . . . . . . . . . . . . . . . . . . . . . 13 Herramientas necesarias. . . . . . . . . . . . . . . . . . .
Garantía CUBRE El fabricante garantiza que este aparato de iluminación no tendrá defectos en los materiales o en la mano de obra por un periodo de cinco (5) años desde la fecha de compra. Esta garantía se aplica sólo al comprador consumidor original y sólo a los productos que se utilizan y reciben servicio en forma normal.
Previo a la instalación (continuación) CONTENIDO DEL PAQUETE Artículo # 1002057128/Modelo #53184101 A C Pieza B Descripción Cantidad A Módulo de luz LED 1 B Adaptador para portalámpara de base media (E26) 1 C Grapa de fricción 2 Artículo # 1002057117/Modelo #53183101 Pieza D E Descripción Cantidad D Módulo de luz LED 1 E Adaptador para portalámpara de base media (E26) 1 Instalación Antes de comenzar el armado, la instalación o antes de operar el producto, asegúrese de que tiene tod
Instalación en carcasa de 5 pul./6 pul. con orejas - Artículo # 1002057128/Modelo # 53184101 1 2 Cortar el suministro eléctrico □□ Asegúrese de cortar el suministro eléctrico a la carcasa empotrada donde se instalará lámpara. Retire el reborde y la bombilla existentes, para dejar el portalámpara. Ajustar las pinzas de muelle □□ El ajuste de fábrica de las pinzas de muelle es para carcasas empotradas cilíndricas de 6 pulg. Para instalar el producto en carcasas de 5 pulg.
Instalación en carcasa de 5 pulg./6 pulg. con orejas (continuación) 5 Insertar las pinzas de muelle en la carcasa empotrada 6 □□ Comprima las pinzas de muelle del módulo de luz LED (A) e insértelos en las orejas en el interior de la carcasa empotrada. Empujar el módulo de la luz LED en la carcasa empotrada □□ Presione cuidadosamente el módulo de luz LED (A) en la carcasa empotrada hasta que el reborde esté al ras de la supercie del techo. A Pinza de muelle A Instalación en carcasa de 5 pulg.
Instalación en carcasa de 5 pulg./6 pulg. sin orejas (continuación) 3 4 Conectar el adaptador para portalámpara Hacer las conexiones eléctricas □□ Conecte el conector del cable del adaptador para portalámpara (B) con el conector del módulo de la luz LED (A). □□ Enrosque el adaptador para portalámpara (B) de base media (E26) en el portalámpara de la carcasa empotrada.
Instalación en carcasa de 4 pulg. - Artículo 1002057117/Modelo # 53183101 1 2 Cortar el suministro eléctrico □□ Asegúrese de cortar el suministro eléctrico a la carcasa empotrada donde se instalará lámpara. Retire el reborde y la bombilla existentes, para dejar el portalámpara. □□ Enrosque el adaptador para portalámpara (E) de base media (E26) en el portalámpara de la carcasa empotrada. AVISO: Aplique la etiqueta de reemplazo en la pared interior de la carcasa empotrada antes de la instalación.
Cuidado y limpieza PRECAUCIÓN: Antes de limpiar el aparato, desconecte el suministro eléctrico hacia este apagando el cortacircuitos o extrayendo el fusible de la caja de fusibles. □□ Limpie el aparato con un paño suave y seco. □□ No utilice limpiadores con productos químicos, solventes o abrasivos. Solución de problemas ADVERTENCIA: Antes de realizar cualquier trabajo en el aparato, desconecte la electricidad que la alimenta. Los problemas menores pueden arreglarse sin ayuda de un electricista.
¿Preguntas, problemas, piezas faltantes? Antes de devolver el producto a la tienda, llame al Centro de Atención al Cliente de Commercial Electric en el horario de 8 a.m. – 7 p.m., Hora del Este de EE.UU., de lunes a viernes. 9 a.m. – 6 p.m., Hora del Este de EE.UU., sábados. 1-877-527-0313 HomeDepot.COM Conserve este manual para uso futuro.