
Instructions / Assembly


4
Installation
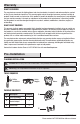
Before beginning assembly, installation or operation of product, make sure all parts are present. Compare parts
with the package contents list. If any part is missing or damaged, do not attempt to assemble, install or operate the
product. Contact customer service for replacement parts.
1
Turning off the power
□ Make sure the power is turned off at the source
to the recessed can housing where the fixture
will be installed.
□ Remove the existing bulb and trim, revealing
the socket.
NOTE: Stick the replacement label on the
inner wall of the recessed housing before
installation.
2
Connecting the socket adapter
□ Screw the medium base (E26) socket adapter
(B) into the socket in the recessed housing.
3
Connecting the cables
□ Plug the cable connector on the socket
adapter (B) into the connector on the LED light
module (A).
B
A
B
4
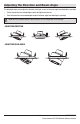
Inserting the spring clips into
the recessed can
□ Compress the spring clips on the LED light
module (A) and insert into the C-clamps on the
inside of the recessed can housing.
Mount to 6 in. Housing with C-Clamps
A
Spring Clips
C-Clamps