
Installation Guide

4
1
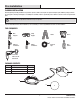
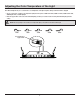
Preparing to mount the downlight
Make sure the power is turned off at the source to the location where
the LED downlight (A) will be installed.
If installing the LED downlight (A) in a preexisting hole:
□ Remove the existing can or fixture and set aside since it will not be needed.
□ Measure the ceiling hole to make sure it is the correct size for the fixture.
If installing the LED downlight (A) in a new ceiling location:
□ Place the hole template (C) over the desired location and trace the outline with a pencil.
□ Cut out the marked opening in the ceiling with a hole saw (not included).
NOTE: 1/2” or 5/8” drywall recommended for easy installation.
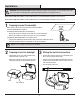
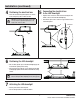
2
Preparing to wire the downlight
□ Slide the latch on the cover of the electrical box (B)
toward the center to open the cover.
□ Remove one of the knock out holes on the side of the
electrical box (B), based on the installation position.
3
Making the electrical connections
□ Feed the wires from the electrical source through the open
knock out hole in the electrical box (B).
□ Insert the hot and neutral (black and white) wires from the
electrical source into the wire connectors of the same color
wires in the electrical box.
□ Close the electrical box cover.
Installation
WARNING: RISK OF ELECTRIC SHOCK. Ensure the electricity to the wires you are working on is shut off. Either remove the
fuse or turn off the circuit breaker before removing an existing light fixture or installing the new one.
Item # 1003532174/Model # 53807101 can be installed into holes cut in the drywall that are between 4 1/4” and 4 3/4”.
Item # 1003532176/Model # 53808101 can be installed into holes cut in the drywall that are between 5 1/8” and 5 3/4”.
Latch
B
Knock out hole
B