Item # 1000532467 Model # 54103161 Use and Care Guide LINKABLE LED SHOP LIGHT Questions, problems, missing parts? Before returning to the store, call Commercial Electric Customer Service 8 a.m. - 7 p.m., EST, Monday - Friday 9 a.m. - 6 p.m., EST, Saturday 1-877-527-0313 HOMEDEPOT.COM THANK YOU We appreciate the trust and confidence you have placed in Commercial Electric through the purchase of this LED light. We strive to continually create quality products designed to enhance your home.
Table of Contents Table of Contents.......................................2 Safety Information.....................................2 Warranty....................................................2 Pre-Installation..........................................3 Planning Installation...............................3 Tools Required........................................3 Package Contents...................................3 Hardware Included..................................3 Installation............................
Pre-Installation PLANNING INSTALLATION Before beginning assembly, installation or operation of the product, make sure all parts are present. Compare parts with package contents list and hardware contents list above. If any part is missing or damaged, do not attempt to assemble, install or operate the product. Contact customer service for replacement parts. NOTE: Keep your receipt and these instructions for proof of purchase. Select a suitable location that can support the weight of the fixture.
Installation Determine the method for mounting the fixture based on the type of ceiling before drilling. Depending on the method chosen for mounting the fixture, mark two spots for the mounting hardware (not included). □□ Mark two spots on the ceiling 43 in. apart for suspension mounting. □□ Mark two spots on the ceiling or wall 42 in. apart for surface mounting. NOTE: Separate mounting hardware (not included) not shown to actual size.
Suspension Mounting 1 Mounting to drywall 2 Mounting to wood □□ Drill two holes large enough to clear the closed flaps of the butterfly nut on the toggle bolt (not included). Make sure to fasten the toggle bolt into the butterfly nut before inserting the flaps into the ceiling. □□ Tighten the toggle bolt. □□ Drill two 1/16 in. diameter holes in the ceiling to accommodate hook screws (not included). Make sure to fasten the combo wood-machine end into the metal hook.
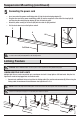
Suspension Mounting (continued) 5 Connecting the power cord □□ Insert one end of the power cord/linking cable (C) into the electrical plug adapter (B). □□ Plug the other end of the power cord/linking cable (C) into the receptacle at the end of the shop light (A) and then plug the electrical plug adapter (B) into an electrical outlet. □□ Attach the power cord (C) to the chain (AA) with the cable tie (CC) provided. □□ Pull the chain down to turn the light on and off.
Optional Surface Mounting 1 Mounting to a flat surface - wall or ceiling □□ Drill two holes in the wall or ceiling 42 in. inches apart. □□ Insert a drywall anchor and a mounting screw (not included) into each drilled mounting hole, but do not tighten fully. The diameter of the screw head used for installation should be 7.5 mm. □□ Align the keyholes on the shop light (A) with the mounting screws in the mounting surface.
Care & Cleaning CAUTION: Before attempting to clean the fixture, disconnect the power to the fixture. □□ Clean the fixture with a soft, dry cloth. □□ Do not use cleaners with chemicals, solvents, or harsh abrasives. Troubleshooting WARNING: Before doing any work on the fixture, disconnect power to the light fixture. Minor problems often can be fixed without the help of an electrician. Problem The fixture will not light. The fuse blows or the circuit breaker trips when the light is turned on.
Notes 9 HOMEDEPOT.COM Please contact 1-877-527-0313 for further assistance.
Questions, problems, missing parts? Before returning to the store, call Commercial Electric Customer Service 8 a.m. - 7 p.m., EST, Monday - Friday 9 a.m. - 6 p.m., EST, Saturday 1-877-527-0313 HOMEDEPOT.COM Retain this manual for future use.
Artículo # 1000532467 Modelo # 54103161 MANUAL DE USO Y CUIDADO LÁMPARA LED DE TALLER ENLAZABLE ¿Preguntas, problemas, piezas faltantes? Antes de devolver el producto a la tienda, llame al Centro de Atención al Cliente de Commercial Electric en el horario de 8 a.m. - 7 p.m., Hora del Este de EE.UU., de lunes a viernes. 9 a.m. - 6 p.m., Hora del Este de EE.UU., sábados. 1-877-527-0313 HOMEDEPOT.COM GRACIAS Apreciamos la confianza que ha puesto en Commercial Electric a través de la compra de esta luz LED.
Contenido Contenido.................................................12 Información sobre seguridad..................12 Garantía....................................................12 Previo a la instalación.............................13 Planificación de la instalación..............13 Herramientas necesarias......................13 Contenido del paquete..........................13 Piezas incluidas....................................13 Instalación...............................................
Previo a la instalación Planificación de la instalación Antes de comenzar el armado, la instalación o antes de operar el producto, asegúrese de que tiene todas las piezas. Compare las piezas con la lista del contenido en la página anterior. Si falta alguna pieza o si está dañada, no comience a armar, instalar, ni operar el producto. Comuníquese con el servicio al cliente para el reemplazo de las piezas. NOTA: Guarde el recibo de compra y estas instrucciones como prueba de compra.
Instalación Antes de taladrar determine por método de montaje del dispositivo según el tipo de cielorraso. Según el método elegido para la instalación del dispositivo de luz, marque dos puntos para la instalación de las piezas de ferretería. (no se incluyen). □□ Marque dos puntos en el cielorraso a una distancia de 43 pulgadas entre sí para la instalación suspendida. □□ Marque dos puntos en el pared o cielorraso a una distancia de 42 pulgadas entre sí para la instalación en superficie.
Instalación suspendida sobre panel de 1 Instalación yeso 2 Instalación sobre madera □□ Taladre dos agujeros de 1/16 pulgadas de diámetro en el cielorraso para ajustar los tornillos de gancho (no se incluyen). Asegúrese de sujetar el extremo de metal del espárrago al tornillo de gancho. □□ Apriete el tornillo de gancho dentro de la madera. □□ Taladre dos agujeros lo suficientemente grandes como para que pasen las alas cerradas de la mariposa del tornillo de fiador (no se incluye).
Instalación suspendida (continuación) 5 Conectar el cable de alimentación □□ Inserte un extremo del cable de alimentación / enlace (C) en el adaptador de enchufe eléctrico (B). □□ Conecte el otro extremo del cable de alimentación / enlace (C) en el receptáculo al final de la lámpara de taller (A) y luego enchufe el adaptador de enchufe eléctrico (B) en una toma de corriente. □□ Ate el cable eléctrico (C) a la cadena (AA) con la corbata de cable (CC) suministrada.
Instalación opcional en superficie 1 Instalación a una superficie plana - pared o cielorraso □□ Taladre dos orificios en la pared o cielorraso los que deben estar a una distancia de 42 pulgadas entre sí. □□ Introduzca un anclaje para pared y un tornillo de montaje (no se incluyen) en cada orificio de montaje, pero no los apriete. El diámetro de la cabeza del tornillo usado para la instalación debe ser de 7.5 mm.
Cuidado y limpieza PRECAUCIÓN: Antes de limpiar el dispositivo desconecte el suministro eléctrico. □□ Limpie la lámpara con un paño suave y seco. □□ No utilice limpiadores con productos químicos, solventes o abrasivos. Solución de problemas ADVERTENCIA: Antes de realizar cualquier trabajo en el dispositivo, desconecte la electricidad que lo alimenta. Los problemas menores pueden arreglarse sin ayuda de un electricista. Problema La lámpara no enciende.
Notas 19 HOMEDEPOT.COM Comuníquese al 1-877-527-0313 para solicitar asistencia.
¿Preguntas, problemas, piezas faltantes? Antes de devolver el producto a la tienda, llame al Centro de Atención al Cliente de Commercial Electric en el horario de 8 a.m. – 7 p.m., Hora del Este de EE.UU., de lunes a viernes. 9 a.m. – 6 p.m., Hora del Este de EE.UU., el sábado. 1-877-527-0313 HOMEDEPOT.COM Conserve este manual para uso futuro.