
Instructions / Assembly


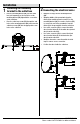
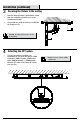


Table Of Contents
- WHAT IS COVERED
- WHAT IS NOT COVERED
- Pre-Installation
- Tools Required
- Hardware includeD (for each flushmount)
- Pre-Installation (continued)
- Package Contents (FOR EACH FLUSHMOUNT)
- Installation (continued)
- LO QUE ESTA CUBIERTO
- LO QUE (NO) ESTA CUBIERTO
- Pre-Instalación
- herramientas necesarias
- Hardware includio (POR CADA MONTAJE EMPOTRADO)
- Pre-Instalación (continuación)
- Contenido del Paquete (POR CADA MONTAJE EMPOTRADO)
- Instalación (continuación)
- CE QUI EST COUVERT
- CE QUI EST COUVERT (ET PAS)
- Pré-Installation
- OUTILS REQUIS
- MaTériel inclus (POUR CHAQUE PLAFONNIER)
- Pré-Installation (suite)
- Contenu de l'emballage (POUR CHAQUE PLAFONNIER)

5 HOMEDEPOT.COM
Please contact 1-877-527-0313 for further assistance.
Installation
1
Attaching the mounting
bracket to the outlet box
2
Connect
ing the electrical wires
□ Place the mounting bracket (AA) over the outlet
box (sold separately) so the oval holes on the
mounting bracket (AA) align with the screw holes
on the outlet box.
□ Place the outlet box screws (BB) through the oval
holes on the mounting bracket (AA), and screw the
outlet box screws (BB) into the appropriate screw
holes on the outlet box.
□ Hang the hook (B) onto the mounting bracket
(AA).
□ Wrap the middle of the ground wire from the
fixture (A) around the ground screw (CC) on the
mounting bracket (AA). Use a wire connector (DD)
to connect the end of the ground wire from the
fixture (A) to the ground wire from the outlet box.
□ Use a wire connector (DD) to connect the white
wire from the fixture (A) to the white wire (neutral
wire) from the outlet box.
□ Use a wire connector (DD) to connect the black
wire from the fixture (A) to the black wire (live
wire) from the outlet box.
□ Wrap the three wire connections with electrical
tape for a more secure connection.
□ Position the wires inside the outlet box.