
Instructions / Assembly


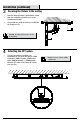
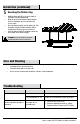


Table Of Contents
- WHAT IS COVERED
- WHAT IS NOT COVERED
- Pre-Installation
- Tools Required
- Hardware includeD (for each flushmount)
- Pre-Installation (continued)
- Package Contents (FOR EACH FLUSHMOUNT)
- Installation (continued)
- LO QUE ESTA CUBIERTO
- LO QUE (NO) ESTA CUBIERTO
- Pre-Instalación
- herramientas necesarias
- Hardware includio (POR CADA MONTAJE EMPOTRADO)
- Pre-Instalación (continuación)
- Contenido del Paquete (POR CADA MONTAJE EMPOTRADO)
- Instalación (continuación)
- CE QUI EST COUVERT
- CE QUI EST COUVERT (ET PAS)
- Pré-Installation
- OUTILS REQUIS
- MaTériel inclus (POUR CHAQUE PLAFONNIER)
- Pré-Installation (suite)
- Contenu de l'emballage (POUR CHAQUE PLAFONNIER)

6
Installation (continued)
3
Securing the fixture to the ceiling
□ Raise the fixture (A) until it is flush with the ceiling.
□ Align the locking hole (C) with the hole on the
mounting bracket (AA).
□ Use your hand to screw the locking screw (EE) into
the locking hole (C).
CAUTION: The fixture (A) is one piece. Do not
disassemble it.
4
Selecting the CCT option
NOTICE: The factory setting is 3000K,
soft white light.
□ Choose your preferred correlated color
temperature (CCT) from the five options: 2700K
warm white, 3000K soft white, 3500K neutral
white, 4000K bright white, or 5000K daylight.
□ Move the CCT switch on the fixture (A) to make
your selection.