Item #1005 375 054 Model #WS-S03A20A1-40 USE AND CARE GUIDE LINKABLE LED STRIP LIGHT Questions, problems, missing parts? Before returning to the store, call Commercial Electric Customer Service 8 a.m. - 7 p.m., EST, Monday - Friday, 9 a.m. - 6 p.m., EST, Saturday 1-877-527-0313 HOMEDEPOT.COM THANK YOU strip light fixture. to continually create quality products designed to enhance your home. Visit us online to see our full line of products available for your home improvement needs.
Table of Contents Table of Contents . . . . . . . . . . . . . . . . . . . . . . . . . . . . . . . . . . . 2 Safety Information . . . . . . . . . . . . . . . . . . . . . . . . . . . . . . . . . . 2 Warranty . . . . . . . . . . . . . . . . . . . . . . . . . . . . . . . . . . . . . . . . . . 3 Pre-Installation . . . . . . . . . . . . . . . . . . . . . . . . . . . . . . . . . . . . . 3 Tools Required . . . . . . . . . . . . . . . . . . . . . . . . . . . . . . . . . . . . 3 Hardware Included. . . . . . . . . . .
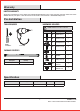
Warranty LIMITED WARRANTY This product is warranted to be free from defects in workmanship and materials for up to 5 years from date of purchase. If defects are found within the first five years, please contact the Customer Service Team at 1-877-527-0313 or visit www.HomeDepot.com. Pre-Installation TOOLS REQUIRED HARDWARE INCLUDED NOTE: Hardware not shown to actual size.
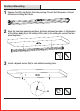
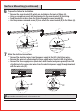
Surface Mounting 1 2 3 Remove the LED strip fixture from the package. Ensure that the power is turned off before installing the fixture. Mark the two hole mounting positions (distance between two holes is 25.6inches) of the fixture body (A) on the ceiling. Drill a hole in the ceiling for each of the two mounting holes. Install a drywall anchor (AA) in each drilled mounting hole.
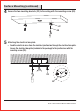
Surface Mounting (continued) 4 Secure the two mounting brackets (CC) to the ceiling with the mounting screw (BB). CC BB R 5 □Attaching the electrical box plate. Feed the electrical wires from the electrical junction box through the electrical box plate. Secure the electrical box plate (included in the package) to the junction box with the mounting screw (DD). DD R EE 5 HOMEDEPOT.COM Please contact 1-877-527-0313 for further assistance.
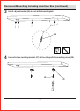
Surface Mounting (continued) the fixture for installation. 6 □Prepare Remove the cover bracket (B) which pre-installed on the back of fixture (A). □ Using a screwdriver punch out the knock out in the cover bracket (B) for wiring. □ Feed the electrical wires from the fixture through the cover bracket (B). □ Use the previous-removed screw (C) to re-attach the cover bracket (B) to the fixture (A). D C B A A the electrical connections.
Surface Mounting (continued) 8 Snap the LED strip onto the mounting brackets. □ Push wiring and wire nut connections back into the inside of junction box. □ Snap the LED strip (A) onto the mounting brackets (CC). CC Recessed Mounting Including Junction Box 1 2 Remove the LED strip fixture from the package. Ensure that the power is turned off before installing the fixture. □ Mark the two hole mounting positions (distance between two holes is 25.6inches) of the fixture body (A) on the ceiling.
Recessed Mounting Including Junction Box (continued) 3 Install a drywall anchor (AA) in each drilled mounting hole. AA 4 Secure the two mounting brackets (CC) to the ceiling with the mounting screw (BB).
Recessed Mounting Including Junction Box (continued) 5 6 Make the electrical connections □ Open the junction box (II) cover and remove the knockout on the side panel. If you are using a flexible metal conduit remove the round knockouts. If you are using non metalic Romex cable, remove the rectangular knockout. □ Insert the electrical supply cable through the knockout. Secure the cable in the knockout with a cable clamp (not provided), if needed.
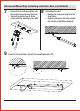
Recessed Mounting Including Junction Box (continued) 7 8 □ Place all wires and connections into the junction box and close the cover. □ Secure the junction box (II) to the ceiling with the mounting screw (BB). Connecting the cord □ Remove the end cover plug from the strip fixture. □ Plug the extension cord from junction box into the end of fixture body (A).
Linking Feature WARNING: Risk OF ELECTRIC SHOCK. Disconnect power to the strip light before linking additional strip lights. □ Multiple light fixtures can be connected, but only the first light fixture needs to be direct wired to an electrical box or plugged into an electrical outlet. WARNING: Provide power to fixtures only after all linking connections have been made. □ Connect each additional fixture using either the linking connector (GG) or linking cord with connector (HH).
Questions, problems, missing parts? Before returning to the store, call Commercial Electric Customer Service 8 a.m. - 7 p.m., EST, Monday - Friday, 9 a.m. - 6 p.m., EST, Saturday 1-877-527-0313 HOMEDEPOT.COM Retain this manual for future use. FCC compliance information is listed as below: Responsible party: Leedarson America, Inc.