
Manual


Commissioning and Administration User Guide
19
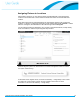
Events
At a high level, an Event can be thought of as the “when and why” of a lighting change. Each
Location has a set of prioritized Events – several Events may be “active” at once due to
scheduling or external signals, but only the Event with the highest priority will actually apply its
lighting Policy.
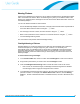
To create an Event:
Select the Location from the Location Settings tab. 1.
Click 2.
Choose if the Event will be a New Scheduled, New Unscheduled or Existing Event and 3.
provide a name if not selecting an Existing Event. Click Next.
For a Scheduled Event, you will need to define if this is a One-Time or Recurring Event and 4.
specify the start and duration in terms of time or days. In the case of a Recurring Event you
will also need to define on which days of the week the Event should repeat. Click Next to
attach a Policy.
! To create an unscheduled Event, select Unscheduled and click Next to attach a Policy.
! When selecting an Existing Event you will not be allowed to edit the schedule for the
Event.
Select an existing Policy from the list or click to create a new one. 5.
Click Finish. 6.
Note: Because an unscheduled Event is activated by an external signal, such as a demand
response system, it requires additional configuration within the Redwood Manager.
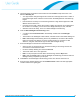
Modifying an Event
Select the Location you want to remove the Event from using the Location Settings tab. 1.
Click 2.
Select Existing and make your changes. 3.
Note: If you simply want to assign a different Policy to the Event you can use the Pencil icon
found next to the Policy name on the Event priority list.
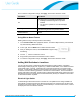
Deleting an Event
You can delete an Event from “All Locations” if it is not used by a Location. If the Event is used
by a Location, first remove it from the Location.
To delete an Event:
Select the Location you want to remove the Event from using the Location Settings tab. 1.
Click the icon next to the Event name. Redwood Manger will confirm your intent. 2.