
Manual


Commissioning and Administration User Guide
25
Scenes
A Scene is used to adjust a Location’s Fixtures to achieve a desired lighting effect for a specific
period of time. Scenes apply to specific Locations, and as such are not global settings. You can
create Scenes for short Events, like a presentation. For example, a common Scene in a
conference room is presentation mode—the lights near the projector screen are turned off
completely, while the other Fixtures are slightly dimmed.
You can also assign specific Scenes to the buttons of the Scene Control Wall Switch to allow
users to override the current Policy or Scenes as needed. The Scene can be deactivated to
return the room’s lighting control to its regularly scheduled Event/Policy.
Note: Applying a Scene overrides Task-Tuning. When the Scene is deactivated, the lights return
to the previously Task-Tuned level.
Adding Scenes to Locations
When creating a Scene, it is recommended that you be physically present in the room for which
you are creating the Scenes.
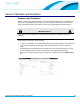
To add a Scene to a Location:
Select the Location in the left panel of the Location Settings tab. 1.
Click the Add Scenes button and select New Scene. 2.
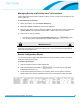
Name the Scene and set the starting light level for all Fixtures in the Location. 3.
Click Done. After you create a Scene, you can adjust or tune the light level for individual 4.
Fixtures in the Scene with the button.
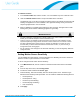
In the Tune Scenes dialog box, click the Scene you want to modify. The Scene’s Fixtures 5.
and Wall Switches are displayed.
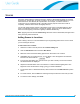
Adjust the individual sliders next to each Fixture to create the desired lighting effect. The 6.
brightness of the actual Fixtures change, giving you real-time feedback.
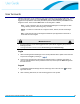
To map the Scene to a Wall Switch button, select a button from the Wall Switch drop-down 7.
menu.
To reorder Scenes, click the Sort icon and drag and drop the Scenes in the order you want. 8.
To save the Scene settings, click Close. 9.