
Installation and Operation Manual


INSTALLATION AND OPERATION MANUAL
NETWAvE
TECHSUPPORT:1.888.678.9427
INS_NetWave_REV– 06/10/13 PAGE 11
5.0 Quick Configuration
1. Connect an Ethernet cable from the port labelled as IN on the power Injection Module to
either a laptop or a PC LAN port.
2. Connect the second Ethernet cable from the OUT port on the Power Injection Module to the
NetWave LAN port.
3. Apply 48 VDC to the Power Injection Module with the provided power supply. You should
notice the green LED illuminate in the Power Injection Module and the power LED on the
NetWave unit.
4. Set the IP address of the laptop being used to configure NetWave to static and the subnet to
192.168.10.x/24 subnet.
5. Point the browser to 192.168.10.101. This is the default address.
For preconfigured kits (NWKX_AP and NWKX_CL) point the Browser to 192.168.10.100 for the
Access Point or 192.168.10.101 .
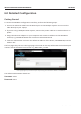
6. A login prompt will pop up. Enter:
Username
admin
Password
admin
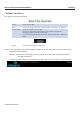
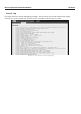
7. Select the NETWORK » WIFI tab and set the desired network settings.
Select Apply &Save
Note: This will be the network address for the NetWave web server. It is not necessary to set to
the same subnet as the operating network but it is recommended.
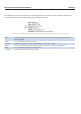
8.
Select the NETWORK ‐> WIFI tab and set:
•
Country code – Only required if setting up the NW2 (ETSI) model
Note:It is the user’s responsibility to ensure that the correct country is chosen. ComNet
accepts no liability for incorrect equipment set up.
•
Set SSID – if changing from the default setting
•
Channel Spectrum Width – May want to reduce to 20M from the default 20M/40M/80M if the 5GHz
spectrum is crowded
•
Wireless Security – if changing from default settings
•
Select Apply Settings
•
Select Save