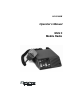
LBI-31693B Operator’s Manual MLS II Mobile Radio
This manual is published by Com-Net Ericsson Critical Radio Systems, Inc., without any warranty. Improvements and changes to this manual necessitated by typographical errors, inaccuracies of current information, or improvements to programs and/or equipment, may be made by Com-Net Ericsson Critical Radio Systems, Inc., at any time and without notice. Such changes will be incorporated into new editions of this manual.
TABLE OF CONTENTS SAFETY INFORMATION ..........................................................4 SAFE DRIVING RECOMMENDATIONS FOR USERS OF MOBILE RADIOS RECOMMENDED BY AAA ...............................................5 OPERATING RULES AND REGULATIONS.............................5 OPERATING STANDARD (TWO CHANNEL) RADIO ..............7 CONTROLS AND INDICATORS.....................................................8 CONTROLS ..............................................................................
SAFETY INFORMATION The operator of any mobile radio should be aware of certain hazards common to the operation of vehicular radio transmissions. A list of several possible hazards is given: 1. Explosive Atmospheres - Just as it is dangerous to fuel a vehicle with the motor running, similar hazards exist when operating a mobile radio. Be sure to turn the radio off while fueling a vehicle. Do not carry containers of fuel in the trunk of a vehicle if the radio is mounted in the trunk 2.
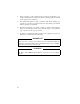
SAFE DRIVING RECOMMENDATIONS FOR USERS OF MOBILE RADIOS RECOMMENDED BY AAA ∗ Read the literature on the safe operation of the radio. ∗ Keep both hands on the steering wheel and the microphone in its hanger whenever the vehicle is in motion. ∗ Place calls only when vehicle is stopped. ∗ When talking from a moving vehicle is unavoidable, drive in the slower lane. Keep conversations brief.
4. Using your radio to send personal messages (except in an emergency) is a violation of FCC rules. You may send only those messages that are essential for the operation of your business. 5. It is against Federal law to repeat or otherwise make known anything you overhear on your radio. Conversations between others sharing your channel must be regarded as confidential. 6. The FCC requires that you identify yourself at certain specific times by means of your call letters.
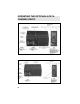
OPERATING STANDARD (TWO CHANNEL) RADIO STANDARD 2-CHANNEL RADIO 7
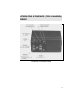
CONTROLS AND INDICATORS CONTROLS POWER A momentary type switch to turn the radio on or off. Press once to turn the radio on; press again to turn the radio off. Power ON is indicated by an illuminated channel number on the system module. VOLUME Momentary type switches to adjust the volume. Press and hold the MAX (up arrow) to increase the volume. Press and hold the MIN (down arrow) to decrease the volume. CHANNEL Two push type switches.
USING THE RADIO TO RECEIVE A MESSAGE 1. Turn the radio on (channel indicator lit). If not, press POWER switch. 2. Select the desired channel by pressing either the 1 or 2 switch. 3. Press and hold MONITOR switch and then adjust VOLUME controls for the desired listening level. Release MONITOR switch. 4. Radio is now ready to receive a message. TO TRANSMIT A MESSAGE 1. Confirm that the radio is turned on (channel indicator lit). If not, press POWER switch. 2.
OPERATING THE OPTIONAL 8 OR 16 CHANNEL RADIO 8 CHANNEL RADIO WITHOUT SCAN/WITH SCAN 16 CHANNEL RADIO WITHOUT SCAN/WITH SCAN 10
CONTROLS AND INDICATORS CONTROLS POWER A momentary type switch to turn the radio on or off. Press once to turn the radio on; press again to turn the radio off. Power ON is indicated by an illuminated channel number on the system module. VOLUME Momentary type switches to adjust the volume. Press and hold the MAX (up arrow) to increase the volume. Press and hold the MIN (down arrow) to decrease the volume.
INDICATORS XMIT (transmit) Lights when your message is being transmitted. BUSY Lights when the channel is in use. CHANNEL Lights to indicate which channel has been selected. P1 When lit, indicates that the channel displayed is a Priority 1 scan channel. P2 When lit, indicates that the channel displayed is a Priority 2 scan channel. S When lit, indicates that the channel displayed is a non-priority scan channel. SCAN When lit, indicates that the radio is operating in the scan mode.
USING THE OPTIONAL 8 OR 16 CHANNEL RADIO (WITHOUT SCAN) TO RECEIVE A MESSAGE 1. Turn the radio on (channel indicator lit). If not, press POWER switch. 2. Select the desired channel by pressing either the ADD or DELETE switch. 3. Press and hold MONITOR switch and then adjust VOLUME control for the desired listening level. Release MONITOR switch. 4. Radio is now ready to receive a message. TO TRANSMlT A MESSAGE 1. Confirm that the radio is turned on (channel indicator lit).
SCAN OPERATION The SCAN function allows monitoring of up to 8 or 16 receive channels (depending upon which control module is being used). The scanned channels may be any frequency within the frequency band limits of the radio and may be Channel Guard protected. The radio messages will then be received only if the correct Channel Guard signal is present. Any channel may be scanned with or without priority level.
* The rate the P1 and P2 channels are sampled while listening to a nonpriority channel depends whether RF carrier is present or not. If no carrier is present on P1 or P2, the scan rate is fast. If carrier is detected but incorrect Channel Guard is present, the rate slows considerably. This prevents the non-priority signal from being badly distorted by the larger mute times needed to detect Channel Guard. If Channel Guard is not programmed for P1 or P2 the scan rate remains fast.
channel to the scan list. The S indicator will light to indicate that the channel is now in the scan program. 5. Release SCAN switch. 6. Repeat steps 2 thru 5 for each channel (up to 8/16) to be added to the scan list. PRIORITY 2 (P2)* 1. Perform Steps 1 thru 3 of the Non-Priority procedure. 2. Press and hold SCAN switch; then press the ADD switch twice.
function. 3. Select each channel (one at a time) using the ADD or DELETE switch and confirm channels included on the scan list. The scan indicators (S, P1, P2) will light for each channel programmed. ∗ If a Priority 1 or 2 scan channel already exists when programming a new Priority 1 or 2 scan channel, the old Priority 1 or 2 channel becomes a Non-Priority channel.
NOTES 18
NOTES 19
Com-Net Ericsson Critical Radio Systems, Inc. P.O. Box 2000 Lynchburg, Virginia 24501 1-800-528-7711 (Outside USA, 804-592-7711) Printed In U.S.A.