QUICK START GUIDE RLGE2FE16R Substation-Rated, Enhanced Security Scada-Aware Ethernet Layer 2 Managed Switch/Layer 3 Router With Optional 2G/3G & 4G LTE Cellular Radio Link, Enhanced Network Security, Terminal Server, PoE+, and 100FX SFP Ports ComNet product series RLGE2FE16R are substation-rated and industrially hardened layer 2 managed switches/layer 3 routers, with a unique and highly robust packet processing SCADA-aware security firewall for the most mission-critical and demanding cyber-security applic
QUICK START GUIDE RLGE2FE16R Contents About This Guide 3 Intended Audience 3 Related Documentation 4 About ComNet 4 Website 4 Support 4 Safety 4 Overview 5 Hardware and Interfaces 5 Device walkthrough 6 Logical Structure 7 Distance kept for natural air flow 7 Grounding 7 Connecting to a Power Source 7 Wiring DC Input voltage feed 7 Wiring AC Input voltage connector 8 Power Budget Configuration Environment Management over Console TECH SUPPORT: 1.888.678.
QUICK START GUIDE RLGE2FE16R About This Guide This quick start guide includes relevant information for utilizing the Reliance RLGE2FE16R line of switches. The information in this document is subject to change without notice and describes only the product defined in the introduction of this document.
QUICK START GUIDE RLGE2FE16R Related Documentation The following documentation is also available: »» RLGE2FE16R Data sheet »» RLGE2FE16R Installation and Operation Manual »» RLGE2FE16R_ES Enhanced Security Software Options Installation and Operation Manual »» SFP Modules Data sheet About ComNet ComNet develops and markets the next generation of video solutions for the CCTV, defense, and homeland security markets.
QUICK START GUIDE RLGE2FE16R Overview Hardware and Interfaces Depending on the RLGE2FE16R hardware variant ordered your switch will be equipped with a combination of Fast Ethernet Ports, Gigabit Ethernet SFPs, Serial ports, and Cellular interfaces »» Serial RJ 45 ports supporting RS-232. Max 4 ports (Optional) »» Ethernet RJ45 copper 10/100 Fast Ethernet. (8 Standard, POE Optional) (Additional 8 10/100 ports optional, replaces cellular and serial) »» Ethernet SFP based ports,100/1000 GE.
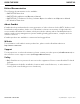
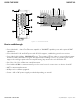
QUICK START GUIDE RLGE2FE16R 10 1 11 4 8 2 12 5 9 6 13 3 7 Figure 2 – R/S/22/28 Variant Device walkthrough »» Ports Labeled 1 – 8 are Fast Ethernet capable of 10/100 FE capable ports with optional POE capabilities. »» Ports Labeled S1-S4 are RJ45 ports with RS-232 support, establishing serial connections. »» Ports Labeled 9 & 10 are 100/1000 GE ports. They require SFPs in order to connect fiber/copper interfaces.
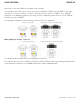
QUICK START GUIDE RLGE2FE16R Logical Structure Distance kept for natural air flow Proper installation depends on natural air flow for cooling. You must maintain a 10cm distance above and below the ComNet switch for proper air flow. Grounding To install the grounding wire: »» Prepare a minimum 10 American Wire Gauge (AWG) grounding wire terminated by a crimped two-hole lug. Use a suitable crimping tool to fasten the lug securely to the wire.
QUICK START GUIDE RLGE2FE16R take care to notice the label on the back of the module. For the DC version there are 2 connection inputs, marked as “PWR A” and “PWR B”. For proper operation it is only necessary to connect one power source, either to “PWR A” or to “PWR B”. However, for redundancy purposes you may connect 2 different power sources one at “PWR A” and the second to “PWR B”. For wiring the voltage an opposite plug connector (2 pcs) is supplied.
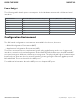
QUICK START GUIDE RLGE2FE16R Power Budget The following table details power consumption of the Hardware variants with cellular and serial interfaces. Unit Power feed Max Power [Watt] Version without POE ports Max Power [Watt] Version with POE ports 12 VDC 18.5 80 24 VDC 18.5 100 48 VDC 18.5 140 110 VDC 18.5 120 220 VDC 18.5 120 110 VAC 20.35 141 220 VAC 20.
QUICK START GUIDE RLGE2FE16R Management over Console Connecting to Device »» Device is capable of being first set up via either the console port, or via an SSH connection »» Default Username: su »» Default Password: 1234 »» By default all ports act as a flat switch, with all ports as members of VLAN 1 »» VLAN 1 set to hold an IP interface by default »» Default Management IP: 10.0.0.1/8 Terminal »» Power on device (Boot may take up to 3 minutes).
QUICK START GUIDE RLGE2FE16R SSH »» SSH Connection to RLGE2FE16R ›› Setup PC network to be on the same as the default management network »» Example PC Setup: ›› IP Address of PC: 10.0.0.51 ›› Subnet mask: 255.0.0.0 ›› Gateway: 10.0.0.1 (Optional) ›› Ping management VLAN IP: 10.0.0.1 ›› From any terminal session type: ssh su@10.0.0.1 ›› Default login username su, password 1234 (password will be invisible) TECH SUPPORT: 1.888.678.
QUICK START GUIDE RLGE2FE16R Modes of Operation ACE vs GCE GCE interface used for »» IP Management to switch (SSH, Terminal, SNMP, FTP) »» Routing of access traffic using static entries or OSPF »» Mainly used for Switching (Vlans, Interface Troubleshoot, System information, etc.) ACE interface used for »» Layer 3 configurations (Firewalls, Cellular, Routing, IPSEC, DMVPN,etc.
QUICK START GUIDE RLGE2FE16R Configuration through CLI At any point of operation you can type ? to get a listing of all available options At any point of typing a command you can press tab to complete a word. Check device software/firmware version typing Show System information (pressing q will end the listing when it shows --more-- , space will continue the page) RLGE2FE16R# show system information Hardware Version : 0202 Firmware Version : 3.5.04.32 U-Boot 2010.
QUICK START GUIDE RLGE2FE16R Check VLAN (Virtual LAN) interface using show vlan to see ports associated to vlan RLGE2FE16R# show vlan Switch default Vlan database ------------Vlan ID Member Ports : 1 : Fa0/1, Fa0/2, Fa0/3, Fa0/4, Fa0/5, Fa0/6 Fa0/7, Fa0/8, Gi0/1, Gi0/2, Gi0/3, Gi0/4 Untagged Ports : Fa0/1, Fa0/2, Fa0/3, Fa0/4, Fa0/5, Fa0/6 Fa0/7, Fa0/8, Gi0/1, Gi0/2 Forbidden Ports : None Name : Status : Permanent ---------------------------------------------------Vlan ID : 4091 Mem
QUICK START GUIDE RLGE2FE16R Check Vlan IP addresses by typing show ip interface RLGE2FE16R# show ip interface vlan1 is up, line protocol is up Internet Address is 10.0.0.0/8 Broadcast Address 10.0.0.255 Create management VLAN Give management VLAN an IP address »» Enter global configuration mode by typing Configure Terminal in the command line you will see RLGE2FE16R(config)# »» Enter vlan interface you wish to set an IP address for (Format will be ip address (a) subnet mask (b) a.a.a.a b.b.b.
QUICK START GUIDE RLGE2FE16R RLGE2FE16R(config)# interface fastethernet 0/1 RLGE2FE16R(config-if)# switchport pvid 1 RLGE2FE16R(config-if)# end RLGE2FE16R# wr st Building configuration ... [OK] % startup-config saved successfully RLGE2FE16R# █ »» End to exit global config mode »» Finish by saving configurations An example of more in depth management interface assignment can be found in the RLGE2FE16R Installation and Operation Manual under the section “Management>Example” TECH SUPPORT: 1.888.678.
QUICK START GUIDE TECH SUPPORT: 1.888.678.
QUICK START GUIDE RLGE2FE16R ComNet Customer Service Customer Care is ComNet Technology’s global service center, where our professional staff is ready to answer your questions at any time. Email ComNet Global Service Center: customercare@comnet.net 3 CORPORATE DRIVE | DANBURY, CT 06810 | USA T: 203.796.5300 | F: 203.796.5303 | TECH SUPPORT: 1.888.678.9427 | INFO@COMNET.