
User Manual


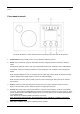


Rear panel Inputs/Outputs
The above illustration is of the Solo (with DAB) rear panel. The Duetto rear panel connections are
identical except for points 10 & 11.
1. AC power in, 100-240V, 50/60Hz: For use with included power cord. The correct voltage for your region
will be automatically detected.
2. DC power in (20VDC/3A) (external adapter not included):
Never
use an adapter and the power cord
simultaneously. The adapter connector should be 5.5mm/2.1mm, center positive.
3. Headphone out (level adjusted using volume knob/remote control), 3.5mm stereo. Long-term
exposure to loud music may cause hearing damage. It is best to avoid extreme volume levels when
listening via earbuds or headphones, especially for extended periods.
4. Line out (fixed level, not affected by volume control), 3.5mm stereo: Connect an analog audio cable to
another device’s analog audio input, such as a home stereo system, to hear the sound from Solo or
Duetto through another system.
5. Auxiliary 1 in, 3.5mm stereo, Hi-res: See Page 48.
6. Auxiliary 2 in, 3.5mm stereo, Hi-res: See Page 48.
7. Optical in: See Page 48.
8. USB in / 5V/1A: See Page 37.
9. Service: For use only by authorized repair agents. Do not connect anything to this input.
10. RCA out (Solo only): For connecting to the Ambiente Speaker as part of the Ambiente system.
11. Audio switch (Solo only): Set to ‘M’ for Mono, or; set to ‘ST’ if the Ambiente Speaker is connected; or
when using two Solos, set one to ‘L’ and the other to ‘R’ for dedicated wireless stereo if desired. Due to
the nature of WiFi, it is possible there may be some latency (delay) between the right and left channel
information. Stereo FM & DAB broadcasts will be indicated by 2 speaker icons in the lower right side of
the display.
12. DAB/FM Antenna: Extend and position for best reception. This antenna has no bearing on WiFi or
Bluetooth reception. Be sure the antenna is extended before performing a DAB station scan or tuning FM
stations. Signal strength will be indicated on the antenna icon in the lower right side of the display.