coffee grinders instructions manual PROFESSIONAL GOURMET K3 TOUCH K3 PUSH K3 TOUCH ADVANCED
index 1. SAFETY MEASURES 1 2. DESCRIPTION 2 3. INSTRUCTIONS 3 4. IDENTIFICATION 3 5. TECHNICAL CHARACTERISTICS 4 6. EXTERNAL COMPONENTS 6 7. INSTALLATION 7 8. REGULATION 9 9. OPERATION 12 10. CLEANING 14 11. MAINTENANCE 16 12.
1. SAFETY MEASURES NOTE: The manufacturer will not be held responsible for any damages resulting from improper use of the equipment, or for not following the safety measures as outlined below. Safety measures incorporated into our grinders: • Special screw to maintain the hopper fixed in place. • Access restrictor in the grind group.
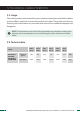
SOUND DECIBEL LEVEL The level of sound emitted in different models is: Sound decibel level With coffee K3 TOUCH K3 PUSH 74,8 dB K3 TOUCH ADVANCED 2. DESCRIPTION Your new grinder has been designed using the most sophisticated technologies in existence. The result is a product of high quality that offers the assurance of the best results possible. Our products are manufactured by hand, one by one, following the strictest quality requirements.
3. INSTRUCTIONS 3.1. This manual is designed to provide the necessary information to correctly install, use and maintain the grinder, as well as to highlight precautions for users to keep in mind. To ensure the best operation of the coffee grinder, please follow the instructions as outlined in this manual. This manual should be saved for the life of the grinder, and should always be at the disposal of the operator. 3.2.
5. TECHNICAL CHARACTERISTICS 5.1. Usage The coffee grinders are intended for use on commercial premises and facilities where ground coffee is required, or in small stores that sell coffee. The grinder must only be used to grind coffee beans. Any use other than this will be considered improper and dangerous. NOTE: The manufacturer will not be held responsible for any damages resulting from improper use of the equipment, or for not following the safety measures as outlined below. 5.2.
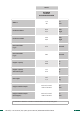
Model K3 TOUCH K3 PUSH K3 TOUCH ADVANCED 2.3 in 58 mm 8.16 lb/h 3,71 Kg/h 9.54 lb/h 4,33 Kg/h Dose time 50Hz (7 gr)* 6.79 Seconds Dose time 60Hz (7 gr)* 5.81 Seconds 1.76 lb 800 gr Ø Burrs Production 50Hz* Production 60Hz* Hopper capacity Hopper capacity with mini hopper Net weight Height x Width x Depth Height x Width x Depth (mini hopper) 0.6 lb 275 gr 13.7 lb 6,1 Kg 19.5 x 6.7 x 14.37 in 495 x 170 x 365 16.5 x 6.7 x 14.
6. EXTERNAL COMPONENTS 6 ORIGINAL INSTRUCTIONS | Ref. quality process 002/03 | v.
7. INSTALLATION 7.1. General Warnings The person installing the grinder should carefully read this instruction manual before installation. The installation of this machine should be completed by qualified and authorized personnel, and all norms of safety and sanitation should be followed. 7.2. Important Warnings The operator of the grinder should be a responsible adult, and a never a minor or person incapable of safely using such equipment.
7.3. Where to Use The grinder should be installed on a flat, stable surface. The minimum dimensions of the work space should be as follows: Model Height Width Depth K3 TOUCH, K3 PUSH, K3 TOUCH ADVANCED K3 TOUCH, K3 PUSH, K3 TOUCH ADVANCED (MINI HOPPER) 20.27 17.31 515 440 mm 7.28 7.28 in 185 185 mm 15.15 15.5 in 385 385 mm in 7.4.
8. REGULATION 8.1. Grinder set up Place the hopper ( ) on the grind regulator ( ) and make sure the bean trap ( ) is in the closed position. Lock the hopper ( ) in place using a flat head screw driver to gently tighten the hopper security screw making it match to the hole at the bean hopper collar ( ) (Fig. 1). Remove the hopper lid ( hopper ( ) (Fig. 2).
8.2. Grind adjustment system 8.2.1. Micrometrical system Rotate the grind regulator ( ) until reaching the grind level desired. Rotating the grind regulator clockwise will result in a courser grind; turning the regulator counter clockwise will result in a finer grinder* (Fig. 3). * It is recommended that the motor be running when adjusting to finer grind setting.
NOTE: If the output is very slow, it could mean that the coffee is being ground too fine. If the output is very fast, it could mean that the coffee is being ground too coarse. A perfect espresso grind is found when the grind point gives an infusion of 25 ml of coffee in 25 seconds using 7 grams of ground coffee. 8.2.3. Parallel micrometrical system (optional) Rotate the grind regulator ( ) until reaching the grind level desired.
8.3. Adjusting the dose of K3 TOUCH / K3 TOUCH ADVANCED On the K3 TOUCH / K3 TOUCH ADVANCED models, the grind time is pre-set at the factory to grind 7 grams of coffee in 6-7 seconds. To adjust the grind time, simply turn the timer knob ( ) found on the front of the grinder (Fig. 5 and 6). Turning clockwise will increase the grind time, and turning the knob counter-clockwise decrease the grind time. The numbers on the dial correspond with motor run time in seconds. 8.4.
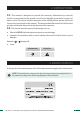
9.2. Using the K3 TOUCH The main power switch on the K3 TOUCH ( I Continuous grind. 0 Off. II Time grind. ) has 3 positions, I - 0 - II (Fig. 8). Giving one gentle tap to the front activation panel ( ) will deliver one freshly ground timed dose of coffee ( ). A double tap will deliver a freshly ground dose that is double the pre-set grind time (Fig. 11). Using the portafilter support ( ), it is possible to run the timed grind cycle hands free. 9.3.
Switch on MANUAL-PUSH: The machine will grind while the front activation panel ( ) is pushed in. Switch on AUTOMATIC-TOUCH: Timed grind using the timer on the front of the grinder (see section 8.3.). Giving one gentle tap to the front activation panel ( ) will deliver one freshly ground timed dose of coffee ( ). A double tap will deliver a freshly ground dose that is double the pre-set grind time (Fig. 11). Using the portafilter support ( ), it is possible to run the timed grind cycle hands free.
10.2. Bean hopper cleaning In order to properly clean the bean hopper ( and fragments. ), first empty out all remaining beans To remove the hopper, first close the bean trap ( screw ( ) and lift the hopper straight up. ), and then loosen the hopper lock Clean the hopper ( ) with a moist soft cloth or with a small amount of water and soap to eliminate any oily residue from the beans. Replace the bean hopper ( in reverse. ) following the same steps as the removal process, but 10.3.
10.4. Cleaning the outside of the grinder To clean the exterior of the grinder, first wipe with a dry soft cloth, and then gently wipe with a damp soapy cloth. 11. MAINTENANCE 11.1. General warning Before performing any type of maintenance you should: • Always turn OFF the main power switch to the off position ( , and ). • If the grinder is jammed, unplug it from the power source and contact an authorized service technician.
11.3. Grinding group maintenance Not following the recommended burr life guidelines can compromise the safety of the grinder. These operations should be done by a qualified service tecnician. To perform grind chamber maintenance please observe the following steps: Turn off the grinder by making sure the main power switch ( , and ) is on the OFF position. Disconnect the plug from the power source. Loosen the hopper security screw ( ) using a flat head screw driver as seen in Fig.
Position the regulator collar ( ) leaving about 45º between the grind point lock screw ( ) and regulator limit stop (Fig. 15). In that position, tighten the regulator ( ) on the upper burr carrier and with an Allen key A3 series. For the models with the micrometric Parallel system, first make sure that the grind point lock screw ( ) is lined up with the locking foot.
13. EC CONFORMITY In accordance with European commu-nity directives, quality certificates have been applied. All materials have been adapted and technical reports are available at our offices. 04/108/EC on the approximation of the laws of the Member States relating to electromagnetic compatibility. 06/42/EC amending Directive 89/392/EC on the approximation of the laws of the Member States relating to machinery REG.