File Number: 980138-F Tull 9, 1998 FCC ID: GKRM773 APPENDIX 5 USER’S MANUAL OF EUT The enclosed manual is for the EUT. As you will notice on the preceding page of this manual is the FCC WARNING about radio and television interference as per the requirement set forth in Part 15 of the FCC Rules. Accredited Lab. of ANEMONE, ALA Page 20 of 28 Listed Lab. of FCC, VCC, MOC ALA Certificate 4: 824.01 (for Emission) ANEMONE Authorization #: ELA 124 (for EMO) Rev.
r= 7 Important Safety Instructions Please read these instructions thoroughly. Please keep this guide for feature use, Please disconnect the device from the main supply before cleaning. Do not use any liquid or aerosol} spray cleaners. The best for cleaning is a piece of cloth dampened with water. To avoid damage of the device, you should only use accessory parts permitted by the manufacturer, ‘The device must be protected against moisture. To setup the device, it must be put in a stable stand position.
FEDERAL COMMUNICATIONS COMMISSION (FCC STATEMENT) ‘This equipment has been tested and found to comply with the limits for a Class B digital device, pursuant to Part 15 of the FCC Rules. These limits are designed to provide reasonable protection against harmful interference in a residential installs son. This equipment generates, uses, and can radiate radio frequency energy, and, if not installed and used in accordance with the instructions, may cause harmful interference to radio communications.
N CHAPTER 1 Introduction Congratulations ont your purchase of the new high performance 17" Monitor. Much consideration has gone into the design of the ‘monitor in order to meet your requirements for full compatibility and versatility as well as quality. Using state-of-the-art electronics, the monitor can support & resolution of 1280x1024, and the on-screen display allows You 10 customize the display settings to Suit Your individual needs. User display settings will be automatically saved 10 memory.
EE Table of Contents Chapter a Introduction _ — Unpacking _ — Getting Started __ a Connecting the Monitor and Stand Removing the Monitor Choosing a Wr workstation _ The AC Connection _ The Signal Cable Connection Monitor Adjustments Chapter 2 6 Adjusting the Brightness and Contrast.
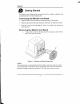
Chapter 1 ££ Getting Started This chapter covers setting up the monitor and stand in a suitable workplace, and connecting the power cord and signal cable, Connecting the Monitor and Stand 1. Align the stand’s four tabs with the slots in the bottom of the monitor. 2. Slide the stand toward the front of monitor. After insert the tabs into the slots. 3. Push back of swivel ball with angle 45° slowly. You will hear the spring lock click into place.
Chapter 1 Choosing a Workstation Keep the following in mind when choosing a work place for the Monitor. . . Place the monitor on a stable even surface. Access to an electrical outlet. Ensure at least three inches clearance at the rear of the monitor to allow for sufficient airflow. Position the Monitor a little above eye-level to reduce neck-strain. Do not place near a window.
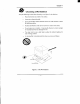
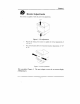
Chapter i ££ Monitor Adjustments The monitor is capable of both tilt and swivel adjustments. 15° Figure 5; Tilt Adjustment + With the tilt feature, the monitor is capable of vertical adjustments of F159 to -5%, + The swivel feature allows for horizontal monitor adjustments of +45° 10-45% © Swivel Adjustment This concludes Chapter I. The next chapter cavers the on-screen display (Misfeatures.
Chapter 2 oA \ Com mi doggedness 083 OMISSION LED Power Bun Figure 7 Contrast (and OSD Increase/Decrease) Control When the OSD Main Menu is not engaged, Press the Contrast Control w adjust the display contrast level to accommodate the ambient lighting conditions of your specific working environment. When the OSD Main Menu is engaged, Press this control adjusts the disseminating values.
Chapter 2 a Adjusting the Brightness and Contrast To adjust the contrast and/or brightness, Press the Contrast Control or the Rightness Control, to call up the following on-screen display: SHE 23 FH: £9.98 HZ [LT Brightness BE Press the Brightness Control right button to increase the brightness. Press the Left button } to decrease the brightness. The brightness level is adjusted from 0% to 100%, Contrast 0] Press the Contrast Contra ( £74/(P ) tight button to increase the contrast.
Chapter 2 © The On-Screen Display (OSD) The monitor features an intuitive, on-screen display (OSGOOD, making changes to the display settings convenient and simple. You can access the OSD any time your PC is powered On. If the PC is in Standby mode, or is powered Of, the OSD cannot be accessed To access the OSD Main Menu, push Theosophy ON/OFF control button & ) The following screen will appear: ‘This screen shows the V-Censer window allowing you to make adjustments to the display’s vertical position.
Chapter 2 H-Size Scroll to the H-biz display. icon, Press the button to adjust the horizontal size of the H-Center EE Scroll to the H-Center icon. Press the g23/(P button 10 position the display along the horizontal axis of the screen. V Size [EE Scroll to the V-Size display. icon. Press the E3/(P button to adjust the vertical size of the V-Center Scroll to the F-Center icon. Press the button to position the display along the vertical axis of the screen.
Chapter 2 % Color Temperature Setup To access the Carol setup menu, sleet to the Display Color Setting icon. The following screen appears: This screen allows you 10 select a color temperature for your monitor, Press the (Bp button to select the desired option. The available options are: > 9300 . 6500 + 5000 Press the Brightness function { g8/3¢) Control The following RGB Ruin window will appear: From this window you can make changes to the display’s Red, Green and Blue gain.
Chapter 2 Red Gain Scroll to the Red Gain icon. Press the Contrast Control £2/(p to adjust the red gain for your display. Green Gain = Resell to the Green Gain icon Press the £23/(P Contrast Control to adjust the green gain for your display. Blue Gain Scroll to the Rive Gain icon. Press the Contrast Control &Z3/(B to adjust the blue gain for your display. Reset = Scroll to the Serer icon. Press the Contrast Control E23/ to reset all three gain values to the default settings.
Chapter 2 & OSD Window Status The OSD Window status icons allow you to adjust the position of the OSD window on your screen, You can also set the time that the OSD window will be displayed on the screen. OSD Horizontal Position Scroll to the OSD Horizontal Position icon. Press the Contrast Control E2/(P to adjust the horizontal position of the OSD on the screen. OSD Vertical Position = Scroll to the OSD Vertical Position icon.
Chapter 2 ® ‘The Reset All option allows you to reset all display settings to their default values. Use the Degassed option to remove unwanted magnetism from the monitor's CRT. Reset All [od Scroll to the Serer All icon, Press the Contrast Control (P to reset all display options. 1f you do not wish to reset all display options, press the OSD ON/OFF Control to close the OSD window. Reset and Degassed Degas Scroll to the Degassed icon. Press the Contrast Control £23/(F to degassed the CRT.
Chapter 2 Function Description [3] | Blue Gain Use this option to adjust the blue gain. +04 Reset This option allows you to reset the three color settings to the default value, 08D Horizontal | Select this option to adjust the horizontal position of | Position the OSD on the screen. = OSD Vertical Select this option te adjust the vertical position of the Position 08D on the screen. 08D Display Use this option to set the amount of time that elapses Close Time before the OSD closes.
APPENDIX A Technical Information Monitor Specifications Screen Size 17" CRI Do Pitch (mm) 028 Surface Non-glare Viewable Display Area fmm) 300% 225 Input Signal Video Suns, RGB Analog a Separate HV, TTL b. Composite H+V, TIL Scanning Frequency Horizontal (KHz) 30-70 Vertical (Hz) 50-120 Video Bandwidth 110MHz Max. Resolution 1280 x 1024 Compatibility IBMVGA, VESALIUS, OVERGRAZE, SAGA, VGA and XGA modes.
Appendix A Color Temperature Yes Reset All Yes Display Modes Preset & User 2 Low Radiation MERIT TCO Optional Operating Range Temperature 040°C Relative Humidity Altitude Dimensions including sand) 412ml) x 434mm (W) x 420 mm (H) Weight Net 16.
Appendix A Troubleshooting "This section will try to anticipate potential problems that you may encounter in the day-to-day use of your monster. Included in this section is information which should help solve these problems for you. If after trying the suggested solutions, your monitor's symptom remains the same, contact your authorized service center. Symptoms Solution: The monitor is switched on, but the power LED is not lit, Check to make sure that the power cord is properly connected.