Presario 1400 Series Model XL240, XL241, XL242, XL244, XL245, XL246, XL247, XL250, XL340, XL341, XL342, XL343, XL344, XL345, XL346, XL350, XL352, XL355, and XL356 Before You Begin Product Description Specifications Pin Assignments Battery & Power Management Troubleshooting Removal Sequence Parts Catalog MSG Index Welcome to the Maintenance & Service Guide (MSG) Welcome to the Maintenance and Service Guide (MSG) for Compaq Presario 1400 Series Portable Notebooks.
Presario 1400 Series Model XL240, XL241, XL242, XL244, XL245, XL246, XL247, XL250, XL340, XL341, XL342, XL343, XL344, XL345, XL346, XL350, XL352, XL355, and XL356 Using this Guide To effectively navigate through this guide, refer to the list of bookmarks at the left of the screen. These bookmarks quickly and easily provide a thorough index of the entire document. These bookmarks remain in full view throughout the Maintenance and Service Guide (MSG).
Presario 1400 Series Model XL240, XL241, XL242, XL244, XL245, XL246, XL247, XL250, XL340, XL341, XL342, XL343, XL344, XL345, XL346, XL350, XL352, XL355, and XL356 Before You Begin Notice The information in this guide is subject to change without notice. COMPAQ COMPUTER CORPORATION SHALL NOT BE LIABLE FOR TECHNICAL OR EDITORIAL ERRORS OR OMISSIONS CONTAINED HEREIN, NOR FOR INCIDENTAL OR CONSEQUENTIAL DAMAGES RESULTING FROM THE FURNISHING, PERFORMANCE, OR USE OF THIS MATERIAL.
Presario 1400 Series Model XL240, XL241, XL242, XL244, XL245, XL246, XL247, XL250, XL340, XL341, XL342, XL343, XL344, XL345, XL346, XL350, XL352, XL355, and XL356 Preface The Maintenance and Service Guide is a troubleshooting guide that can be used as a reference when servicing the Compaq Presario 1400 Series Portable Notebooks. Compaq Computer Corporation reserves the right to make changes to Compaq Presario 1400 Series Portable Notebooks without notice.
Presario 1400 Series Model XL240, XL241, XL242, XL244, XL245, XL246, XL247, XL250, XL340, XL341, XL342, XL343, XL344, XL345, XL346, XL350, XL352, XL355, and XL356 Locating Additional Information The following documentation is available to support this product: • Compaq Presario 1400 Series Portable Notebook documentation set • Introducing Windows 98 Guide • Introducing Windows 2000 Guide • Servicing Training Guides • Compaq Service Advisories and Bulletins PRESARIO NOTEBOOK MAINTENANCE AND SERVI
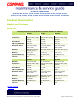
Presario 1400 Series Model XL240, XL241, XL242, XL244, XL245, XL246, XL247, XL250, XL340, XL341, XL342, XL343, XL344, XL345, XL346, XL350, XL352, XL355, and XL356 Product Description Models and Features XL240-246 Compaq Presario 1400 Series Portable Notebook Models XL240 XL241 XL242 Display 13.0-inch HPA 13.0-inch HPA 13.0-inch HPA Processor Celeron 600 (128) FCPGA Celeron 600 (128) FCPGA Celeron 566 (128) FCPGA Hard Drive 6.0 GB 6.0 GB 6.
Presario 1400 Series Model XL240, XL241, XL242, XL244, XL245, XL246, XL247, XL250, XL340, XL341, XL342, XL343, XL344, XL345, XL346, XL350, XL352, XL355, and XL356 XL247-250 Compaq Presario 1400 Series Portable Notebook Models XL247 XL250 Display 13.3-inch TFT 13.3-inch TFT Processor Celeron 600 (128) FCPGA Celeron 600 (128) FCPGA Hard Drive 6.0 GB 6.0 GB CD or DVD Drive CD-RW DVD Diskette Drive 3.5-inch Floppy Drive USB 3.
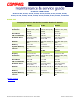
Presario 1400 Series Model XL240, XL241, XL242, XL244, XL245, XL246, XL247, XL250, XL340, XL341, XL342, XL343, XL344, XL345, XL346, XL350, XL352, XL355, and XL356 XL340-345 Compaq Presario 1400 Series Portable Notebook Models XL340 XL341 XL342 Display 12.1-inch TFT 13.0-inch HPA 13.3-inch TFT Processor Celeron 600 (128) FCPGA Celeron 633 (128) FCPGA Celeron 700 (256) FCPGA Hard Drive 6.0 GB 6.0 GB 10.0 GB CD or DVD Drive 8X DVD 24X CD 24X CD Diskette Drive 3.5-inch Floppy Drive USB 3.
Presario 1400 Series Model XL240, XL241, XL242, XL244, XL245, XL246, XL247, XL250, XL340, XL341, XL342, XL343, XL344, XL345, XL346, XL350, XL352, XL355, and XL356 XL346-356 Compaq Presario 1400 Series Portable Notebook Models XL346 XL350 XL352 Display 13.3-inch TFT 13.3-inch TFT 12.1-inch TFT Processor Celeron 600 (128) FCPGA Celeron 700 (256) FCPGA Celeron 600 (128) FCPGA Hard Drive 10.0 GB 15.0 GB 6.0 GB CD or DVD Drive 8X DVD 24X CD 8X DVD Diskette Drive 3.5-inch Floppy Drive USB 3.
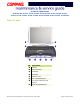
Presario 1400 Series Model XL240, XL241, XL242, XL244, XL245, XL246, XL247, XL250, XL340, XL341, XL342, XL343, XL344, XL345, XL346, XL350, XL352, XL355, and XL356 Front of Unit No.
Presario 1400 Series Model XL240, XL241, XL242, XL244, XL245, XL246, XL247, XL250, XL340, XL341, XL342, XL343, XL344, XL345, XL346, XL350, XL352, XL355, and XL356 Internet Zone Buttons and Lights No.
Presario 1400 Series Model XL240, XL241, XL242, XL244, XL245, XL246, XL247, XL250, XL340, XL341, XL342, XL343, XL344, XL345, XL346, XL350, XL352, XL355, and XL356 Front Bezel Components No. Description No.
Presario 1400 Series Model XL240, XL241, XL242, XL244, XL245, XL246, XL247, XL250, XL340, XL341, XL342, XL343, XL344, XL345, XL346, XL350, XL352, XL355, and XL356 Right Side Components No.
Presario 1400 Series Model XL240, XL241, XL242, XL244, XL245, XL246, XL247, XL250, XL340, XL341, XL342, XL343, XL344, XL345, XL346, XL350, XL352, XL355, and XL356 Left Side Components No.
Presario 1400 Series Model XL240, XL241, XL242, XL244, XL245, XL246, XL247, XL250, XL340, XL341, XL342, XL343, XL344, XL345, XL346, XL350, XL352, XL355, and XL356 Underneath the Unit No.
Presario 1400 Series Model XL240, XL241, XL242, XL244, XL245, XL246, XL247, XL250, XL340, XL341, XL342, XL343, XL344, XL345, XL346, XL350, XL352, XL355, and XL356 Rear Connectors No.
Presario 1400 Series Model XL240, XL241, XL242, XL244, XL245, XL246, XL247, XL250, XL340, XL341, XL342, XL343, XL344, XL345, XL346, XL350, XL352, XL355, and XL356 Specifications Physical and Environmental This section covers the following specifications of Compaq Presario 1400 Series Portable Notebooks. Notebook Specifications U.S. Metric Dimensions Height Depth Width 1.67 in 13.11 in 11.02 in 42.40 cm 33.30 cm 27.99 cm Weight with 13.0 inch Display with 13.3 inch Display 6.40 lb 6.22 lb 2.90 kg 2.
Presario 1400 Series Model XL240, XL241, XL242, XL244, XL245, XL246, XL247, XL250, XL340, XL341, XL342, XL343, XL344, XL345, XL346, XL350, XL352, XL355, and XL356 Notebook Specifications U.S. Relative Humidity (non-condensing) Operating Non Operating (tw = 38.7 degree C max) Metric 10% to 90% 5% to 95% Altitude Operating Non-Operating 0 to 10,000 ft 0 to 30,000 ft Shock Operating Non-Operating 10 G, 11 ms, half sine 240 G, 2 ms, half sine Vibration Operating 0.5 G Non-Operating 1.
Presario 1400 Series Model XL240, XL241, XL242, XL244, XL245, XL246, XL247, XL250, XL340, XL341, XL342, XL343, XL344, XL345, XL346, XL350, XL352, XL355, and XL356 System Interrupts System Interrupts Hardware IRQ System Function Hardware IRQ System Function IRQ0 System Timer IRQ10 SCI IRQ used by ACPI Bus IRQ1 Standard 101/102key or Microsoft Natural Keyboard IRQ11 ACPI IRQ Holder for PCI IRQ Steering IRQ2 Programmable Interrupt Controller IRQ11 VIA Tech 3038 PCI to USB Universal Host Control
Presario 1400 Series Model XL240, XL241, XL242, XL244, XL245, XL246, XL247, XL250, XL340, XL341, XL342, XL343, XL344, XL345, XL346, XL350, XL352, XL355, and XL356 System DMA System DMA Hardware DMA System Function DMA 2 Standard Floppy Disk Controller DMA 4 Direct Memory Access Controller System I/O Addresses System I/O Addresses I/O Address (Hex) System Function (Shipping Configuration) 0000h-000Fh Direct Memory Access Controller 0020h-0021h Programmable Interrupt Controller 0040h-0043h Syste
Presario 1400 Series Model XL240, XL241, XL242, XL244, XL245, XL246, XL247, XL250, XL340, XL341, XL342, XL343, XL344, XL345, XL346, XL350, XL352, XL355, and XL356 System I/O Addresses I/O Address (Hex) System Function (Shipping Configuration) 0378h-037Fh Printer Port (LPT1) 03B0h-03BBh Trident CyberBlade i1 AGP (51) 03C0h-03DFh Trident CyberBlade i1 AGP (51) 03E8h-03EFh Symphony Port (COM3) 03F0h-03F5h Standard Floppy Disk Controller 03F6h-03F6h VIA Bus Master PCI IDE Controller 03F6h-03F6h
Presario 1400 Series Model XL240, XL241, XL242, XL244, XL245, XL246, XL247, XL250, XL340, XL341, XL342, XL343, XL344, XL345, XL346, XL350, XL352, XL355, and XL356 System Memory Catalog System Memory Catalog Memory Address System Function 00000000h-0009FFFFh System Board Extension for ACPI BIOS 000A0000h-000AFFFFh Trident CyberBlade i1 AGP (51) 000B0000h-000BFFFFh Trident CyberBlade i1 AGP (51) 000C0000h-000CBFFFh Trident CyberBlade i1 AGP (51) 000DC000h-000DFFFFh System Board Extension for ACPI
Presario 1400 Series Model XL240, XL241, XL242, XL244, XL245, XL246, XL247, XL250, XL340, XL341, XL342, XL343, XL344, XL345, XL346, XL350, XL352, XL355, and XL356 HPA Display 12.1-in and 13-in HPA Display 12.1-in Active Area Height Width 13.0-in 9.56 in (245 mm) 7.17 in (183.8 mm) 10.39 in (263.98 mm) 7.79 in (197.98 mm) 7.9 in (202.5 mm) 10.7 in (275.0 mm) .31 in (8.0 mm) 11.6 in (295.0 mm) 8.58 in (218.0 mm) .31 in (8.
Presario 1400 Series Model XL240, XL241, XL242, XL244, XL245, XL246, XL247, XL250, XL340, XL341, XL342, XL343, XL344, XL345, XL346, XL350, XL352, XL355, and XL356 TFT Display 12.1-in and 13.3-in TFT Display 12.1-in DimensionsWi dth Display Dimensions Height Width Depth 13.
Presario 1400 Series Model XL240, XL241, XL242, XL244, XL245, XL246, XL247, XL250, XL340, XL341, XL342, XL343, XL344, XL345, XL346, XL350, XL352, XL355, and XL356 Memory Expansion Memory Expansion System Memory Expansion Board Memory Total Memory 64 MB none 64 MB 64 MB 32 MB 96 MB 64 MB 64 MB 128 MB 64 MB 128 MB 192 MB 64 MB 256 MB 320 MB Diskette Drive Diskette Drive Capacity per Diskette (High/Low) 1.44 MB/720 KB Diskette Size 3.
Presario 1400 Series Model XL240, XL241, XL242, XL244, XL245, XL246, XL247, XL250, XL340, XL341, XL342, XL343, XL344, XL345, XL346, XL350, XL352, XL355, and XL356 Hard Drive Hard Drive Drive Type 6.0 GB 12.0 GB 18.0 GB Capacity Per Drive 6.0 GB 12.0 GB 18.0 GB Logical Configuration Cylinders Heads Sectors per track Bytes per sector 8647 4 190/330 512 11968 6 190/330 512 11968 6 190/330 512 4 14 24 4 14 24 4 14 24 33.3 MB/s 33.3 MB/s 33.
Presario 1400 Series Model XL240, XL241, XL242, XL244, XL245, XL246, XL247, XL250, XL340, XL341, XL342, XL343, XL344, XL345, XL346, XL350, XL352, XL355, and XL356 CD/DVD Drive CD/DVD Drive 24x CD-ROM DVD Dimensions 128 x 129 x 12.7 mm 128 x 129 x 12.7 mm Weight 0.175 kg 0.28 kg Rotational Speed 4225 rpm 3450 rpm 3600 KB/s 8100 KB/s 120 ms 140 ms Spin Up Time 2.
Presario 1400 Series Model XL240, XL241, XL242, XL244, XL245, XL246, XL247, XL250, XL340, XL341, XL342, XL343, XL344, XL345, XL346, XL350, XL352, XL355, and XL356 Battery Pack Battery Packs Type Lithium Ion (Li-ion) Nickel Metal Hydride (NiMH) Dimensions Height Length Width 0.8 inch (20.3 mm) 5.7 inch (145 mm) 3.1 inch (78.7 mm) 0.8 inch (20.3 mm) 5.7 inch (145 mm) 3.1 inch (78.7 mm) Weight 0.90 pounds (408.2 g) 1.01 lbs (458.
Presario 1400 Series Model XL240, XL241, XL242, XL244, XL245, XL246, XL247, XL250, XL340, XL341, XL342, XL343, XL344, XL345, XL346, XL350, XL352, XL355, and XL356 Pin Assignments This section provides connector pin assignment tables for Compaq Presario 1400 Series Portable Notebook. For additional information on connectors, refer to the sections on Rear Connectors.
Presario 1400 Series Model XL240, XL241, XL242, XL244, XL245, XL246, XL247, XL250, XL340, XL341, XL342, XL343, XL344, XL345, XL346, XL350, XL352, XL355, and XL356 External Monitor External Monitor 2 PIN ASSIGNMENTS 1 Red 2 Green 3 Blue 4 N/C 5 Ground 6 Ground 7 Ground 8 Ground 9 Power 10 Ground 11 N/C 12 SDA 13 Hsync 14 Vsync 15 SCL PRESARIO NOTEBOOK MAINTENANCE AND SERVICE GUIDE 1400 SERIES
Presario 1400 Series Model XL240, XL241, XL242, XL244, XL245, XL246, XL247, XL250, XL340, XL341, XL342, XL343, XL344, XL345, XL346, XL350, XL352, XL355, and XL356 RJ-45 (NIC) RJ-45 (NIC) 1 8PMJ-1 2 8PMJ-2 3 8PMJ-3 4 8PMJ-4 5 8PMJ-5 6 8PMJ-6 7 8PMJ-7 8 8PMJ-8 PRESARIO NOTEBOOK MAINTENANCE AND SERVICE GUIDE 1400 SERIES PIN ASSIGNMENTS 3
Presario 1400 Series Model XL240, XL241, XL242, XL244, XL245, XL246, XL247, XL250, XL340, XL341, XL342, XL343, XL344, XL345, XL346, XL350, XL352, XL355, and XL356 S-Video S-Video 1 Y/R 2 C/G 3 Ground 4 Ground AC Adapter AC Adapter 4 PIN ASSIGNMENTS Center Pin Power Outside Pin Ground PRESARIO NOTEBOOK MAINTENANCE AND SERVICE GUIDE 1400 SERIES
Presario 1400 Series Models: XL240, XL241, XL242, XL244, XL245, XL246, XL247, XL250, XL340, XL341, XL342, XL343, XL344, XL345, XL346, XL350, XL352, XL355, and XL356 Battery and Power Management This chapter describes power management and proper battery operating practices for Presario 1400 Series Notebooks. These practices include conservation of AC power and effective control of energy to extend the operating life of the battery.
Presario 1400 Series Models: XL240, XL241, XL242, XL244, XL245, XL246, XL247, XL250, XL340, XL341, XL342, XL343, XL344, XL345, XL346, XL350, XL352, XL355, and XL356 Full Off Full Off mode consumes no power. The battery charges continuously if the battery is installed while the Notebook is in Full Off mode and if the Notebook remains plugged into external AC power. Note: Unsaved information is lost if the Notebook is turned off without first saving the data.
Presario 1400 Series Models: XL240, XL241, XL242, XL244, XL245, XL246, XL247, XL250, XL340, XL341, XL342, XL343, XL344, XL345, XL346, XL350, XL352, XL355, and XL356 Summary of Power Modes The following table outlines the procedures for entering and exiting the various power modes, and the external indicators for each mode.
Presario 1400 Series Models: XL240, XL241, XL242, XL244, XL245, XL246, XL247, XL250, XL340, XL341, XL342, XL343, XL344, XL345, XL346, XL350, XL352, XL355, and XL356 Power Settings Power management modes can be initiated based on the amount of time passed since the last system activity. System activity includes keyboard strokes, mouse movement, CD/DVD playback, and modem usage. Power Schemes Different patterns of Notebook use determine the level of power management needed.
Presario 1400 Series Models: XL240, XL241, XL242, XL244, XL245, XL246, XL247, XL250, XL340, XL341, XL342, XL343, XL344, XL345, XL346, XL350, XL352, XL355, and XL356 Alarms The Notebook can be set to Alarm when the battery power level is reduced or when it reaches a critically low level. The Notebook can also be set to enter a low-power mode when the battery reaches a specific power level. Ä CAUTION: The settings on the Alarms tab are preset for the Notebook to run at optimum efficiency.
Presario 1400 Series Models: XL240, XL241, XL242, XL244, XL245, XL246, XL247, XL250, XL340, XL341, XL342, XL343, XL344, XL345, XL346, XL350, XL352, XL355, and XL356 If power surges or sags, the display and status lights may flicker, and the Notebook may automatically restart. If an improper shutdown occurs, the Microsoft Windows utility program, ScanDisk, runs automatically once power is restored. ScanDisk determines whether the improper shutdown has caused any errors on the hard disk.
Presario 1400 Series Models: XL240, XL241, XL242, XL244, XL245, XL246, XL247, XL250, XL340, XL341, XL342, XL343, XL344, XL345, XL346, XL350, XL352, XL355, and XL356 Maximizing the Energy Stored To maximize the energy stored in the battery pack, follow these guidelines: • Condition a Battery Pack at least every 30 days to improve overall battery performance. • Keep a battery pack in the Notebook when using it with AC power to supply the battery pack with a constant trickle charge.
Presario 1400 Series Models: XL240, XL241, XL242, XL244, XL245, XL246, XL247, XL250, XL340, XL341, XL342, XL343, XL344, XL345, XL346, XL350, XL352, XL355, and XL356 Disposing of a Used Battery Pack In the interests of safeguarding our environment, Compaq Computer Corporation recommends that nickel metal hydride (NiMH) and lithium-ion (Li-ion) battery packs be recycled. Battery packs should be handled in accordance with country, state, province, or local regulations.
Presario 1400 Series Models: XL240, XL241, XL242, XL244, XL245, XL246, XL247, XL250, XL340, XL341, XL342, XL343, XL344, XL345, XL346, XL350, XL352, XL355, and XL356 Troubleshooting This section provides information for troubleshooting Compaq Presario 1400 Series Portable Notebooks. To isolate problems while troubleshooting the Notebook, refer to the following procedures: 1. Preliminary Steps. 2. Power-On Self-Test (POST). 3.
Presario 1400 Series Models: XL240, XL241, XL242, XL244, XL245, XL246, XL247, XL250, XL340, XL341, XL342, XL343, XL344, XL345, XL346, XL350, XL352, XL355, and XL356 Preliminary Steps Before running the Power-On Self-Test (POST), complete the following steps: 1. If a Power-on password has been established, type the password and press the Enter key. If the password is unknown, clear the password (See Clearing the Power-On Password). 2. Run the Computer Checkup (TEST). 3.
Presario 1400 Series Models: XL240, XL241, XL242, XL244, XL245, XL246, XL247, XL250, XL340, XL341, XL342, XL343, XL344, XL345, XL346, XL350, XL352, XL355, and XL356 Clearing the Power-On Password Ä CAUTION: Clearing the Power-on password also removes all of the Notebook’s setup attributes that are programmed in the CMOS. If the password is unknown, clear the password by following these steps: 1. Turn off the Notebook. 2. Disconnect the power cord. 3.
Presario 1400 Series Models: XL240, XL241, XL242, XL244, XL245, XL246, XL247, XL250, XL340, XL341, XL342, XL343, XL344, XL345, XL346, XL350, XL352, XL355, and XL356 Power-On Self-Test (POST) To run POST, complete the following action: Turn off the Notebook, then turn it on again. As soon as the Compaq logo appears, press ESC to clear the logo and display the POST messages as they occur. If the Notebook does not beep, POST has successfully completed its test and detected no errors.
Presario 1400 Series Models: XL240, XL241, XL242, XL244, XL245, XL246, XL247, XL250, XL340, XL341, XL342, XL343, XL344, XL345, XL346, XL350, XL352, XL355, and XL356 XX000YZZ 201—Memory Error Probable Cause Recommended Action Keyboard failure. 1. Ensure that no keys are pressed during POST. 2. Reconnect the keyboard with the Notebook off. 3. Replace the keyboard. 304—Keyboard or System Unit Error Probable Cause Recommended Action Keyboard or system board error. 1. Replace the keyboard. 2.
Presario 1400 Series Models: XL240, XL241, XL242, XL244, XL245, XL246, XL247, XL250, XL340, XL341, XL342, XL343, XL344, XL345, XL346, XL350, XL352, XL355, and XL356 Compaq Diagnostics Compaq Diagnostics are installed on the hard drive of the Notebook. Run the Diagnostic utilities when viewing or testing system information or if devices have been installed or connected. If Compaq Diagnostics are performed from a diskette, ensure that the diagnostic program is version 10.11 or later.
Presario 1400 Series Models: XL240, XL241, XL242, XL244, XL245, XL246, XL247, XL250, XL340, XL341, XL342, XL343, XL344, XL345, XL346, XL350, XL352, XL355, and XL356 Computer Checkup (TEST) Computer Checkup (TEST) determines whether the various Notebook components and devices are recognized by the system and functioning properly. Information generated by Computer Checkup can be displayed, printed, or saved. Follow this procedure to run Computer Checkup: 1. Plug the Notebook into an external power source.
Presario 1400 Series Models: XL240, XL241, XL242, XL244, XL245, XL246, XL247, XL250, XL340, XL341, XL342, XL343, XL344, XL345, XL346, XL350, XL352, XL355, and XL356 View System Information (INSPECT) The View System Information (INSPECT) utility provides information about the Notebook and devices installed or connected to it. Display, print, or save the information. Follow these steps to run View System Information (INSPECT) from the Compaq Diagnostics diskette: 1.
Presario 1400 Series Models: XL240, XL241, XL242, XL244, XL245, XL246, XL247, XL250, XL340, XL341, XL342, XL343, XL344, XL345, XL346, XL350, XL352, XL355, and XL356 Diagnostic Error Codes Diagnostic error codes are displayed if the system recognizes a problem while running the Compaq Diagnostic program. These error codes help to identify possibly defective subassemblies. The following tables list error codes, a description of the error condition, and the action required to resolve the error condition.
Presario 1400 Series Models: XL240, XL241, XL242, XL244, XL245, XL246, XL247, XL250, XL340, XL341, XL342, XL343, XL344, XL345, XL346, XL350, XL352, XL355, and XL356 Memory, Keyboard, and Parallel Printer Test Error Codes Memory Test Error Codes Error Code Description Recommended Action 200-xx Memory machine ID test failed. 202-xx Memory system ROM checksum failed. 1. Flash the system ROM and retest. 2. Replace the system board and retest. 203-xx Read-write test failed.
Presario 1400 Series Models: XL240, XL241, XL242, XL244, XL245, XL246, XL247, XL250, XL340, XL341, XL342, XL343, XL344, XL345, XL346, XL350, XL352, XL355, and XL356 Diskette Drive and Serial Test Error Codes Diskette Drive Test Error Codes Error Code Description Recommended Action 600-xx Diskette ID drive types test failed. 601-xx Diskette format failed. 602-xx Diskette read test failed. 603-xx Diskette read-write, compare test failed. 604-xx Diskette random read test failed. 1.
Presario 1400 Series Models: XL240, XL241, XL242, XL244, XL245, XL246, XL247, XL250, XL340, XL341, XL342, XL343, XL344, XL345, XL346, XL350, XL352, XL355, and XL356 Hard Drive Test Error Codes Hard Drive Test Error Codes Error Code Description Recommended Action 1701-xx Hard drive format test failed. 1702-xx Hard drive read test failed. 1703-xx Hard drive read-write, compare test failed. 1704-xx Hard drive random seek test failed. 1705-xx Hard drive controller test failed.
Presario 1400 Series Models: XL240, XL241, XL242, XL244, XL245, XL246, XL247, XL250, XL340, XL341, XL342, XL343, XL344, XL345, XL346, XL350, XL352, XL355, and XL356 Video Test Error Codes Video Test Error Codes Error Code Description Recommended Action 501-xx Video controller test failed. 502-xx Video memory test failed. 503-xx Video attribute test failed. 504-xx Video character set test failed. 505-xx Video 80 x 25 mode 9 x 14 character cell test failed.
Presario 1400 Series Models: XL240, XL241, XL242, XL244, XL245, XL246, XL247, XL250, XL340, XL341, XL342, XL343, XL344, XL345, XL346, XL350, XL352, XL355, and XL356 Video Test Error Codes Error Code Description Recommended Action 2402-xx Video memory test failed. 2403-xx Video attribute test failed. 2404-xx Video character set test failed. 2405-xx Video 80 x 25 mode 9 x 14 character cell test failed. 2406-xx Video 80 x 25 mode 8 x 8 character cell test failed.
Presario 1400 Series Models: XL240, XL241, XL242, XL244, XL245, XL246, XL247, XL250, XL340, XL341, XL342, XL343, XL344, XL345, XL346, XL350, XL352, XL355, and XL356 Video Test Error Codes (Continued) Error Code Description Recommended Action 2419-xx ECG/VGC ROM checksum test failed. 2421-xx ECG/VGC 640 x 200 graphics mode test failed. 2422-xx ECG/VGC 640 x 350 16 color set test failed. 2423-xx ECG/VGC 640 x 350 64 color set test failed. 2424-xx ECG/VGC monochrome graphics mode test failed.
Presario 1400 Series Models: XL240, XL241, XL242, XL244, XL245, XL246, XL247, XL250, XL340, XL341, XL342, XL343, XL344, XL345, XL346, XL350, XL352, XL355, and XL356 Audio, DVD or CD, and TouchPad/Pointing Device Test Error Codes Audio Test Error Codes Error Code Description Recommended Action 3206-xx Audio System Internal Error. Replace the system board and retest. TouchPad/Pointing Device Interface Test Error Codes Error Code Description Recommended Action 8601-xx Mouse test failed.
Presario 1400 Series Models: XL240, XL241, XL242, XL244, XL245, XL246, XL247, XL250, XL340, XL341, XL342, XL343, XL344, XL345, XL346, XL350, XL352, XL355, and XL356 Troubleshooting without Diagnostics This section provides information about how to identify and correct some common hardware, memory, and software problems. It also explains several types of common messages that may be displayed on the screen.
Presario 1400 Series Models: XL240, XL241, XL242, XL244, XL245, XL246, XL247, XL250, XL340, XL341, XL342, XL343, XL344, XL345, XL346, XL350, XL352, XL355, and XL356 Before Replacing Parts 1. Verify that cables are connected properly to the parts suspected to be defective. 2. Run Computer Setup after connecting external devices. 3. Verify that all required device drivers are installed. 4. Verify that all required changes have been made to the CONFIG.SYS file. 5.
Presario 1400 Series Models: XL240, XL241, XL242, XL244, XL245, XL246, XL247, XL250, XL340, XL341, XL342, XL343, XL344, XL345, XL346, XL350, XL352, XL355, and XL356 Solving Minor Problems Some minor problems and possible solutions are outlined in the following tables. If the problem appears related to a software application, check the documentation provided with the software.
Presario 1400 Series Models: XL240, XL241, XL242, XL244, XL245, XL246, XL247, XL250, XL340, XL341, XL342, XL343, XL344, XL345, XL346, XL350, XL352, XL355, and XL356 Solving Battery Pack/Gauge Problems Problem Probable Cause Solution Notebook is beeping and battery icon is blinking. Battery charge is low. Immediately save any open file(s). Then try either pf the following solutions: • Connect the Notebook to an external power source to charge the battery pack.
Presario 1400 Series Models: XL240, XL241, XL242, XL244, XL245, XL246, XL247, XL250, XL340, XL341, XL342, XL343, XL344, XL345, XL346, XL350, XL352, XL355, and XL356 Solving Battery Pack/Gauge Problems (Continued) Problem Probable Cause Solution Battery has partially self-discharged. Recharge the battery. Discharge the battery completely, and then recharge it. Power management is disabled. Set a power management level in Computer Setup. An external device or PC card is draining the battery.
Presario 1400 Series Models: XL240, XL241, XL242, XL244, XL245, XL246, XL247, XL250, XL340, XL341, XL342, XL343, XL344, XL345, XL346, XL350, XL352, XL355, and XL356 Solving Battery Pack/Gauge Problems (Continued) Problem Probable Cause Solution Battery pack has partially selfdischarged. Condition the battery pack by fully charging, fully discharging, then fully recharging again. To maintain the charge, leave battery packs in the Notebook when it is connected to external power.
Presario 1400 Series Models: XL240, XL241, XL242, XL244, XL245, XL246, XL247, XL250, XL340, XL341, XL342, XL343, XL344, XL345, XL346, XL350, XL352, XL355, and XL356 Solving Diskette Drive Problems Some causes and solutions for common diskette drive problems are listed in the table below: Solving Diskette Drive Problems Problem Probable Cause Solution Diskette drive cannot write to a diskette. Diskette is write-protected.
Presario 1400 Series Models: XL240, XL241, XL242, XL244, XL245, XL246, XL247, XL250, XL340, XL341, XL342, XL343, XL344, XL345, XL346, XL350, XL352, XL355, and XL356 Solving Display Problems This section lists some causes and solutions for common Notebook display and external monitor problems. You can perform a monitor self-test on an external VGA color or monochrome monitor by disconnecting the monitor from the Notebook. To do so, complete the following steps: 1. Turn off the monitor. 2.
Presario 1400 Series Models: XL240, XL241, XL242, XL244, XL245, XL246, XL247, XL250, XL340, XL341, XL342, XL343, XL344, XL345, XL346, XL350, XL352, XL355, and XL356 Solving Display Problems Problem Probable Cause Solution The light tubes on the edge of the display panel do not light up, and the Power-On Self-Test (POST) completes when the unit is powered up.** Improper backlight or display cable connections Replace the display assembly. Defective inverter board Replace the display assembly.
Presario 1400 Series Models: XL240, XL241, XL242, XL244, XL245, XL246, XL247, XL250, XL340, XL341, XL342, XL343, XL344, XL345, XL346, XL350, XL352, XL355, and XL356 Solving Display Problems (Continued) Problem Probable Cause Solution The display panel has a continuous pattern across it (for example, “jailbars” pattern), has a single color on it, or has garbled graphics across the entire panel. This failure occurs across the entire panel, not just in one section.
Presario 1400 Series Models: XL240, XL241, XL242, XL244, XL245, XL246, XL247, XL250, XL340, XL341, XL342, XL343, XL344, XL345, XL346, XL350, XL352, XL355, and XL356 Solving Hard Drive Problems Some causes and solutions for common hard drive problems are listed in the table below. Ä CAUTION: To prevent loss of information, always maintain an up-to-date backup file on the hard drive at all times, in case of errors or failures.
Presario 1400 Series Models: XL240, XL241, XL242, XL244, XL245, XL246, XL247, XL250, XL340, XL341, XL342, XL343, XL344, XL345, XL346, XL350, XL352, XL355, and XL356 Solving Hardware Installation Problems Some causes and solutions for common hardware installation problems are listed in following table. Solving Hardware Installation Problems Problem Probable Cause Solution A new device is not recognized as part of the Notebook system.
Presario 1400 Series Models: XL240, XL241, XL242, XL244, XL245, XL246, XL247, XL250, XL340, XL341, XL342, XL343, XL344, XL345, XL346, XL350, XL352, XL355, and XL356 Solving Keyboard and Numeric Keypad Problems Some causes and solutions for common keyboard and numeric keypad problems are listed in the following table. Solving Keyboard/Numeric Keypad Problems Problem Probable Cause Solution Embedded numeric keypad on Notebook keyboard is disabled. Num Lock function is not enabled.
Presario 1400 Series Models: XL240, XL241, XL242, XL244, XL245, XL246, XL247, XL250, XL340, XL341, XL342, XL343, XL344, XL345, XL346, XL350, XL352, XL355, and XL356 Solving Memory Problems Some causes and solutions for common memory problems are listed in the table below. Solving Memory Problems Problem Probable Cause Solution Memory count during Power-On Self-Test (POST) is incorrect. Optional memory expansion card is installed incorrectly, is incompatible with the Notebook, or is defective.
Presario 1400 Series Models: XL240, XL241, XL242, XL244, XL245, XL246, XL247, XL250, XL340, XL341, XL342, XL343, XL344, XL345, XL346, XL350, XL352, XL355, and XL356 Solving PC Card Problems The following table lists some causes and solutions for common PC Card problems. Solving PC Card Problems Problem Probable Cause Solution When the Notebook is turned on and a PC card is inserted, the Notebook does not beep. Card is not inserted properly. Ensure that the card is inserted in the correct orientation.
Presario 1400 Series Models: XL240, XL241, XL242, XL244, XL245, XL246, XL247, XL250, XL340, XL341, XL342, XL343, XL344, XL345, XL346, XL350, XL352, XL355, and XL356 Solving Power Problems See also “Solving Battery Pack and Battery Gauge Problems” in this section. Solving Power Problems Problem Probable Cause Solution Notebook will not turn on and battery pack is not inserted. Notebook is not connected to a power source. Insert battery or connect an external power source.
Presario 1400 Series Models: XL240, XL241, XL242, XL244, XL245, XL246, XL247, XL250, XL340, XL341, XL342, XL343, XL344, XL345, XL346, XL350, XL352, XL355, and XL356 Solving Printer Problems If you experience problems printing, run a printer self-test. Refer to the documentation provided with the printer for instructions. If the self-test fails, it is a printer-specific problem. Refer also to the printing section of the application documentation.
Presario 1400 Series Models: XL240, XL241, XL242, XL244, XL245, XL246, XL247, XL250, XL340, XL341, XL342, XL343, XL344, XL345, XL346, XL350, XL352, XL355, and XL356 Solving TouchPad/Pointing Device Problems The following table lists some causes and solutions for common TouchPad/Pointing Device problems. Solving TouchPad/Pointing Device Problems Problem Probable Cause Solution TouchPad or mouse does not work. No device driver is installed, or an incorrect driver is installed.
Presario 1400 Series Model XL240, XL241, XL242, XL244, XL245, XL246, XL247, XL250, XL340, XL341, XL342, XL343, XL344, XL345, XL346, XL350, XL352, XL355, and XL356 Removal Sequence This section describes the removal and replacement process for the Presario 1400 Series Notebook. The procedures are divided into two subsections: The Customer Removable Parts and The Service Removable Parts.
Presario 1400 Series Model XL240, XL241, XL242, XL244, XL245, XL246, XL247, XL250, XL340, XL341, XL342, XL343, XL344, XL345, XL346, XL350, XL352, XL355, and XL356 Electrostatic Discharge A sudden discharge of static electricity from a finger or other conductor can destroy static-sensitive devices or microcircuitry. Often the spark is neither felt nor heard, but damage occurs.
Presario 1400 Series Model XL240, XL241, XL242, XL244, XL245, XL246, XL247, XL250, XL340, XL341, XL342, XL343, XL344, XL345, XL346, XL350, XL352, XL355, and XL356 Service Considerations During the disassembly and assembly of your Notebook, please keep in mind the considerations listed below.
Presario 1400 Series Model XL240, XL241, XL242, XL244, XL245, XL246, XL247, XL250, XL340, XL341, XL342, XL343, XL344, XL345, XL346, XL350, XL352, XL355, and XL356 Notebook Disassembly Before beginning The Removal and Replacement Procedures, complete the following steps: 1. Disconnect AC power and any external devices. 2. Remove any PC cards. 3. Remove the battery pack (pg 5). Å WARNING: Battery pack contains harmful components when exposed. Do not open, crush, puncture, or incinerate the battery pack.
Presario 1400 Series Model XL240, XL241, XL242, XL244, XL245, XL246, XL247, XL250, XL340, XL341, XL342, XL343, XL344, XL345, XL346, XL350, XL352, XL355, and XL356 Battery Pack To remove the battery pack, complete the following steps: 1. Slide the battery compartment door switch 2. Simultaneously slide door 1 up to release the door. 2 right. 3. Lift door to remove. Important: The battery pack should be removed before performing any internal maintenance on the Notebook.
Presario 1400 Series Model XL240, XL241, XL242, XL244, XL245, XL246, XL247, XL250, XL340, XL341, XL342, XL343, XL344, XL345, XL346, XL350, XL352, XL355, and XL356 4. Pull up on battery pack ribbon. 5. Disconnect battery pack from connectors. 6. Lift battery pack from compartment. To replace the battery pack, reverse these procedures. Å WARNING: Battery pack contains harmful components when exposed. Do not open, crush, puncture, or incinerate the battery pack. It contains no fieldserviceable parts.
Presario 1400 Series Model XL240, XL241, XL242, XL244, XL245, XL246, XL247, XL250, XL340, XL341, XL342, XL343, XL344, XL345, XL346, XL350, XL352, XL355, and XL356 Cosmetic Side Covers To remove the Cosmetic Side Covers, complete the following steps: 1. Prepare the Notebook for disassembly (pg 4). 2. Remove one screw located on the side near the back of the unit with a Phillips screwdriver from the cosmetic side cover, left or right. 3.
Presario 1400 Series Model XL240, XL241, XL242, XL244, XL245, XL246, XL247, XL250, XL340, XL341, XL342, XL343, XL344, XL345, XL346, XL350, XL352, XL355, and XL356 Speaker Port Covers To remove the Speaker Port Covers, complete the following steps: 1. Prepare the Notebook for disassembly (pg 4). 2. Remove the cosmetic side covers (pg 7). 3. Remove the upper and lower Speaker Port Covers from chassis. To replace the Speaker Port Covers, reverse these procedures.
Presario 1400 Series Model XL240, XL241, XL242, XL244, XL245, XL246, XL247, XL250, XL340, XL341, XL342, XL343, XL344, XL345, XL346, XL350, XL352, XL355, and XL356 Modem/Memory Access Door To remove the Modem/Memory Access Door, complete the following steps: 1. Prepare the Notebook for disassembly (pg 4). 2. Turn the Notebook upside down. 3. Remove the one screw 1 with Phillips screwdriver from the Modem/ Memory Access Door 2. 4. Lift up and remove the Modem/Memory Access Door from the unit.
Presario 1400 Series Model XL240, XL241, XL242, XL244, XL245, XL246, XL247, XL250, XL340, XL341, XL342, XL343, XL344, XL345, XL346, XL350, XL352, XL355, and XL356 Modem or Network/Modem Combo Card To remove the Modem, complete the following steps: 1. Prepare the Notebook for disassembly (pg 4). 2. Turn the Notebook over. 3. Remove the Modem/Memory Access door from the unit (pg 9). 1 on each side of the Modem or Network/Modem Card. Lift and remove the card 2 from the chassis. 4. Pull the tab 5.
Presario 1400 Series Model XL240, XL241, XL242, XL244, XL245, XL246, XL247, XL250, XL340, XL341, XL342, XL343, XL344, XL345, XL346, XL350, XL352, XL355, and XL356 Extended Memory Card To remove the Extended Memory Card, complete the following steps: 1. Prepare the Notebook for disassembly (pg 4). 2. Turn the Notebook upside down. 3. Remove the Modem/Memory Access door (pg 9). 1 on each side of the Extended Memory Card. Lift and remove the Extended Memory Card 2 from the connectors. 4. Pull the tab 5.
Presario 1400 Series Model XL240, XL241, XL242, XL244, XL245, XL246, XL247, XL250, XL340, XL341, XL342, XL343, XL344, XL345, XL346, XL350, XL352, XL355, and XL356 DVD, CD-Rom, or CD-RW Drive To remove the DVD, CD-Rom, or CD-RW Drive, complete the following steps: 1. Prepare the Notebook for disassembly (pg 4). 2. Remove the right cosmetic side cover (pg 7). Note: It is not necessary to remove the left cosmetic side cover to remove the DVD, CD-Rom, or CD-RW Drive. 3. Turn the Notebook upside down. 4.
Presario 1400 Series Model XL240, XL241, XL242, XL244, XL245, XL246, XL247, XL250, XL340, XL341, XL342, XL343, XL344, XL345, XL346, XL350, XL352, XL355, and XL356 5. Turn the Notebook over. 6. Slide the DVD, CD-Rom, or CD-RW Drive out to remove. Note: The illustration may show extra components removed that are not necessary for this step. Complete only the written steps that are provided. To replace the DVD, CD-Rom, or CD-RW Drive, reverse these procedures.
Presario 1400 Series Model XL240, XL241, XL242, XL244, XL245, XL246, XL247, XL250, XL340, XL341, XL342, XL343, XL344, XL345, XL346, XL350, XL352, XL355, and XL356 Hard Drive To remove the Hard Drive, complete the following steps: 1. Prepare the Notebook for disassembly (pg 4). 2. Remove the left cosmetic side cover (pg 7). Note: It is not necessary to remove the right cosmetic side cover to remove the Hard Drive. 3. Turn the Notebook upside down. 4. Remove one screw from underneath the unit.
Presario 1400 Series Model XL240, XL241, XL242, XL244, XL245, XL246, XL247, XL250, XL340, XL341, XL342, XL343, XL344, XL345, XL346, XL350, XL352, XL355, and XL356 5. Turn the unit over. 6. Slide the Hard Drive out and remove. To replace the Hard Drive, reverse the procedure.
Presario 1400 Series Model XL240, XL241, XL242, XL244, XL245, XL246, XL247, XL250, XL340, XL341, XL342, XL343, XL344, XL345, XL346, XL350, XL352, XL355, and XL356 The Service Removable Parts Serial Number When customers request information or order spare parts, be sure to ask them for their Notebook’s serial number 1. It is located on the underside of the unit. Before servicing the unit, refer to Preparing the Notebook for Disassembly (pg 4).
Presario 1400 Series Model XL240, XL241, XL242, XL244, XL245, XL246, XL247, XL250, XL340, XL341, XL342, XL343, XL344, XL345, XL346, XL350, XL352, XL355, and XL356 Electrostatic Discharge A sudden discharge of static electricity from a finger or other conductor can destroy static-sensitive devices or microcircuitry. Often the spark is neither felt nor heard, but damage occurs.
Presario 1400 Series Model XL240, XL241, XL242, XL244, XL245, XL246, XL247, XL250, XL340, XL341, XL342, XL343, XL344, XL345, XL346, XL350, XL352, XL355, and XL356 Service Considerations During the disassembly and assembly of the Notebook, please keep in mind the considerations listed below.
Presario 1400 Series Model XL240, XL241, XL242, XL244, XL245, XL246, XL247, XL250, XL340, XL341, XL342, XL343, XL344, XL345, XL346, XL350, XL352, XL355, and XL356 Cables and Connectors Most of the cables inside the Notebook are ribbon cables. Handle cables with extreme care to avoid damage. During insertion or removal from the connector, apply only the amount of pressure required to seat or unseat the cable, handling it by the connector whenever possible.
Presario 1400 Series Model XL240, XL241, XL242, XL244, XL245, XL246, XL247, XL250, XL340, XL341, XL342, XL343, XL344, XL345, XL346, XL350, XL352, XL355, and XL356 Connectors and Plastic Parts Plastic parts can be damaged by the use of excessive force during disassembly and reassembly. Handle with care when disassembling and assembling plastic parts. As recommended in the maintenance instructions, apply pressure only at the designated points.
Presario 1400 Series Model XL240, XL241, XL242, XL244, XL245, XL246, XL247, XL250, XL340, XL341, XL342, XL343, XL344, XL345, XL346, XL350, XL352, XL355, and XL356 Speaker Assembly Cable The ribbon cable position for the speaker assembly is shown below. Ä CAUTION: When servicing a Notebook, place cables in their proper location during the reassembly process. Improper cable placement can cause severe damage to the Notebook. To view other cables, click Cable Illustrations.
Presario 1400 Series Model XL240, XL241, XL242, XL244, XL245, XL246, XL247, XL250, XL340, XL341, XL342, XL343, XL344, XL345, XL346, XL350, XL352, XL355, and XL356 Keyboard Ribbon Cable The ribbon cable position for the keyboard is shown below. Ä CAUTION: When servicing a Notebook, place cables in their proper location during the reassembly process. Improper cable placement can cause severe damage to the Notebook. To view other cables, click Cable Illustrations.
Presario 1400 Series Model XL240, XL241, XL242, XL244, XL245, XL246, XL247, XL250, XL340, XL341, XL342, XL343, XL344, XL345, XL346, XL350, XL352, XL355, and XL356 Internet Button Board Cover 1. Prepare the Notebook for disassembly (pg 4). 2. Remove the cosmetic side covers (pg 7). 3. Turn the Notebook upside down. 4. Remove the two screws from underneath the unit toward the rear.
Presario 1400 Series Model XL240, XL241, XL242, XL244, XL245, XL246, XL247, XL250, XL340, XL341, XL342, XL343, XL344, XL345, XL346, XL350, XL352, XL355, and XL356 5. Carefully pry with the flat end of a screwdriver to lift the Internet Button Board Cover. 6. Disconnect the backlight and flex cables. 7. Remove the Internet Button Board Cover from the Notebook. Note: The hinge covers and backlight switch are located on the Internet Button Board Cover.
Presario 1400 Series Model XL240, XL241, XL242, XL244, XL245, XL246, XL247, XL250, XL340, XL341, XL342, XL343, XL344, XL345, XL346, XL350, XL352, XL355, and XL356 Keyboard To remove the keyboard, complete the following steps: 1. Prepare the Notebook for disassembly (pg 4). 2. Remove the cosmetic side covers (pg 7). 3. Remove the Internet Button Board Cover (pg 23). 4. Lift the back of the keyboard and disconnect the flex cable from the ZIF Connector on the system board. 5.
Presario 1400 Series Model XL240, XL241, XL242, XL244, XL245, XL246, XL247, XL250, XL340, XL341, XL342, XL343, XL344, XL345, XL346, XL350, XL352, XL355, and XL356 PCA Button Board To remove the PCA Button Board, complete the following steps: 1. Prepare the Notebook for disassembly (pg 4). 2. Remove the cosmetic side covers (pg 7). 3. Remove the Internet Button Board Cover (pg 23). 4. Remove the keyboard (pg 25). 5. Disconnect the backlight cable from the system board.
Presario 1400 Series Model XL240, XL241, XL242, XL244, XL245, XL246, XL247, XL250, XL340, XL341, XL342, XL343, XL344, XL345, XL346, XL350, XL352, XL355, and XL356 6. Remove two screws 1 on the PCA Button Board. 7. Pry with the flat end of a screwdriver and lift the PCA Button Board. The data cable that is attached to the PCA Button Board is still connected to the system board. 8. Disconnect the data cable Board. 3 on the bottom side of the PCA Button 9. Remove the PCA Button Board 2 from the chassis.
Presario 1400 Series Model XL240, XL241, XL242, XL244, XL245, XL246, XL247, XL250, XL340, XL341, XL342, XL343, XL344, XL345, XL346, XL350, XL352, XL355, and XL356 Display Panel Assembly To remove the display panel assembly, complete the following steps: 1. Prepare the Notebook for disassembly (pg 4). 2. Remove the cosmetic side covers (pg 7). 3. Remove the Internet Button Board cover (pg 23). 4. Remove the keyboard (pg 25). 5. Remove the PCA Button Board (pg 26). 6.
Presario 1400 Series Model XL240, XL241, XL242, XL244, XL245, XL246, XL247, XL250, XL340, XL341, XL342, XL343, XL344, XL345, XL346, XL350, XL352, XL355, and XL356 MP3 Zone Cover To Remove the MP3 Zone Cover, complete the following steps: 1. Prepare the Notebook for disassembly (pg 4). 2. Remove the cosmetic side covers (pg 7). 3. Remove the speaker port covers (pg 8). 1 from the MP3 Zone Cover. Pull the MP3 Zone Cover 2 forward and remove it from the chassis. 4. Remove the four screws 5.
Presario 1400 Series Model XL240, XL241, XL242, XL244, XL245, XL246, XL247, XL250, XL340, XL341, XL342, XL343, XL344, XL345, XL346, XL350, XL352, XL355, and XL356 Heatspreader with Fan Assembly To remove the Heatspreader with Fan Assembly, complete the following steps: 1. Prepare the Notebook for disassembly (pg 4). 2. Remove the cosmetic side covers (pg 7). 3. Remove the Internet Button Board cover (pg 23). 4. Remove the keyboard (pg 25). 1 with a T-9 Torx driver.
Presario 1400 Series Model XL240, XL241, XL242, XL244, XL245, XL246, XL247, XL250, XL340, XL341, XL342, XL343, XL344, XL345, XL346, XL350, XL352, XL355, and XL356 Fan Assembly To remove the Fan Assembly, complete the following steps: 1. Prepare the Notebook for disassembly (pg 4). 2. Remove the cosmetic side covers (pg 7). 3. Remove the Internet Button Board cover (pg 23). 4. Remove the keyboard (pg 25). 5. Remove the Heatspreader with Fan Assembly (pg 30). 1 with a Phillips screwdriver.
Presario 1400 Series Model XL240, XL241, XL242, XL244, XL245, XL246, XL247, XL250, XL340, XL341, XL342, XL343, XL344, XL345, XL346, XL350, XL352, XL355, and XL356 Palmrest Cover with TouchPad (Upper CPU) To remove the Palmrest Cover with TouchPad (Upper CPU), complete the following steps: 1. Prepare the Notebook for disassembly (pg 4). 2. Remove the cosmetic side covers (pg 7). 3. Remove the speaker port covers (pg 8). 4. Remove the Power-on and Internet Button Board Cover (pg 23). 5.
Presario 1400 Series Model XL240, XL241, XL242, XL244, XL245, XL246, XL247, XL250, XL340, XL341, XL342, XL343, XL344, XL345, XL346, XL350, XL352, XL355, and XL356 11. Remove seven screws 1 and one standoff from the Upper CPU Cover with Palmrest and TouchPad. 12. Remove the TouchPad data cable with a flat-blade screwdriver. 13. Lift the Upper CPU Cover with Palmrest and TouchPad it from the chassis. 2 upward and remove Note: Illustrations may show a fewer number of screws removed.
Presario 1400 Series Model XL240, XL241, XL242, XL244, XL245, XL246, XL247, XL250, XL340, XL341, XL342, XL343, XL344, XL345, XL346, XL350, XL352, XL355, and XL356 Modem/Modem-NIC Combo Cable To remove the NIC (Network Interface Card) cable, complete the following steps: 1. Prepare the Notebook for disassembly (pg 4). 2. Remove the cosmetic side covers (pg 7). 3. Remove the speaker port covers (pg 8). 4. Remove the Modem/Memory Access Door (pg 9). 5. Remove the Internet Button Board cover (pg 23). 6.
Presario 1400 Series Model XL240, XL241, XL242, XL244, XL245, XL246, XL247, XL250, XL340, XL341, XL342, XL343, XL344, XL345, XL346, XL350, XL352, XL355, and XL356 12. Disconnect and lift off the large end located near the hard drive. 1 of the Modem/NIC cable connector 13. Disconnect and lift off the small end near the rear of the unit. 2 of the Modem/NIC cable connector located 14. Remove one standoff with a 5mm nut driver. 15. Remove NIC cable from chassis.
Presario 1400 Series Model XL240, XL241, XL242, XL244, XL245, XL246, XL247, XL250, XL340, XL341, XL342, XL343, XL344, XL345, XL346, XL350, XL352, XL355, and XL356 MP3 Audio Board To remove the MP3 Audio Board, complete the following steps: 1. Prepare the Notebook for disassembly (pg 4). 2. Remove the cosmetic side covers (pg 7). 3. Remove the speaker port covers (pg 8). 4. Remove the Modem/Memory Access Door (pg 9). 5. Remove the Internet Button Board Cover (pg 23). 6. Remove the keyboard (pg 25). 7.
Presario 1400 Series Model XL240, XL241, XL242, XL244, XL245, XL246, XL247, XL250, XL340, XL341, XL342, XL343, XL344, XL345, XL346, XL350, XL352, XL355, and XL356 1 from the system board. Lift and remove the MP3 Audio Board 2 from the system board. 12. Remove one screw 13. 14. Disconnect the speaker cable from the system board. To replace the MP3 Audio Board, reverse the procedure.
Presario 1400 Series Model XL240, XL241, XL242, XL244, XL245, XL246, XL247, XL250, XL340, XL341, XL342, XL343, XL344, XL345, XL346, XL350, XL352, XL355, and XL356 Speaker Assembly To remove the Speaker Assembly, complete the following steps: 1. Prepare the Notebook for disassembly (pg 4). 2. Remove the cosmetic side covers (pg 7). 3. Remove the speaker port covers (pg 8). 4. Remove the Modem/Memory Access Door (pg 9). 5. Remove the Internet Button Board cover (pg 23). 6. Remove the keyboard (pg 25). 7.
Presario 1400 Series Model XL240, XL241, XL242, XL244, XL245, XL246, XL247, XL250, XL340, XL341, XL342, XL343, XL344, XL345, XL346, XL350, XL352, XL355, and XL356 13. Lift and remove the Speaker Assembly from the chassis. To replace the Speaker Assembly, reverse the procedure.
Presario 1400 Series Model XL240, XL241, XL242, XL244, XL245, XL246, XL247, XL250, XL340, XL341, XL342, XL343, XL344, XL345, XL346, XL350, XL352, XL355, and XL356 System Board To remove the system board, complete the following steps: 1. Prepare the Notebook for disassembly (pg 4). 2. Remove the cosmetic side covers (pg 7). 3. Remove the speaker port covers (pg 8). 4. Remove the modem/memory access door (pg 9). 5. Remove the CD drive (pg 12). 6. Remove the hard drive (pg 14). 7.
Presario 1400 Series Model XL240, XL241, XL242, XL244, XL245, XL246, XL247, XL250, XL340, XL341, XL342, XL343, XL344, XL345, XL346, XL350, XL352, XL355, and XL356 1 from two Hard Drive Rails. Remove both Hard Drive Rails 2 from the system board. 17. Remove four screws 18.
Presario 1400 Series Model XL240, XL241, XL242, XL244, XL245, XL246, XL247, XL250, XL340, XL341, XL342, XL343, XL344, XL345, XL346, XL350, XL352, XL355, and XL356 19. Remove six 5mm standoffs 20. Lift system board 1 from system board. 2 from chassis. Note: Illustrations may show a fewer number of standoffs removed. It is necessary to remove only the parts listed in the written procedure. To replace the system board, reverse the procedure.
Presario 1400 Series Model XL240, XL241, XL242, XL244, XL245, XL246, XL247, XL250, XL340, XL341, XL342, XL343, XL344, XL345, XL346, XL350, XL352, XL355, and XL356 Processor To remove the processor, complete the following steps: 1. Prepare the Notebook for disassembly (pg 4). 2. Remove the cosmetic side covers (pg 7). 3. Remove the Internet Button Board cover (pg 23). 4. Remove the PCA Button Board (pg 26). 5. Remove the keyboard (pg 25). 6. Remove MP3 Zone Cover (pg 29). 7. Remove the heatspreader (pg 30).
Presario 1400 Series Model XL240, XL241, XL242, XL244, XL245, XL246, XL247, XL250, XL340, XL341, XL342, XL343, XL344, XL345, XL346, XL350, XL352, XL355, and XL356 9. Shift with the flat end of screwdriver to the side in the slot unlock the processor. 10. Lift the processor 1 that reads “OPEN” to 2 from the chassis. Note: The bottom of the processor contains socket pins that can be easily damaged if not properly removed or installed.
Presario 1400 Series Model XL240, XL241, XL242, XL244, XL245, XL246, XL247, XL250, XL340, XL341, XL342, XL343, XL344, XL345, XL346, XL350, XL352, XL355, and XL356 Replacing the Processor To replace the processor, complete the following procedure: 1. Place the processor triangle 3. 2 on the connectors correctly aligning the gold triangle with the silver 2. Shift with the flat end of a screwdriver, to the side in the slot the processor.
Presario 1400 Series Model XL240, XL241, XL242, XL244, XL245, XL246, XL247, XL250, XL340, XL341, XL342, XL343, XL344, XL345, XL346, XL350, XL352, XL355, and XL356 Parts Catalog This section provides illustrations of the spare for the Compaq Presario 1400 Series Notebook Computer and identifies the spare part ordering number and availability of each item. Illustrated Parts The Notebook serial number should be provided to Compaq whenever requesting information or ordering spare parts.
Presario 1400 Series Model XL240, XL241, XL242, XL244, XL245, XL246, XL247, XL250, XL340, XL341, XL342, XL343, XL344, XL345, XL346, XL350, XL352, XL355, and XL356 System Unit No. Description 1 Keyboard 2 Palmrest Cover with TouchPad and Button Board 3 Speakers with Conductive 4 Battery Packs 5 Enclosure Base To order parts, refer to Part Numbers & Availability shown later in this chapter.
Presario 1400 Series Model XL240, XL241, XL242, XL244, XL245, XL246, XL247, XL250, XL340, XL341, XL342, XL343, XL344, XL345, XL346, XL350, XL352, XL355, and XL356 Boards No. Description 1 Memory 2 Processor 3 RJ11 Connector Board 4 Modems K-56K Mini 5 Hard Drive 6 Internet Board 7 Heatspreader with Fan Assembly 8 Audio Board 9 System Board To order parts, refer to Part Numbers & Availability shown later in this chapter.
Presario 1400 Series Model XL240, XL241, XL242, XL244, XL245, XL246, XL247, XL250, XL340, XL341, XL342, XL343, XL344, XL345, XL346, XL350, XL352, XL355, and XL356 Display Assembly Description Display Panel Assembly To order parts, refer to Part Numbers & Availability shown later in this chapter.
Presario 1400 Series Model XL240, XL241, XL242, XL244, XL245, XL246, XL247, XL250, XL340, XL341, XL342, XL343, XL344, XL345, XL346, XL350, XL352, XL355, and XL356 Mass Storage Devices Spare Part Items No. Description 1 1.44MB Diskette Drive 2 Hard Drive 3 DVD-ROM Drive 4 24X CD-ROM Drive To order parts, refer to Part Numbers & Availability shown later in this chapter.
Presario 1400 Series Model XL240, XL241, XL242, XL244, XL245, XL246, XL247, XL250, XL340, XL341, XL342, XL343, XL344, XL345, XL346, XL350, XL352, XL355, and XL356 Miscellaneous Hardware Kit Spare Part Items Description Miscellaneous Hardware Kit 1 Left Hard Drive Rail 2 Right Hard Drive Rail To order parts, refer to Part Numbers & Availability shown later in this chapter.
Presario 1400 Series Model XL240, XL241, XL242, XL244, XL245, XL246, XL247, XL250, XL340, XL341, XL342, XL343, XL344, XL345, XL346, XL350, XL352, XL355, and XL356 Miscellaneous Parts Spare Part Items Description AC Adapter To order parts, refer to Part Numbers & Availability shown later in this chapter.
Presario 1400 Series Model XL240, XL241, XL242, XL244, XL245, XL246, XL247, XL250, XL340, XL341, XL342, XL343, XL344, XL345, XL346, XL350, XL352, XL355, and XL356 Part Numbers & Availability This section is a comprehensive list of the parts associated with the 1400 Series Notebooks. It provides the part number, applicable model(s), and the availability of each item.
Presario 1400 Series Model XL240, XL241, XL242, XL244, XL245, XL246, XL247, XL250, XL340, XL341, XL342, XL343, XL344, XL345, XL346, XL350, XL352, XL355, and XL356 Alphabetical Spares Listing In this section, the following spare parts pertaining to the 1400 Series Notebooks are listed alphabetically. To find a part number, choose the letter that your spare part starts with from the alphabet index below (Example: choose “P” for Processor).
Presario 1400 Series Model XL240, XL241, XL242, XL244, XL245, XL246, XL247, XL250, XL340, XL341, XL342, XL343, XL344, XL345, XL346, XL350, XL352, XL355, and XL356 Spare Part Description Part Number Applicable Models Display Panel (12.1-in DSTN) 212783-001 CTO Display Panel (13.0-in STN) 201562-001 240, 241, 242, 244, CTO Display Panel (13.3-in TFT) 201563-001 245, 247, 250, CTO Display Panel (12.1-in TFT B0031) 221668-001 340, 352 Display Panel (13.
Presario 1400 Series Model XL240, XL241, XL242, XL244, XL245, XL246, XL247, XL250, XL340, XL341, XL342, XL343, XL344, XL345, XL346, XL350, XL352, XL355, and XL356 Spare Part Description Part Number Applicable Models Availability Keyboard (FR) 201795-051 242, 250, 355 Keyboard (IT) 201795-061 242, 250, 352, 355 Keyboard (DK) 201795-081 250, 355 Keyboard (NO) 201795-091 242, 250, 355 Keyboard (SE) 201795-101 242, 250, 355 Keyboard (LA) 201795-161 241, 341, 355 Keyboard (BEL) 201795-181
Presario 1400 Series Model XL240, XL241, XL242, XL244, XL245, XL246, XL247, XL250, XL340, XL341, XL342, XL343, XL344, XL345, XL346, XL350, XL352, XL355, and XL356 Spare Part Description Part Number Applicable Models Processors, PIII 600 MHz 256K Cache 159485-001 240, 241, 247, 250, CTO Processors, PIII 650 MHz 256K Cache 175308-001 345, CTO Processors, PIII 700 MHz 256K Cache 221415-001 342, 350 Return Kit 293799-001 All, CTO Speakers with Conductive 197597-001 All, CTO System Board (I/O