Presario 1800 Series Models: XL180, XL181, XL182, XL183, XL185, and XL190, XL191, XL192 Before You Begin Notice The information in this guide is subject to change without notice. COMPAQ COMPUTER CORPORATION SHALL NOT BE LIABLE FOR TECHNICAL OR EDITORIAL ERRORS OR OMISSIONS CONTAINED HEREIN, NOR FOR INCIDENTAL OR CONSEQUENTIAL DAMAGES RESULTING FROM THE FURNISHING, PERFORMANCE, OR USE OF THIS MATERIAL. This guide contains information protected by copyright.
Presario 1800 Series Models: XL180, XL181, XL182, XL183, XL185, and XL190, XL191, XL192 Preface This Maintenance and Service Guide is a troubleshooting guide that is used as a reference guide when servicing the Compaq Presario 1800 Series Notebook Computers. Compaq Computer Corporation reserves the right to make changes to the Compaq Presario 1800 Series Notebooks without notice. Symbols The following words and symbols mark special messages throughout this guide.
Presario 1800 Series Models: XL180, XL181, XL182, XL183, XL185, and XL190, XL191, XL192 Serial Number The unit’s serial number 1 is required when requesting information or ordering spare parts. The serial number is located on the underside of the Notebook as shown below.
Presario 1800 Series Models: XL180, XL181, XL182, XL183, XL185, and XL190, XL191, XL192 4 BEFORE YOU BEGIN PRESARIO NOTEBOOK MAINTENANCE AND SERVICE GUIDE 1800 SERIES
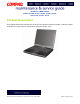
Presario 1800 Series Models: XL180, XL181, XL182, XL183, XL185, and XL190, XL191, XL192 Product Description This chapter describes the features of each of the Presario 1800XL models. It also provides illustrations of the exterior components unique to these units.
Presario 1800 Series Models: XL180, XL181, XL182, XL183, XL185, and XL190, XL191, XL192 Models and Features Compaq Presario 1800 Series Portable Notebook Computer Models Feature XL180 XL181 XL182 XL183 Display 15.0" TFT 15.0" TFT 15.0" TFT 15.0" TFT Processor PIII 600MHz, 256 Cache PIII 500 MHz, 256 Cache PIII 600 MHz, 256 Cache PIII 600 MHz, 256 Cache Hard Drive 6.0 GB 12.0 GB 12.0 GB 12.0 GB CD or DVD Drive 6X DVD Drive 6X DVD Drive 6X DVD Drive 6X DVD Drive Modem 56.
Presario 1800 Series Models: XL180, XL181, XL182, XL183, XL185, and XL190, XL191, XL192 Front of Unit # 1 2 3 4 5 Description # Description Keyboard 6 7 8 9 TouchPad - Model Number Display Release Latches Display Power (On/Off) Button PRESARIO NOTEBOOK MAINTENANCE AND SERVICE GUIDE 1800 SERIES Integrated Speakers Left TouchPad Button Scroll Up/Down Button Right TouchPad Button PRODUCT DESCRIPTION 3
Presario 1800 Series Models: XL180, XL181, XL182, XL183, XL185, and XL190, XL191, XL192 Internet Zone Buttons and Lights # Description # Description 1 AC Adapter Light 2 Caps Lock Light 7 Instant Search 8 Online Marketplace (US/Puerto Rico) 3 Instant Internet Access 9 Retail Central (US/Puerto Rico) 4 Instant E-mail Access - Num Lock Light 5 My Presario Instant Access q Scroll Lock Light Instant Answer (outside US) Instant E-Commerce (outside US) 6 Power Button 4 PRODUCT DESCRIPTION PRESAR
Presario 1800 Series Models: XL180, XL181, XL182, XL183, XL185, and XL190, XL191, XL192 Front Bezel Components # 1 2 3 4 Description # Description Sleep Status Icon 7 Battery Gauge 8 DisqPlay On/Off Button 9 Volume Down Button Power Status Icon - Volume Up Button Previous Track Button Next Track Button 5 Battery Charging Status q Play/Pause Button 6 DisqPlay Status Icon w Stop Button Icon PRESARIO NOTEBOOK MAINTENANCE AND SERVICE GUIDE 1800 SERIES PRODUCT DESCRIPTION 5
Presario 1800 Series Models: XL180, XL181, XL182, XL183, XL185, and XL190, XL191, XL192 Right-Side Components # 1 2 3 4 6 PRODUCT DESCRIPTION Description Battery Compartment PC Card Eject Button PC Card Slot # Description 5 Microphone Jack 6 Modem Port 7 Ethernet Port Headphone Jack PRESARIO NOTEBOOK MAINTENANCE AND SERVICE GUIDE 1800 SERIES
Presario 1800 Series Models: XL180, XL181, XL182, XL183, XL185, and XL190, XL191, XL192 Left-Side Components # Description 1 Security Slot 2 CD or DVD Drive 3 CD/DVD Drive Eject Button # Description 4 CD or DVD Manual Eject Hole 5 Diskette Drive 6 Diskette Drive Eject Button PRESARIO NOTEBOOK MAINTENANCE AND SERVICE GUIDE 1800 SERIES PRODUCT DESCRIPTION 7
Presario 1800 Series Models: XL180, XL181, XL182, XL183, XL185, and XL190, XL191, XL192 Underneath the Unit # Description 1 Stand Feet 2 Serial Number 8 PRODUCT DESCRIPTION # Description 3 Memory Compartment 4 Stand Feet PRESARIO NOTEBOOK MAINTENANCE AND SERVICE GUIDE 1800 SERIES
Presario 1800 Series Models: XL180, XL181, XL182, XL183, XL185, and XL190, XL191, XL192 Rear Connectors # 1 2 3 4 5 Description Keyboard/Mouse Port AC Adapter Connector Parallel Port QuikDock Connector # 6 7 8 9 Description TV Out Connector External Monitor Port Serial Ports Universal Serial Bus Port Fan Vent PRESARIO NOTEBOOK MAINTENANCE AND SERVICE GUIDE 1800 SERIES PRODUCT DESCRIPTION 9
Presario 1800 Series Models: XL180, XL181, XL182, XL183, XL185, and XL190, XL191, XL192 QuikDock Components # Description 1 QuikDock Interface Connector 2 QuikDock Guide Posts QuikDock Connectors # Description # Description 1 Universal Serial Bus Port 2 Universal Serial Bus Port 3 Power (AC Adapter) 8 Serial Port 9 External Monitor Port - 10/100TX Ethernet 4 5 6 7 q S Video w (Composite) TV Out e Audio Out Connector 10 PRODUCT DESCRIPTION Keyboard/Mouse Port Keyboard/Mouse Port Parallel Port
Presario 1800 Series Models: XL180, XL181, XL182, XL183, XL185, and XL190, XL191, XL192 Specifications Physical and Environmental Specification U.S. Metric Height Depth Width 1.63 in 12.99 in 11.02 in 4.14 cm 33.00 cm 28.00 cm Weight with 14.1" TFT Display with 15.0" Display 7.8 lbs 3.54 kg Battery Pack Power Requirements Nominal Operating Maximum Average Peak Operating Li-ion 3.2 AHr W @ 14.8 V W @ 14.8 V W @ 14.
Presario 1800 Series Models: XL180, XL181, XL182, XL183, XL185, and XL190, XL191, XL192 System Interrupts Hardware System Function IRQ Hardware System Function IRQ IRQ0 System Timer IRQ10 Available IRQ1 Standard 101/102-Key or Microsoft Natural Keyboard IRQ11 Intel (R) Pro/100S Mobile LAN on Motherboard IRQ2 Programmable Interrupt Controller IRQ11 Texas Instruments PCI-1410 CardBus Controller IRQ3 Lucent 56K V.
Presario 1800 Series Models: XL180, XL181, XL182, XL183, XL185, and XL190, XL191, XL192 System I/O Address I/O Address System Function (Shipping Configuration) 0000h - 000Fh Direct Memory Access Controller 0020h - 0021h Programmable Interrupt Controller 0040h - 0043h System Timer 0060h - 0060h Standard 101/102-Key or Microsoft Natural Keyboard 0061h - 0061h System Speaker 0062h - 0062h ACPI Embedded Controller 0064h - 0064h Standard 101/102-Key or Microsoft Natural Keyboard 0066h - 0066h A
Presario 1800 Series Models: XL180, XL181, XL182, XL183, XL185, and XL190, XL191, XL192 I/O Address System Function (Shipping Configuration) 03F8h - 03FFh Communications Port (COM1) 04D0h -04D1h Motherboard Resources 0CF8h - 0CFFh PCI Bus 1000h - 10FFh Lucent 56K V.
Presario 1800 Series Models: XL180, XL181, XL182, XL183, XL185, and XL190, XL191, XL192 Memory Address System Function F4101000h-F41010FFh Lucent 56K V.
Presario 1800 Series Models: XL180, XL181, XL182, XL183, XL185, and XL190, XL191, XL192 Memory Expansion Memory Expansion System Memory Expansion Board Memory Total Memory 64 MB none 64 MB 64 MB 32 MB 96 MB 64 MB 64 MB 128 MB 64 MB 128 MB 192 MB 64 MB 256 MB 320 MB Diskette Drive Diskette Drive Capacity per Diskette (High/Low) 1.44Mb/720 Kb Diskette Size 3.
Presario 1800 Series Models: XL180, XL181, XL182, XL183, XL185, and XL190, XL191, XL192 Hard Drive Hard Drives Specification 6.0 GB 12.0 GB 18.0 GB Drive Type Ultra DMA 66.7 Ultra DMA 66.7 Ultra DMA 66.7 Cylinders Heads Sectors per Track Bytes per Sector 15200 2 63 512 15200 4 63 512 15200 6 63 512 Seek Times (typical) Read/Write (incl. settling) Single track Full stroke 13 ms 3 ms 24 ms 13 ms 3 ms 24 ms 13 ms 3 ms 24 ms Transfer Rate at Interface Ultra DMA mode (max) PIO mode 66.7 Mb/s 16.
Presario 1800 Series Models: XL180, XL181, XL182, XL183, XL185, and XL190, XL191, XL192 Battery Pack Battery Pack Type Lithium Ion (Li-Ion) Height Length Width 0.8 in (20.3 mm) 5.7 in (145 mm) 3.1 in (78.7 mm) Weight 0.90 lb (408.2 g) Discharge/Use Limit* 2 hr 30 min* Energy Circuit Voltage Capacity Power 14.4 V 3000 mAH 43.
Presario 1800 Series Models: XL180, XL181, XL182, XL183, XL185, and XL190, XL191, XL192 Connector Pin Assignments This chapter provides the pin assignments for Presario 1800 Series Notebook connectors. For more information on connectors or external ports, refer to Rear Connectors and QuikDock Connectors. Note: The signals in all tables of this chapter are considered active high unless otherwise indicated by an asterisk (*).
Presario 1800 Series Models: XL180, XL181, XL182, XL183, XL185, and XL190, XL191, XL192 Serial Connector Pin Signal Pin Signal 1 Carrier Detect 6 Data Set Ready 2 Receive Data 7 Ready to Send 3 Transmit Data 8 Clear to Send 4 Data Terminal Ready 9 Ring Indicator 5 Signal Ground Keyboard/Mouse Connector Pin Signal Pin Signal 1 Data 1 4 +5 V 2 Data 2 5 Clock 1 3 Ground 6 Clock 2 2 CONNECTOR PIN ASSIGNMENTS PRESARIO NOTEBOOK MAINTENANCE AND SERVICE GUIDE 1800 SERIES
Presario 1800 Series Models: XL180, XL181, XL182, XL183, XL185, and XL190, XL191, XL192 Modem Connector Pin Signal Pin Signal 1 Unused 4 Unused 2 Tip 5 Unused 3 Ring 6 Unused Game Port Connector Pin Signal Pin Signal 1 +5V 9 +5V 2 SWA 10 SWC 3 RBTA 11 RBTC 4 GND 12 RMSO 5 GND 13 RBTD 6 RBTB 14 SWD 7 SWB 15 RMSI 8 +5V PRESARIO NOTEBOOK MAINTENANCE AND SERVICE GUIDE 1800 SERIES CONNECTOR PIN ASSIGNMENTS 3
Presario 1800 Series Models: XL180, XL181, XL182, XL183, XL185, and XL190, XL191, XL192 External VGA Monitor Port Pin Signal Pin Signal 1 Red Analog 9 +5V 2 Green Analog 10 Ground 3 Blue Analog 11 Monitor Detect 4 Not connected 12 DDC2B Data 5 Ground 13 Horizontal Sync 6 Ground Analog 14 Vertical Sync 7 Ground Analog 15 DDC2B Clock 8 Ground Analog S-Video Connector Pin Signal Pin Signal 1 Ground 3 SYR 2 Ground 4 SCG 4 CONNECTOR PIN ASSIGNMENTS PRESARIO NOTEBOO
Presario 1800 Series Models: XL180, XL181, XL182, XL183, XL185, and XL190, XL191, XL192 TV Out Connector Pin Signal Pin Signal 1 Ground 3 2 Composite Ground Univeral Serial Bus (USB) Pin Signal Pin Signal 1 +5V 3 Data + 2 Data - 4 Ground PRESARIO NOTEBOOK MAINTENANCE AND SERVICE GUIDE 1800 SERIES CONNECTOR PIN ASSIGNMENTS 5
Presario 1800 Series Models: XL180, XL181, XL182, XL183, XL185, and XL190, XL191, XL192 QuikDock Connector Pin Signal Pin Signal 1 Adapter Power 22 Serial Port DCD 43 Keyboard Clock 64 MIDI Output 2 Adapter Power 23 Serial Port DSR 44 Keyboard Data 65 Headphone Sense 3 Adapter Power 24 Serial Port TXD 45 Mouse Clock 66 USB Power 4 Adapter Power 25 Serial Port RTS 46 Mouse Data 67 USB Power 5 Adapter Power 26 Monitor DDC 47 Lp Select 68 USB Power 6 Adapter Power 2
Presario 1800 Series Models: XL180, XL181, XL182, XL183, XL185, and XL190, XL191, XL192 Battery and Power Management This chapter describes power management and proper battery operating practices for Presario 1800XL Notebooks. These practices include conservation of AC power and extending the operating life of the battery. The following sections also outline proper methods to startup and shutdown the Notebook in various situations.
Presario 1800 Series Models: XL180, XL181, XL182, XL183, XL185, and XL190, XL191, XL192 Full Off Off mode consumes no power. However, the battery charges while the Notebook is in Off mode if the battery is installed and the Notebook remains plugged into external AC power. Note: Unsaved information is lost if the Notebook is shutdown without saving the data. To activate Off mode, click the Start button on the Windows taskbar, click Shut Down, and then select shutdown from the options.
Presario 1800 Series Models: XL180, XL181, XL182, XL183, XL185, and XL190, XL191, XL192 Power Settings Power management can be initiated based on the amount of time passed since the last system activity. System activity includes keyboard strokes, mouse movement, CD/DVD playback, or modem use. Power Schemes Differing patterns of Notebook use determine the level of power management needed. Power management settings can be selected using several predefined Power Schemes.
Presario 1800 Series Models: XL180, XL181, XL182, XL183, XL185, and XL190, XL191, XL192 Alarms The Notebook can be set to alarm when the battery power level is reduced or when it reaches a critically low level. The Notebook can also be set to enter a low-power mode when the battery reaches a specific power level. Ä CAUTION: The settings on the Alarms tab are preset for the Notebook to run at its best. Changing any of these settings could cause the Notebook to function improperly.
Presario 1800 Series Models: XL180, XL181, XL182, XL183, XL185, and XL190, XL191, XL192 Rebooting After a Lockup To reboot the Notebook when the keyboard is frozen or the screen is locked, press and hold down the Power button for at least four seconds; this causes a Manual Shutdown. Then, restart the Notebook with a single press of the Power button.
Presario 1800 Series Models: XL180, XL181, XL182, XL183, XL185, and XL190, XL191, XL192 Increasing Battery-Operating Life Battery pack operating life is affected by several variables.
Presario 1800 Series Models: XL180, XL181, XL182, XL183, XL185, and XL190, XL191, XL192 Conditioning a Battery Pack Ä CAUTION: To avoid a loss of data, ensure that all information is saved before completely discharging the battery pack. To condition a battery pack, complete the following steps: 1. Plug in the AC adapter and allow the battery to charge until the fast charge arrow on the status display disappears. The battery gauge may read 100% for a period of time before the arrow disappears.
Presario 1800 Series Models: XL180, XL181, XL182, XL183, XL184, XL185, and XL190, XL191, XL192 Troubleshooting This section covers troubleshooting and resolving common problems associated with Compaq Presario 1800 Series Notebook Computers. The basic steps in troubleshooting include: 1. Preparing the Notebook for troubleshooting as outlined in Preliminary Steps on the following page 2.
Presario 1800 Series Models: XL180, XL181, XL182, XL183, XL184, XL185, and XL190, XL191, XL192 Preliminary Steps Before running POST, complete the following steps: 1. If a power-on password is established, type the password and press the Enter key. If you do not know the password, clear the password (See Clearing the Power-On Password). 2. Run Compaq Diagnostics. 3. Turn off the Notebook and its external devices. 4. Disconnect any external devices that you do not want to test.
Presario 1800 Series Models: XL180, XL181, XL182, XL183, XL184, XL185, and XL190, XL191, XL192 Clearing the Power-On Password Ä CAUTION: Clearing the power-on password also removes all setup attributes that are programmed in the CMOS. If you do not know the power-on password, clear it by performing the following steps: 1. Turn off the computer. 2. Disconnect the power cord. 3. Remove the battery. 4. Remove the Palmrest cover. 5. Remove the keyboard. 6. Remove the Heatspreader. 7.
Presario 1800 Series Models: XL180, XL181, XL182, XL183, XL184, XL185, and XL190, XL191, XL192 Power-On Self Test (POST) To run POST, complete these steps: Turn off the Notebook, then turn it on again. As soon as the Compaq logo appears press the ESC key to display the POST messages as they occur. Remember any POST error codes that are displayed. If the Notebook does not beep, POST has successfully completed its test and detected no errors. The Notebook with automatically restart.
Presario 1800 Series Models: XL180, XL181, XL182, XL183, XL184, XL185, and XL190, XL191, XL192 XX000YZZ 201-Memory Error Probable Cause Recommended Action 1. Replace the memory modules. 2. Replace the system board. Memory failure 301-Keyboard Error Probable Cause Keyboard failure Recommended Action 1. Ensure the keys are not depressed during POST. 2. Reconnect the keyboard with the Notebook off. 3. Replace the keyboard.
Presario 1800 Series Models: XL180, XL181, XL182, XL183, XL184, XL185, and XL190, XL191, XL192 Compaq Diagnostics Compaq Diagnostics utilities come pre-installed on 1800XL Series Notebooks. Run the Diagnostic utilities to view or test system information and external devices. If Compaq Diagnostics is run from a diskette, ensure that the diagnostic program is version 10.11 or later.
Does the CPQ Diagnostics disk come with each new Notebook? Presario 1800 Series Models: XL180, XL181, XL182, XL183, XL184, XL185, and XL190, XL191, XL192 Checkup (TEST) Does Checkup also come pre-installed as mentioned on the previous page? Checkup is included on the Compaq Diagnostics Diskette. Checkup determines if the various Notebook components and devices are recognized by the system and are functioning properly. You can display, print, or save the information generated by Checkup.
Presario 1800 Series Models: XL180, XL181, XL182, XL183, XL184, XL185, and XL190, XL191, XL192 10. Follow the on-screen instructions as the devices are tested. When testing is complete, the Test Option menu is displayed. Does INSPECT also 11. Exit the Test Option and Diagnostics menus. come pre-installed as mentioned on the 1st page? View System Information (INSPECT) The INSPECT utility provides information about the Notebook and installed or connected devices.
Presario 1800 Series Models: XL180, XL181, XL182, XL183, XL184, XL185, and XL190, XL191, XL192 Diagnostic Error Codes Diagnostic error codes are displayed if the system recognizes a problem while running the Compaq Diagnostics program. These error codes help identify subassemblies that may be damaged or defective. The following tables list error codes, a description of the error condition, and the action required to resolve the error condition. Important: Retest the system after completing each step.
Presario 1800 Series Models: XL180, XL181, XL182, XL183, XL184, XL185, and XL190, XL191, XL192 Processor Test Error Codes Error Code Description Recommended Action 101-xx CPU test failed 102-xx Coprocessor or Weitek Error Replace the processor and retest. 1. Run the Configuration and Diagnostics utilities. 2. Replace the processor and retest. 103-xx DMA page registers test failed Replace the system board and retest.
Presario 1800 Series Models: XL180, XL181, XL182, XL183, XL184, XL185, and XL190, XL191, XL192 Keyboard Test Error Codes Error Code Description 300-xx Failed ID Test 301-xx Failed Self Test/Interface Test 302-xx Failed Individual Key Test 304-xx Failed Keyboard Repeat Test Recommended Action 1. Check the keyboard connection. If disconnected, turn off the Notebook and reconnect the keyboard. 2. Replace the keyboard and retest. 3. Replace the system board and retest.
Presario 1800 Series Models: XL180, XL181, XL182, XL183, XL184, XL185, and XL190, XL191, XL192 Diskette Drive Test Error Codes Error Code Description 600-xx Diskette ID drive types test failed 601-xx Diskette format failed 602-xx Diskette read test failed 603-xx Diskette write, read, compare test failed 604-xx Diskette random read test failed 605-xx Diskette ID media failed 606-xx Diskette speed test failed 609-xx Diskette reset controller test failed 610-xx Diskette change line test 69
Presario 1800 Series Models: XL180, XL181, XL182, XL183, XL184, XL185, and XL190, XL191, XL192 Hard Drive Test Error Codes Error Code Description 1701-xx Hard drive format test failed 1702-xx Hard drive read test failed 1703-xx Hard drive write/read/compare test failed 1704-xx Hard drive random seek test failed 1705-xx Hard drive controller test failed 1706-xx Hard drive ready test failed 1707-xx Hard drive recalibration test failed 1708-xx Hard drive format bad track test failed 1709-xx
Presario 1800 Series Models: XL180, XL181, XL182, XL183, XL184, XL185, and XL190, XL191, XL192 Video Test Error Codes Error Code Description 501-xx Video controller test failed 502-xx Video memory test failed 503-xx Video attribute test failed 504-xx Video character set test failed 505-xx Video 80 x 25 mode 9 x 14 character cell test failed 506-xx Video 80 x 25 mode 8 x 8 character cell test failed 507-xx Video 40 x 25 mode test failed 508-xx Video 320 x 200 mode color set 0 test failed 5
Presario 1800 Series Models: XL180, XL181, XL182, XL183, XL184, XL185, and XL190, XL191, XL192 Video Test Error Codes (Continued) Error Code Description 2402-xx Video memory test failed 2403-xx Video attribute test failed 2404-xx Video character set test failed 2405-xx Video 80 x 25 mode 9 x 14 character cell test failed 2406-xx Video 80 x 25 mode 8 x 8 character cell test failed 2408-xx Video 320 x 200 mode color set 0 test failed 2409-xx Video 320 x 200 mode color set 1 test failed 2410-x
Presario 1800 Series Models: XL180, XL181, XL182, XL183, XL184, XL185, and XL190, XL191, XL192 Video Test Error Codes (Continued) Error Code Description 2419-xx ECG/VGC ROM checksum test failed 2421-xx ECG/VGC 640 x 200 graphics mode test failed 2422-xx ECG/VGC 640 x 350 16 color set test failed 2423-xx ECG/VGC 640 x 350 64 color set test failed 2424-xx ECG/VGC monochrome text mode test failed 2425-xx ECG/VGC monochrome graphics mode test failed 2431-xx 640 x 480 graphics test failure 2432-
Presario 1800 Series Models: XL180, XL181, XL182, XL183, XL184, XL185, and XL190, XL191, XL192 Audio Test Error Codes Error Code Description Recommended Action 3206-xx Audio System Internal Error Replace the system board and retest. TouchPad Interface Test Error Codes Error Code Description 8601-xx Mouse test failed 8602-xx Interface test failed Recommended Action 1. Replace the TouchPad and retest. 2. Replace the system board and retest.
Presario 1800 Series Models: XL180, XL181, XL182, XL183, XL184, XL185, and XL190, XL191, XL192 Troubleshooting without Diagnostics This section provides information about how to identify and correct some common hardware, memory, and software problems. It also explains several types of common messages that may be displayed on the screen.
Presario 1800 Series Models: XL180, XL181, XL182, XL183, XL184, XL185, and XL190, XL191, XL192 Solving Minor Problems Some problems and possible solutions are outlined in the following tables. If the problem appears related to a software application, check the documentation provided with the software. Audio Solutions Some common audio problems and solutions are listed in the following table. Audio Problem Probable Cause Solution Notebook does not beep after the PowerOn Self-Test (POST).
Presario 1800 Series Models: XL180, XL181, XL182, XL183, XL184, XL185, and XL190, XL191, XL192 Battery Pack/Gauge Problem Probable Cause Notebook is beeping and battery icon is blinking. Battery charge is low. Immediately save any open file(s). Then complete one of the following: • Connect the Notebook to an external power source to charge the battery pack. • Turn off the Notebook or initiate Hibernation until you can find another power source or charge the battery pack.
Presario 1800 Series Models: XL180, XL181, XL182, XL183, XL184, XL185, and XL190, XL191, XL192 Battery Pack/Gauge Problem Probable Cause Solution(s) Power management is disabled. Set a power management level in Setup. An external device or PC Card is draining the battery. Turn off or disconnect external devices when not in use. Battery pack is warm to the touch after charging. Normal warming has occurred due to charging. No action is required.
Presario 1800 Series Models: XL180, XL181, XL182, XL183, XL184, XL185, and XL190, XL191, XL192 CD and DVD Drive Solutions Some common causes and solutions for CD and DVD drive problems are listed in the following table. CD or DVD Drive Problem Probable Cause Solution(s) CD or DVD drive cannot read a Compact Disc or Digital Versatile Disc. Disc is upside down or is improperly inserted in the CD or DVD drive. Open the loading tray, lay the compact disc in it (label side up), then close the tray.
Presario 1800 Series Models: XL180, XL181, XL182, XL183, XL184, XL185, and XL190, XL191, XL192 Diskette Drive Problem Probable Cause Solution(s) Diskette drive cannot read a diskette. Diskette is not formatted. Format the diskette. At the system prompt, enter FORMAT A: Cannot boot from diskette. Bootable diskette is not in drive A. Put the bootable diskette in drive A. Diskette Boot has incorrect setting in Setup. Run Setup and set diskette as first to boot.
Presario 1800 Series Models: XL180, XL181, XL182, XL183, XL184, XL185, and XL190, XL191, XL192 Display Problem Probable Cause Solution(s) Screen is blank. Display has overheated. If the Notebook is in direct sunlight, move it and allow it to cool off. Display is blank and the Standby icon is flashing. System is in Standby mode. Press any key or touch the TouchPad. Notebook display is blank and the screen on an external monitor displays information.
Presario 1800 Series Models: XL180, XL181, XL182, XL183, XL184, XL185, and XL190, XL191, XL192 Display (Continued) Problem Probable Cause Backlight (brightness) cannot be adjusted with Fn+F7 or Fn+F8. Improper display cable connections. Solution(s) 1. Reseat the display cable to the system board. 2. Replace the display assembly. Defective inverter board. Replace the display assembly. Defective display cable. Replace the display assembly. Defective system board. Replace the system board.
Presario 1800 Series Models: XL180, XL181, XL182, XL183, XL184, XL185, and XL190, XL191, XL192 Hard Drive Solutions Some common causes and solutions for hard drive problems are listed in the following table. Ä CAUTION: To prevent loss of information, always maintain an up-to-date backup of your hard drive in case of errors or failures. Hard Drive Problem Probable Cause Solution(s) Reading hard drive takes an unusually long time after restarting the Notebook.
Presario 1800 Series Models: XL180, XL181, XL182, XL183, XL184, XL185, and XL190, XL191, XL192 Keyboard/Numeric Keypad Solutions Some common causes and solutions for keyboard/numeric keypad problems are listed in the following table. Keyboard/Numeric Keypad Problem Probable Cause Solution(s) Embedded numberic keypad on Notebook keyboard is disabled. Num Lock function is not enabled. Press the Shift+NumLk keys to enable the Num Lock function and embedded numberic keypad.
Presario 1800 Series Models: XL180, XL181, XL182, XL183, XL184, XL185, and XL190, XL191, XL192 PC Card Solutions The following table lists some common causes and solutions for PC Card problems. PC Card Problem Probable Cause Solution(s) When turned on, the Notebook does not beep when a PC Card is inserted. Card is not inserted properly. Ensure that the card is inserted in the correct orientation. PC Card beeps are disabled.
Presario 1800 Series Models: XL180, XL181, XL182, XL183, XL184, XL185, and XL190, XL191, XL192 PC Card Problem Modem netword PC Card does not work. Memory or storage PC Card does not work. Probable Cause Solution(s) The card is not supported. Use supported cards only. Network driver is not installed or is not set up properly. Install driver. Telephone cord is not properly connected. Verify telephone connection. SRAM and flash memory cards require the memory card driver (loaded and enabled).
Presario 1800 Series Models: XL180, XL181, XL182, XL183, XL184, XL185, and XL190, XL191, XL192 Power Solutions See also Battery Pack/Gauge Solutions in this chapter. Power Problem Probable Cause Solution(s) Notebook will not turn on and the battery pack is not inserted. Notebook is not connected to a power source. Insert battery or connect an external power source. Power cords to the external power source are unplugged.
Presario 1800 Series Models: XL180, XL181, XL182, XL183, XL184, XL185, and XL190, XL191, XL192 Printer Solutions If you experience problems printing, run a printer self-test. Refer to the documentation provided with the printer for instructions. If the self-test fails, the problem is associated with the printer, not the Notebook. To diagnose other printing problems, refer to the printing section of the application documentation. Printer Problem Probable Cause Solution(s) Printer will not turn on.
Presario 1800 Series Models: XL180, XL181, XL182, XL183, XL184, XL185, and XL190, XL191, XL192 TouchPad/Pointing Device Solutions The following table lists some common causes and solutions for TouchPad/pointing device problems. TouchPad/Pointing Device Problem Probable Cause Solution(s) TouchPad or mouse does not work. Incorrect or no device driver is installed. Install the device driver and add to the AUTOEXEC.BAT file or CONFIG.SYS file. The device driver is not installed in Windows.
Presario 1800 Series Models: XL180, XL181, XL182, XL183, XL184, XL185, and XL190, XL191, XL192 Contacting Compaq Support Customers should provide the following information when contacting Compaq Reseller Support: • Product name • Product serial number • Purchase date • Conditions under which the problem occurred • Any error messages that have occurred • Hardware configuration • Type of printer connected • Hardware/software installed • Printed result of Checkup (TEST) • Printed copies of
Presario 1800 Series Models: XL180, XL181, XL182, XL183, XL185, and XL190, XL191, XL192 Removal and Replacement This chapter details removing and replacing each component of the Presario 1800XL units. Electrostatic Discharge When removing or replacing parts, be careful to discharge static electricity before touching the Notebook’s internal components. A sudden discharge of static electricity from a finger or other conductor can destroy static-sensitive devices and microcircuitry.
Presario 1800 Series Models: XL180, XL181, XL182, XL183, XL185, and XL190, XL191, XL192 Tool and Software Requirements The following items are required to service the Notebook: • Torx T-8 screwdriver • 5mm nut drivers (for screwlocks and standoffs) • Small standard screwdriver • Small Phillips screwdriver • Diagnostics software Screws The screws used in the Notebook are not interchangeable. If an incorrect screw is used during the reassembly process, it can damage the unit.
Presario 1800 Series Models: XL180, XL181, XL182, XL183, XL185, and XL190, XL191, XL192 ZIF Connector The 1800XL Series Notebooks use zero insertion force (ZIF) connectors on the system board. Ä CAUTION: A ZIF connector and its attached cable can be easily damaged. Handle only the connector slide when removing or replacing a cable. Never pull or twist on the cable while it is connected.
Presario 1800 Series Models: XL180, XL181, XL182, XL183, XL185, and XL190, XL191, XL192 Cables Most cables used throughout the unit are ribbon cables. Cables must be handled with extreme care to avoid damage. Use the following precautions when handling cables to avoid damage to the cable and Notebook: • Always handle cables by their connectors. • In all cases, avoid bending, twisting, pulling, or tearing cables. • Apply only the minimum force required to seat or unseat cables from their connectors.
Presario 1800 Series Models: XL180, XL181, XL182, XL183, XL185, and XL190, XL191, XL192 Hard Drive Ribbon Cable The position for the hard drive ribbon cable is shown below. Ä CAUTION: When servicing the Notebook, ensure that cables are placed in their proper location during the reassembly process. Improper cable placement can damage the Notebook.
Presario 1800 Series Models: XL180, XL181, XL182, XL183, XL185, and XL190, XL191, XL192 CD/DVD Ribbon Cable The ribbon cable position for the CD or DVD drive is shown below. Ä CAUTION: When servicing the Notebook, ensure that cables are placed in their proper location during the reassembly process. Improper cable placement can damage the Notebook.
Presario 1800 Series Models: XL180, XL181, XL182, XL183, XL185, and XL190, XL191, XL192 Diskette Drive Ribbon Cable The ribbon cable position for the diskette drive is shown below. Ä CAUTION: When servicing the Notebook, ensure that cables are placed in their proper location during the reassembly process. Improper cable placement can damage the Notebook.
Presario 1800 Series Models: XL180, XL181, XL182, XL183, XL185, and XL190, XL191, XL192 Speaker Assembly Cable The cable position for the speaker assembly is shown below. The cable is routed under the battery charger (voltage converter) board and under the edge of the system board. Ä CAUTION: When servicing this Notebook, ensure that cables are placed in their proper location during the reassembly process. Improper cable placement can damage the Notebook.
Presario 1800 Series Models: XL180, XL181, XL182, XL183, XL185, and XL190, XL191, XL192 Modem Cable The cable position for the modem is shown below. Ä CAUTION: When servicing the Notebook, ensure that cables are placed in their proper location during the reassembly process. Improper cable placement can damage the Notebook.
Presario 1800 Series Models: XL180, XL181, XL182, XL183, XL185, and XL190, XL191, XL192 Keyboard Ribbon Cable The ribbon cable position for the keyboard is shown below. Ä CAUTION: When servicing this Notebook, ensure that cables are placed in their proper location during the reassembly process. Improper cable placement can damage the Notebook.
Presario 1800 Series Models: XL180, XL181, XL182, XL183, XL185, and XL190, XL191, XL192 Preparing the Notebook for Disassembly Before beginning the removal or replacement of any Notebook components, complete the following steps: 1. Disconnect the AC power source and any external devices. 2. Remove the QuikDock (pg 12). 3. Remove any PC Cards. 4. Remove the battery pack (pg 13). Important: The battery pack should be removed before performing any internal maintenance on the Notebook.
Presario 1800 Series Models: XL180, XL181, XL182, XL183, XL185, and XL190, XL191, XL192 Disconnecting the QuikDock To disconnect the Notebook from the QuikDock, perform the following steps: 1. Lift up the handle 1 on top of the QuikDock. 2. Lift the Notebook 2 straight up.
Presario 1800 Series Models: XL180, XL181, XL182, XL183, XL185, and XL190, XL191, XL192 Removing the Battery To remove the battery pack, complete the following steps: 1. Slide the battery compartment door down 2. Pull the battery 1 and remove it from the chassis. 2 from the chassis by the tab located on the end of the battery pack. To replace the battery, reverse these procedures. Important: The battery pack should be removed before performing any internal maintenance on the Notebook.
Presario 1800 Series Models: XL180, XL181, XL182, XL183, XL185, and XL190, XL191, XL192 Removing the Palmrest Cover with TouchPad Note: It is not necessary to remove the display panel assembly to access the interior components of the Notebook. To remove the Palmrest cover with TouchPad, complete the following steps: 1. Prepare the Notebook for disassembly (pg 11). 2. Close the display and turn the Notebook upside down. 3. Remove five screws from the underside of the Notebook. Continued on the next page.
Presario 1800 Series Models: XL180, XL181, XL182, XL183, XL185, and XL190, XL191, XL192 4. Turn the Notebook over (right side up). 5. Pull the display release latches and open the display. 6. Lift up the front end of the Palmrest cover and remove it from the groove in the chassis. Continued on the next page.
Presario 1800 Series Models: XL180, XL181, XL182, XL183, XL185, and XL190, XL191, XL192 7. Disconnect the flex cable from the ZIF Connector on the DisqPlay module. To replace the Palmrest cover, reverse these procedures.
Presario 1800 Series Models: XL180, XL181, XL182, XL183, XL185, and XL190, XL191, XL192 Removing the Keyboard To remove the keyboard, complete the following steps: 1. Prepare the Notebook for disassembly (pg 11). 2. Remove the Palmrest cover with TouchPad (pg 14). 3. Gently lift 1 up the front of the keyboard and disconnect 2 the flex cable from the ZIF Connector on the system board and remove the keyboard. To replace the keyboard, reverse these procedures.
Presario 1800 Series Models: XL180, XL181, XL182, XL183, XL185, and XL190, XL191, XL192 Removing the Internet Zone Cover (Status Panel Assembly) Note: Illustrations may show parts removed that are not part of this procedure. It is necessary to remove only the parts listed in the written procedure. To remove the Internet Zone cover, complete the following steps: 1. Prepare the Notebook for disassembly (pg 11). 2.
Presario 1800 Series Models: XL180, XL181, XL182, XL183, XL185, and XL190, XL191, XL192 3. Remove two innermost screws from the display hinges that secure the Internet Zone cover to the chassis. 4. Turn the unit upside down and remove the two screws located near the back of the Notebook that secure the Internet Zone cover to the chassis. Continued on the next page.
Presario 1800 Series Models: XL180, XL181, XL182, XL183, XL185, and XL190, XL191, XL192 5. Turn the unit over (right side up) and open the display. 6. Lift up one corner of the Internet Zone cover, 1 push forward from the back (center piece) to release the snaps on the Internet Zone cover, and 2 remove from the chassis. To replace the status panel assembly, reverse these procedures.
Presario 1800 Series Models: XL180, XL181, XL182, XL183, XL185, and XL190, XL191, XL192 Removing the Internet Button Board Note: Illustrations may show parts removed that are not part of this procedure. It is necessary to remove only the parts listed in the written procedure. To remove the Internet button board, complete the following steps: 1. Prepare the Notebook for disassembly (pg 11). 2. Remove the Internet Zone Cover (pg 18). 3.
Presario 1800 Series Models: XL180, XL181, XL182, XL183, XL185, and XL190, XL191, XL192 4. Remove two screws securing the Internet button board and remove from the chassis. To replace the Internet button board, reverse these procedures.
Presario 1800 Series Models: XL180, XL181, XL182, XL183, XL185, and XL190, XL191, XL192 Removing the Heatspreader To remove the Heatspreader, complete the following steps: 1. Prepare the Notebook for disassembly (pg 11). 2. Remove the Palmrest cover with TouchPad (pg 14). 3. Remove the keyboard (pg 17). 4. Remove six screws from the Heatspreader and lift out of the chassis. To replace the Heatspreader, reverse these procedures.
Presario 1800 Series Models: XL180, XL181, XL182, XL183, XL185, and XL190, XL191, XL192 Removing the Modem To remove the modem, complete the following steps: 1. Prepare the Notebook for disassembly (pg 11). 2. Remove the Palmrest cover with TouchPad (pg 14). 3. Remove the keyboard (pg 17). 4. Remove the Internet Zone cover (pg 18). 5. Remove the Heatspreader (pg 23). 6. Remove three screws from the modem board and lift the modem off the connector on the system board. 7.
Presario 1800 Series Models: XL180, XL181, XL182, XL183, XL185, and XL190, XL191, XL192 Removing the Hard Drive Note: Illustrations may show parts removed that are not part of this procedure. It is necessary to remove only the parts listed in the written procedure. To remove the hard drive, complete the following steps: 1. Prepare the Notebook for disassembly (pg 11). 2. Remove the Palmrest cover with TouchPad (pg 14). 3. Remove three screws from the hard drive mounting bracket. 4.
Presario 1800 Series Models: XL180, XL181, XL182, XL183, XL185, and XL190, XL191, XL192 Removing the Hard Drive Mounting Brackets To remove the hard drive mounting brackets, remove two screws from each of side of the hard drive. To replace the hard drive and mounting brackets, reverse these procedures.
Presario 1800 Series Models: XL180, XL181, XL182, XL183, XL185, and XL190, XL191, XL192 Removing the DisqPlay Module Note: Illustrations may show parts removed that are not part of this procedure. It is necessary to remove only the parts listed in the written procedure. To remove the DisqPlay module, complete the following steps: 1. Prepare the Notebook for disassembly (pg 11). 2. Remove the Palmrest cover with TouchPad (pg 14). 3. Remove the hard drive (pg 25). 4.
Presario 1800 Series Models: XL180, XL181, XL182, XL183, XL185, and XL190, XL191, XL192 Removing the Processor To remove the processor, complete the following steps: 1. Prepare the Notebook for disassembly (pg 11). 2. Remove the Palmrest cover with TouchPad (pg 14). 3. Remove the keyboard (pg 17). 4. Remove the Heatspreader (pg 23). 5. If the processor matches the one shown below, proceed with step a below. If the processor does not match the one shown, skip step a and proceed with step b on the next page.
Presario 1800 Series Models: XL180, XL181, XL182, XL183, XL185, and XL190, XL191, XL192 b. With standard screwdriver, turn screw counter-clockwise toward “0” and lift processor from the chassis. To replace the processor, perform the following: 1. Fully align the processor connector with the system board connector. 2. Press down carefully on the processor directly over the connectors to seat the processor. 3. Reassemble the remaining subassemblies by reversing their removal procedures.
Presario 1800 Series Models: XL180, XL181, XL182, XL183, XL185, and XL190, XL191, XL192 Removing the CD/DVD Drive To remove the CD/DVD Drive, complete the following steps: 1. Prepare the Notebook for disassembly (pg 11). 2. Remove the Palmrest cover with TouchPad (pg 14). 3. Remove the keyboard (pg 17). 4. Remove the Heatspreader (pg 23). 5. Turn the Notebook over (upside down) and remove the two screws that secure the CD/DVD drive to the chassis. Continued on the next page.
Presario 1800 Series Models: XL180, XL181, XL182, XL183, XL185, and XL190, XL191, XL192 6. Turn the unit over (right side up) and remove the two screws located at the back of the CD/DVD drive. 7. Disconnect the CD/DVD drive cable and push forward from the back of the drive to slide the drive out of the chassis. To replace the CD/DVD drive, reverse these procedures.
Presario 1800 Series Models: XL180, XL181, XL182, XL183, XL185, and XL190, XL191, XL192 Removing the Display Panel Assembly Note: Illustrations may show parts removed that are not part of this procedure. It is necessary to remove only the parts listed in the written procedure. To remove the display panel assembly, complete the following steps: 1. Prepare the Notebook for disassembly (pg 11). 2. Remove the Internet Zone cover (pg 18). 3.
Presario 1800 Series Models: XL180, XL181, XL182, XL183, XL185, and XL190, XL191, XL192 4. Remove the two outermost screws securing the display panel to the chassis. 5. Remove the display assembly from the chassis. To replace the display panel, reverse these procedures.
Presario 1800 Series Models: XL180, XL181, XL182, XL183, XL185, and XL190, XL191, XL192 Removing the Upper CPU Cover To remove the upper CPU cover, complete the following: 1. Prepare the Notebook for disassembly (pg 11). 2. Remove the Palmrest cover with TouchPad (pg 14). 3. Remove the keyboard (pg 17). 4. Remove the Heatspreader (pg 23). 5. Remove the Internet Zone cover (pg 18). 6. Remove the Internet button board (pg 21). 7. Remove the hard drive (pg 25). 8. Remove the display panel assembly (pg 32). 9.
Presario 1800 Series Models: XL180, XL181, XL182, XL183, XL185, and XL190, XL191, XL192 Removing the Fan Assembly To remove the fan assembly, complete the following: 1. Prepare the Notebook for disassembly (pg 11). 2. Remove the Palmrest cover with TouchPad (pg 14). 3. Remove the keyboard (pg 17). 4. Remove the Heatspreader (pg 23). 5. Remove the Internet Zone cover (pg 18). 6. Remove the Internet button board (pg 21). 7. Remove the display panel assembly (pg 32). 8. Remove the hard drive (pg 25). 9.
Presario 1800 Series Models: XL180, XL181, XL182, XL183, XL185, and XL190, XL191, XL192 To remove the fan gasket, pull the gasket from the fan. To replace the fan assembly and gasket, reverse these procedures. Important: When replacing the fan assembly ensure that the arrow (located on the side of the fan near the connector) is pointing inward.
Presario 1800 Series Models: XL180, XL181, XL182, XL183, XL185, and XL190, XL191, XL192 Removing the Real Time Clock Battery Ä CAUTION: Removing the RTC battery clears the power-on password and removes all setup attributes that are programmed in the CMOS. To remove the RTC battery, complete the following steps: 1. Prepare the Notebook for disassembly (pg 11). 2. Remove the Palmrest cover with TouchPad (pg 14). 3. Remove the keyboard (pg 17). 4. Remove the Heatspreader (pg 23). 5.
Presario 1800 Series Models: XL180, XL181, XL182, XL183, XL185, and XL190, XL191, XL192 9. Locate the RTC battery on the system board behind the CD/DVD drive near the back of the unit. 10. Using your fingers or a small non-metallic object, gently pry the RTC battery upward and remove it from the battery socket. To replace the RTC battery, press the battery firmly into the socket and reassemble the remaining components by reversing their removal procedures.
Presario 1800 Series Models: XL180, XL181, XL182, XL183, XL185, and XL190, XL191, XL192 Removing the Diskette Drive To remove the diskette drive, complete the following steps: 1. Prepare the Notebook for disassembly (pg 11). 2. Remove the Palmrest cover with TouchPad (pg 14). 3. Remove the keyboard (pg 17). 4. Remove the Heatspreader (pg 23). 5. Remove the CD/DVD drive (pg 30). 6. Remove the Internet Zone cover (pg 18). 7. Remove the Internet button board (pg 21). 8.
Presario 1800 Series Models: XL180, XL181, XL182, XL183, XL185, and XL190, XL191, XL192 12. Remove the screw that connects the diskette drive bracket to the chassis. 13. Disconnect the diskette drive data cable from the ZIF Connector on the system board and lift the diskette drive from the chassis. To replace the diskette drive, reverse these procedures.
Presario 1800 Series Models: XL180, XL181, XL182, XL183, XL185, and XL190, XL191, XL192 Removing the Battery Charger Board (Voltage Converter Board) To remove the battery charger board, complete the following: 1. Prepare the Notebook for disassembly (pg 11). 2. Remove the Palmrest cover with TouchPad (pg 14). 3. Remove the keyboard (pg 17). 4. Remove the Heatspreader (pg 23). 5. Remove the Internet Zone cover (pg 18). 6. Remove the Internet button board (pg 21). 7.
Presario 1800 Series Models: XL180, XL181, XL182, XL183, XL185, and XL190, XL191, XL192 Removing the Speaker Assembly To remove the speaker assembly, complete the following: 1. Prepare the Notebook for disassembly (pg 11). 2. Remove the Palmrest cover with TouchPad (pg 14). 3. Remove the keyboard (pg 17). 4. Remove the Heatspreader (pg 23). 5. Remove the Internet Zone cover (pg 18). 6. Remove the Internet button board (pg 21). 7. Remove the display panel assembly (pg 32). 8. Remove the hard drive (pg 25).
Presario 1800 Series Models: XL180, XL181, XL182, XL183, XL185, and XL190, XL191, XL192 11. Disconnect the speaker cables from the system board and lift the speaker assembly from the chassis. To replace the speaker assembly, reverse these procedures. Ä CAUTION: When replacing the speaker assembly, ensure that the Speaker Assembly Cable is placed in its proper location. Improper cable placement can damage the Notebook.
Presario 1800 Series Models: XL180, XL181, XL182, XL183, XL185, and XL190, XL191, XL192 Removing the System Board To remove the system board, complete the following steps: 1. Prepare the Notebook for disassembly (pg 11). 2. Remove the Palmrest cover with TouchPad (pg 14). 3. Remove the keyboard (pg 17). 4. Remove the Heatspreader (pg 23). 5. Remove the Internet Zone cover (pg 18). 6. Remove the Internet button board (pg 21). 7. Remove the display panel assembly (pg 32). 8. Remove the hard drive (pg 25). 9.
Presario 1800 Series Models: XL180, XL181, XL182, XL183, XL185, and XL190, XL191, XL192 17. Remove the five standoffs from the system board. Note: The four remaining standoffs located on the system board may be left in place. 18. Remove the two screws from the CD/DVD drive mounting rail and lift the mounting rail from the system board. Continued on the next page.
Presario 1800 Series Models: XL180, XL181, XL182, XL183, XL185, and XL190, XL191, XL192 19. Remove four screws from the system board. 20. Lift up the front and pull forward to remove the system board from the chassis. To replace the system board, reverse these procedures. Important: Before replacing the system board, remove all remaining cables.
Presario 1800 Series Models: XL180, XL181, XL182, XL183, XL185, and XL190, XL191, XL192 Removing the Memory Module To remove the memory module, complete the following steps: 1. Prepare the Notebook for disassembly (pg 11). 2. Close the display and turn the Notebook over (upside down). 3. Remove the screw from the memory module door. 4. With the front of the Notebook facing you, slide the memory module door to the left and lift. 5.
Presario 1800 Series Models: XL180, XL181, XL182, XL183, XL185, and XL190, XL191, XL192 Illustrated Parts Catalog This chapter provides illustrations of the spare parts for Presario 1800XL Series Notebooks. The Notebook serial number is required when customers request information or order spare parts. The serial number 1 is located on the underside of the unit.
Presario 1800 Series Models: XL180, XL181, XL182, XL183, XL185, and XL190, XL191, XL192 System Units # Description Part No.
Presario 1800 Series Models: XL180, XL181, XL182, XL183, XL185, and XL190, XL191, XL192 System Boards # Description Part No.
Presario 1800 Series Models: XL180, XL181, XL182, XL183, XL185, and XL190, XL191, XL192 Display Panel Assembly Description Part No. 15.0” TFT/LVDS Display Panel 171814-001 203698-001 Mass Storage Devices # Description 1 Hard Drives 6.0GB 12.0GB 2 1.44-MB Diskette Drive 3 DVD Drives 6X 6X 8X 170087-001 170086-001 138188-001 158165-001 192408-001 175326-001 4 24X CD ROM Drive 143922-001 5 CD-R/W Drive 171377-001 (not shown) (not shown) 4 ILLUSTRATED PARTS CATALOG Part No.
Presario 1800 Series Models: XL180, XL181, XL182, XL183, XL185, and XL190, XL191, XL192 Miscellaneous Cables # Description Miscellaneous Cable Kit* 1 2 3 4 5 6 7 Part No. 138189-001 Hard Drive Cable CD/DVD Drive Cable Diskette Drive Cable Status Panel Cable DisqPlay LCD Cable Modem Cable (not shown) TouchPad Cable (not shown) *Kit includes one each of the above items unless quantity specified.
Presario 1800 Series Models: XL180, XL181, XL182, XL183, XL185, and XL190, XL191, XL192 Miscellaneous Hardware Kit # Description Part No.
Presario 1800 Series Models: XL180, XL181, XL182, XL183, XL185, and XL190, XL191, XL192 Miscellaneous Plastics Part No. # Description Miscellaneous Plastics Kit* 138190-001 1 2 3 4 5 6 7 8 9 Battery Pack Door Memory Module Cover PCMCIA Door Display Hinge Cover (Right) Display Hinge Cover (Left) CD Drive Guide Latch (Right) (qty. 10) Latch (Left) (qty. 10) Stand-foot (qty. 10) - Rubber Foot (qty. 10) q Rubber Plug (side mount for 14.1" display) (qty. 10) w Rubber Plug side mount for 15.
Presario 1800 Series Models: XL180, XL181, XL182, XL183, XL185, and XL190, XL191, XL192 Miscellaneous Parts # Description Part No. 1 AC Adapter 298239-001 164854-001 180675-001 180676-001 2 QuikDock 3 Misc. Screw Kit 138167-001 APD 60W Slim 3-Wire 60W Slim 2-Wire (not shown) 138161-001 4 Logo Kit (not shown) 169610-001 138166-001 5 Return Kit (not shown) 6 AC Power Cords (not shown) N.
Presario 1800 Series Models: XL180, XL181, XL182, XL183, XL185, and XL190, XL191, XL192 Configure To Order (CTO) Parts Part No. Description Display 14.1" TFT 15.0" TFT LVDS 15.
Presario 1800 Series Models: XL180, XL181, XL182, XL183, XL185, and XL190, XL191, XL192 Description Part No. Hard Drive 06.0-GB 12.0-GB 18.0-GB 30.0-GB TBD TBD 161544-001 TBD Base Unit Floppy, 64M, 56K, ATI8M-US TBD Battery Li-ON 3.