User’s Guide
First Edition (April 1999) The information in this guide is subject to change without notice. COMPAQ COMPUTER CORPORATION SHALL NOT BE LIABLE FOR TECHNICAL OR EDITORIAL ERRORS OR OMISSIONS CONTAINED HEREIN; NOR FOR INCIDENTAL OR CONSEQUENTIAL DAMAGES RESULTING FROM THE FURNISHING, PERFORMANCE, OR USE OF THIS MATERIAL. This guide contains information protected by copyright. No part of this guide may be photocopied or reproduced in any form without prior written consent from Compaq Computer Corporation.
Contents 1 Understanding your printer ........ 1 Using the parts of the printer. . . . . . . . . . . . . . . . . . . . . . . . . 2 Using the buttons. . . . . . . . . . . . . . . . . . . . . . . . . . . . . . . . . . 4 Understanding the lights . . . . . . . . . . . . . . . . . . . . . . . . . . . 5 2 Using the printer software ......... 7 Using the Printer Properties . . . . . . . . . . . . . . . . . . . . . . . . . 8 Using the Control Program . . . . . . . . . . . . . . . . . . . . . . . . .
Caring for your print cartridges . . . . .29 Installing or replacing print cartridges . . . . . . . . . . . . . . . . 30 Improving print quality . . . . . . . . . . . . . . . . . . . . . . . . . . . . 32 Appendix . . . . . . . . . . . . . . . . . . . . . . . . .41 Installing the printer software . . . . . . . . . . . . . . . . . . . . . . . . . 41 Printing from Windows 3.1 or 3.11 . . . . . . . . . . . . . . . . . . . . 41 Printing from Windows NT 4.0 . . . . . . . . . . . . . . . . . . . . . . .
Understanding your printer Chapter 1 Your printer is a general purpose color inkjet printer that provides high quality text and graphics. For information about: See page: Using the parts of the printer 2 Using the buttons 4 Understanding the lights 5 Understanding your printer Glossary Inkjet A non-impact printing technology that creates characters and graphics with programmed patterns of ink.
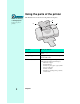
Using the parts of the printer Quick Fix This illustration shows the front of the printer and its parts. Printer has missing or damaged parts B Contact your point of purchase. 2 A C Use the: When you want to: A Paper guide Make sure paper feeds correctly into the printer. B Paper support Keep paper and specialty media straight in the automatic feeder. C Automatic feeder Automatically load paper and specialty media.
Use the: When you want to: D Manual feeder Manually load paper and specialty media one sheet at a time. You can also use the manual feeder when: • You have one type of media already loaded in the automatic feeder, and you want to print one sheet of a different size or type. For example, you may have plain paper loaded in the automatic feeder, but you need to print an envelope or transparency. • Paper feeds incorrectly from the automatic feeder.
The following illustration shows the back parts of the printer: Quick Fix The Power light is on and the Paper Feed light is blinking H I The printer may be out of paper or have a paper jam. Check your screen for any error messages. J If the printer is out of paper: 1 Load paper. 2 Press the Paper Feed button. If the printer has a paper jam: 1 Press the Power button to turn the printer off. 2 Pull firmly on the paper to remove it.
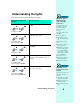
Understanding the lights Quick Fix Your printer has a Power light and a Paper Feed light. If your printer lights look like this: Then the printer: The Power light is blinking and the Paper Feed light blinks twice The print cartridge carrier has stalled or you have a paper jam. Check your screen for any error messages. Is Off. Both lights are Off If the print cartridge carrier has stalled: Is On and ready to print. 1 Turn the printer off. 2 After waiting a few seconds, turn the printer back on.
6 Chapter 1
Using the printer software Chapter 2 This chapter describes how to use your printer software in Windows 95 and 98. For help using your printer software in Windows 3.1, 3.11 or NT 4.0, see the appendix, starting on page 41. When you installed your printer, several software applications were installed on your computer. These applications allow you to perform printing tasks with the best printing results.
Using the Printer Properties Tip To open the Printer Properties from a Windows application, click: 1 File. 2 Print, Print Setup, or Printer Setup. 3 The Properties, Options, The Printer Properties includes several tabs. You can use the Paper and Document/Quality tabs to change your printer settings. For information on opening the Printer Properties, see the “Tip” in the margin. The Paper tab Choose your paper size. or Setup button. Glossary Choose automatic or manual feeder.
The Document/Quality tab Note Change the color mode here. Use this section to tell the printer what type of paper you’re using. Adjust your print quality and print speed here. Overrides Some software applications may override the Paper Source, Paper Size, and Orientation settings in your printer software. You can also reset your software to factory defaults. Click here if you need any additional help.
3 In the Print Setup dialog box, click the Properties, Options, or Setup button (depending on the application). Your application may have a slightly different dialog box than the one shown below. Click the Properties button. 4 Change settings as needed. Opening Printer Properties from Windows Opening the Printer Properties from the Windows 95 or 98 desktop allows you to make changes to your printer settings that will apply to ALL documents you print.
3 Select Properties from the sidebar menu. Note Using the Control Program Windows 3.1 and 3.11 The Control Program includes five tabs: Status, Options, Cartridges, DOS Printing, and About. Each tab contains settings relating to the operation of your printer and its software. In Windows 3.1 or 3.11, the Control Program has a sixth tab for Windows printing. You can use this tab to open Printer Properties or Spool Manager. Change settings for DOS printing.
12 Chapter 2
Printing on paper and other media Quick Fix Automatic feeder loads multiple sheets at one time • Make sure the paper is aligned against the right side of the automatic feeder. Chapter 3 Printing on plain paper • Make sure the media guide is against the left edge of the paper.
2 Quick Fix Squeeze the release tab and the paper guide together and slide the paper guide to the edge of the paper. Paper guide Paper jams Release tab 1 Press the Power button to turn the printer off. 2 Pull firmly on the paper to remove it. If you cannot reach the paper because it is too far inside the printer, raise the front cover and pull the paper out from the front of the printer. 3 Close the front cover. 4 Press the Power button to turn the printer on. 5 Resend your document.
Step Three - Sending a document to print To print your document: 1 2 3 Open your application’s File menu. Choose Print. When the Print Document dialog box appears, click the Print button. Printing on specialty media In addition to printing on regular paper, you can also print on a variety of specialty media, such as envelopes, photo paper, transparencies, iron-on transfers, and greeting cards.
Printing transparencies Quick Fix 1 Transparencies stick together Load up to 25 transparencies against the right side of the automatic feeder. Insert transparencies with the print side facing up (the removable stripe away from you and pointing down). To keep transparencies from sticking together: • Remove each transparency as it exits the printer and allow it to dry before stacking. • Use a transparency designed for an inkjet printer. • Make sure the print side faces up.
Printing envelopes or card stock 1 Load up to 10 envelopes, index cards, or postcards vertically against the right side of the automatic feeder. Insert the envelopes, index cards, or postcards with print side facing you and stamp location in the upper left corner. Squeeze the release tab and the media guide together, and slide the media guide to the edge of the envelopes, index cards, or postcards.
Tip Printing near paper edges For the best print quality near paper edges, use these minimum margin settings in your application: Printing on customized paper sizes 1 Load up to 25 sheets of specialty media or up to 100 sheets of plain paper against the right side of the automatic feeder. Load the specialty media or plain paper with the print side facing you. • Set the left and right margin settings to at least 6.35mm (0.25 in.) each for all paper sizes except A4.
2 Customize the Printer Properties for printing special paper sizes. For information on opening the Printer Properties, see the “Tip” in the margin. Tip To open Printer Properties from an application, click: Click the Paper tab. 1 File. 2 Print, Print Setup, or Printer Setup. 3 The Properties, Options, Use the scroll bar to select Custom paper size. or Setup button. Glossary Enter the dimensions for the paper size you are using and click OK.
Printing greeting cards 1 Load up to 10 greeting cards against the right side of the automatic feeder. Insert greeting cards with the print side facing you. 2 Tip To open the Printer Properties from an application, click: Customize the Printer Properties to print greeting cards. For information on opening Printer Properties, see the “Tip” in the margin. Click the Document/ Quality tab. 1 File. 2 Print, Print Setup, or Printer Setup. 3 The Properties, Options, or Setup button.
Printing iron-on transfers 1 Tip Load up to 10 transfers against the right side of the automatic feeder. Insert the iron-on transfers with the print side facing you (blank side facing up). Squeeze the release tab and the paper guide together, and slide the paper guide to the edge of the iron-on transfers. Print a sample first Many software applications create iron-on transfers differently. We recommend printing a sample on plain paper before printing it on an iron-on transfer.
Printing banners Tip Inkjet banner paper Use banner paper recommended for inkjets. We do not recommend using the type of continuous form paper intended for dot matrix printers. This kind of continuous form paper is designed for use with a different kind of ink. 1 2 Remove any paper from the automatic feeder. Load the number of sheets required to print your banner (up to 20). a Open the banner paper holder on the back of the printer. c Insert banner paper into the banner paper holder.
d Insert the unattached edge of the first page into the automatic feeder. 3 e Squeeze the release tab and the paper guide together and slide the paper guide to the edge of the banner. Customize the Printer Properties for printing banners. For information on opening the Printer Properties, see the “Tip” in the margin. Tip To open the Printer Properties from an application, click: Click the Paper tab. 1 File. 2 Print, Print Setup, or Printer Setup.
Printing photos Quick Fix Photo papers stick together • Use a glossy/photo paper designed for an inkjet printer. 1 To print high-quality photos, you will need to replace the black cartridge in your printer with a photo cartridge. b Snap the black cartridge a Raise the front cover. The print cartridge carrier moves to the loading position (unless printer is busy). out of place. • Remove each sheet of glossy/photo paper as it exits the printer.
e Remove the sticker and tape covering the gold contact area of the photo print cartridge. f Insert the photo cartridge. g Snap the photo Warning cartridge into place. Cartridge handling Do NOT touch the gold contact area on the print cartridge! Microscopic particles may clog the print nozzles. Supplies Photo cartridge P/N 337711-001 2 Complete the cartridge installation by updating the control program. For information on opening the Control Program, see the “Tip” in the margin.
Tip Insert the photo paper with the print side facing you. 4x6 photo paper Squeeze the release tab and the paper guide together, and slide the paper guide to the edge of the photo paper. If you’re printing on 4x6 photo cards, you will need to insert the cards into the printer vertically. For help, see “Printing envelopes or card stock” on page 17. Tip Allow photos to dry Remove each sheet as it exits the printer and allow it to dry before stacking.
7 Click the paper tab and use the scroll bar to select the correct size of photo paper. For information on opening the Printer Properties, see the “Tip” in the margin. Click the Paper tab. Tip To open the Printer Properties from an application, click: 1 File. 2 Print, Print Setup, or Use the scroll bar to select the correct size of photo paper. Printer Setup. 3 The Properties, Options, or Setup button. Quick Fix Printer prints slowly • Decrease the print quality.
Glossary Specialty media Print media that, because of size or type, requires temporary modification to your printer settings. This would include, for example, envelopes, glossy/photo paper, and banner paper. Printing specialty media from the manual feeder You can load only one sheet of specialty media into the manual feeder. To load specialty media: 1 Place the specialty media against the right side of the manual feeder, with the print side facing you.
Caring for your print cartridges Chapter 4 Glossary This chapter describes how to install, replace, and care for your print cartridges. For information about: See page: Installing or replacing print cartridges 30 Removing a print cartridge from the printer 30 Installing or changing a print cartridge 30 Completing the cartridge installation 31 Improving print quality Print cartridge The ink reservoir and printhead unit.
Supplies Black cartridge 337709-001 Color cartridge 337710-001 Installing or replacing print cartridges If you are replacing a print cartridge, begin with “Removing a print cartridge from the printer.” If you are installing a print cartridge for the first time, see “Installing or changing a print cartridge.” Photo cartridge 337711-001 Removing a print cartridge from the printer 1 2 Note Storing an extra print cartridge Make sure the Power light is on.
If necessary, follow the steps for “Removing a print cartridge from the printer” on page 30 before proceeding. 1 To install the cartridge in the printer: a If you are installing a new cartridge, remove the sticker and tape covering the gold contact area of the print cartridge. b Insert the replacement print cartridge into the print cartridge carrier. Quick Fix Print cartridge is loose c Push back firmly on the cartridge until it snaps securely into place.
To complete the cartridge installation: Tip 1 To open the Control Program, click: 1 Start. 2 Programs. 3 Compaq IJ750 Series. 4 Compaq IJ750 Control Use the Control Program to update the printer software. For information on opening the Control Program, see the “Tip” in the margin. Click the Cartridges tab. Click Install/Change Cartridge. Program on LPTx. Tip Text printing For normal text printing, make sure you have a black cartridge installed instead of a photo cartridge.
The following illustrations show a sample result of aligned and misaligned print cartridges: Tip Cartridge alignment Align the print cartridges when: • Characters are not aligned correctly at left margin. Aligned 1 Misaligned Use the Control Program to begin alignment. For information on opening the Control Program, see the “Tip” in the margin. • The black portions of a graphic or text do not align properly with the color portions. • Vertical lines appear “wavy.” Tip Click the Cartridges tab.
The Align Cartridge dialog box appears on your screen. Depending on the cartridge combination you have installed in your printer, a test page with one or more alignment patterns is printed. Each pattern has a number under it. The test page looks similar to the one shown: Note Alignment page The alignment page that you print may look different from the example shown here. Sample group A, pattern 4. Tip Print quality suggestions • Make sure you are using a paper designed especially for inkjet printing.
Cleaning print nozzles The print cartridge nozzle test helps you pinpoint any clogged nozzles. The nozzle test also cleans the print cartridge by cleaning the nozzles. A test line prints so you can see if the cleaning process was successful. Clean the print nozzles when you suspect the nozzles are clogged or when characters are not printing completely. 1 2 Make sure plain paper is loaded in the printer. Use the Control Program to run the nozzle test.
The printer feeds a sheet of paper and prints a nozzle test pattern, similar to the one shown: Broken lines indicate clogged nozzles. Note Clean the print nozzles when: • Characters are not printing completely. • Characters print with white lines. • White dashes appear in graphics. Unbroken lines indicate clean nozzles. • Print is smudged or too dark. Quick Fix Poor print quality 3 4 Make sure you have installed your cartridges in their appropriate positions.
Wiping print nozzles and contacts If print quality does not improve after cleaning the print nozzles (see “Cleaning print nozzles” on page 35), the problem may be caused by dried ink on the print cartridge nozzles. 1 Wipe the print cartridge nozzles: a Remove the print cartridge from the printer. For help, see “Removing a print cartridge from the printer” on page 30. b Dampen a clean cloth with water and gently wipe the entire gold-colored area, including the nozzles.
3 Wipe the print cartridge contacts: a Dampen another section of clean cloth with water and gently wipe the entire gold-colored area, including the contacts. When cleaning the color cartridge, wipe the contacts in one direction. Warning Contacts Cartridge handling Do NOT wipe the nozzles and contacts with the same section of cloth. Microscopic particles may clog the print nozzles. b 38 To dissolve dried ink, hold the damp cloth against the contacts for about three seconds. Gently blot and wipe dry.
Cleaning print cartridge carrier contacts Clean the print cartridge carrier contacts only if you have cleaned and wiped the print nozzles and print quality is still unsatisfactory. To clean the print cartridge carrier contacts: 1 Remove both print cartridges. For help, see “Removing a print cartridge from the printer” on page 30. 2 Unplug the power supply from the electrical outlet.
Preserving print cartridges To ensure the longest life from your print cartridge and optimum performance from your printer: 40 • Keep a print cartridge in its packaging until you are ready to install it. • Do not remove a print cartridge from the printer except to replace, clean, or store it in a print cartridge storage unit. The print cartridge will not print correctly if removed from the printer and left exposed for an extended period of time.
Appendix In this section, you can find information about: • Installing the printer software • Printing from Windows 3.1, 3.11, or NT 4.0 • Printing from DOS • Limited Warranty Statement • Federal Communications Commission (FCC) Compliance Information Statement • Notices • Safety information Installing the printer software You can obtain the printer software from the CD-ROM, diskettes, or World Wide Web.
• Change settings for DOS printing • Control when and how the Control Program appears • Install or replace print cartridges • Monitor print jobs and print cartridge ink levels • Print a test page • Cancel a print job Opening Printer Properties from Windows Opening the Control Program 3 Click the Windows Driver From the Compaq IJ750 program group, double-click the Control Program icon.
3 Right-click on the Compaq IJ750 printer icon. 4 A sidebar menu appears. Click Document Defaults. 5 Change settings as needed. Learn more about your printer software while your job is printing. See the Readme file for your Compaq printer for more information. not native DOS. 2 From the Control Program, Printing from DOS 4 Make sure Disable DOS Appropriate drivers in order of preference are: – – HP DeskJet 500C HP DeskJet 500 You must use the HP DeskJet 500C for color print jobs.
Printing from nonWindows DOS applications Follow these steps if your application runs from the native DOS prompt, but does not run from the DOS prompt in Windows. 1 From the printer's Control Program, click the Options tab. For help opening the Control Program, see “Using the Printer Properties” on page 8. 2 Make sure Disable DOS 8 Start Windows. 9 Double-click the MS-DOS icon in the Main group of Windows.
receipt of the exchange printer, pack the defective printer (in the carton which contained the exchange printer) and make it available for pickup by a Compaq representative. If you fail to return the defective printer within 5 business days, you will be responsible for the full amount of the replacement printer. How do I obtain online support? Compaq offers free technical support via the Internet at http:// www.compaq.com/athome/ web site. You may also visit our technical support chat site at forum.compaq.
provider for geographic restrictions, proof-of-purchase requirements, response time commitments and other specific on-site service requirements. EXCEPT AS EXPRESSLY SET FORTH IN THIS WARRANTY, COMPAQ MAKES NO OTHER WARRANTIES, EXPRESSED OR IMPLIED, INCLUDING ANY IMPLIED WARRANTIES OF MERCHANTABILITY AND FITNESS FOR A PARTICULAR PURPOSE. COMPAQ EXPRESSLY DISCLAIMS ALL WARRANTIES NOT STATED IN THIS LIMITED WARRANTY.
Notices Industry Canada Compliance Statement This Class B digital apparatus meets all requirements of the Canadian Interference-Causing Equipment Regulations. Avis de conformité aux normes d’Industrie Canada Cet appareil numérique de la classe B respecte toutes les exigences du Règlement sur le matériel brouilleur du Canada. is near the product and easily accessible. • Refer service or repairs, other than those described in the operating instructions, to a professional service person.
48 Appendix
Index A C A4 paper size 19 aligning print cartridges 32 alignment test page 34 appendix 41 application, definition 7 automatic feeder locating 2 using 2 card stock printing 17 selecting from printer properties 17 cards greeting 20 index 17 cards, greeting printing 20 selecting in printer properties 20 software overrides 20 carrier contacts, cleaning 39 cartridge carrier, print contact, cleaning 39 loading position 39 cartridge, print aligning 33 caring for 29 definition 29 disposal 30 handling 25, 30, 37
from native DOS 44 in Windows 43 to file 43 properties 20 software overrides 20 M H E handling print cartridges 37, envelopes printing 28 in DOS 17 envelopes, printing 17 error lights paper jam 5 printer not printing 5 stalled print cartridge carrier 5 exit tray locating 3 using 3 F FCC statement 46 foils see transparencies 16 front cover locating 3 using 3 G glossary items A4/Letter 19 inkjet 1 interface 3 page orientation 8 print cartridge 29 print media 13 printer driver 9 run minimized 11 softwa
ordering supplies photo cartridge 25 print cartridge 30 transparencies 16 orientation 8 overrides definition 9 P page orientation defining 8 selecting 8 paper continuous form 22 error lights 4 jams 14 loading 13 printing 13 recommended banner 22 photo 25 paper exit tray locating 3 using 3 paper feed problems multiple sheets 13 paper fails to feed 13 paper jam 5 paper jams 14 paper feed button 4 locating 4 using 4 paper feed light 5 error 4, 5 understanding 5 paper feeder, automatic 2 paper feeder, manual 3
from application 9 from Windows 3.1 or 3.11 9 from Windows 95 or 98 9 paper tab 8 using 9 printer settings changing 14 checking 14 printer software Control Program 8 control program 11 Printer Properties 8 printer properties 9 updating 31 using 7, 9 printing banners 22 card stock 17 continuous forms 22 customized paper sizes 18 envelopes 17, 28 from the manual feeder 28 from Windows 3.1 or 3.
solid black areas 16 stick together 16 troubleshooting dark print 34 DOS printing job does not print 44 job takes too long to print 44 error lights out of paper 4 paper jam 5 paper jams 4 printer not printing 5 stalled printer cartridge carrier 5 general 2, 3, 9, 24, 27, stick together 16 unexpected or missing characters 37 white dashes 36 white lines 36 W Windows 3.1 or 3.11 41, 42 printing from 41 Windows NT 4.