
Technical data


2–2
Replacement Procedures
Preparation Procedures
Establishing a Local Connection to the
Controller
You can communicate with a controller locally or remotely. Use a local connection to
configure the controller for the first time. Use a remote connection to your host
system for all subsequent configuration tasks. See the Quick Setup Guide that came
with your platform kit for details.
The maintenance port provides a convenient way to connect a PC or terminal to the
controller so that you can troubleshoot and configure the controller. This port accepts
a standard RS-232 jack from any EIA-423 compatible terminal or a PC with a
terminal-emulation program. The maintenance port supports serial communications
with default values of 9600 baud using 8 data bits, 1 stop bit, and no parity.
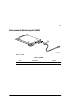
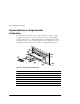
NOTE: There are two maintenance port cables shown in Figure 2–1. One has a 9-
pin connector molded onto its end for a PC connection. An optional cable is
available for a terminal connection.
Follow these steps to establish a local connection for setting the controller’s initial
configuration:
1. Turn off the PC or terminal, and connect it to the controller, as shown in Figure
2–1.
a. For a PC connection, plug one end of the maintenance port cable into the ter-
minal; plug the other end into the controller’s maintenance port.
b. For a terminal connection, refer to Figure 2–1 on page 2–3 for cabling infor-
mation.
2. Turn on the PC or terminal.
3. Configure the terminal emulation software for 9600 baud, 8 data bits, 1 stop bit,
and no parity.