
Technical data

2–14
Replacement Procedures
7. Disengage both retaining levers, remove the cache module, and place the cache
module into an antistatic bag or onto a grounded antistatic mat.
NOTE: Remove the DIMMs from the cache module. They will be installed in the
replacement cache module.
8. Press down on the DIMM retaining levers at either end of the DIMM you want to
remove.
9. Grasp the DIMM and gently remove it from the DIMM slot. Repeat for all
DIMMs.
Installing the Cache Module in a Single-Controller
Configuration
Use the following steps to install the cache module:
CAUTION: ESD can easily damage a cache module or a DIMM. Wear a
snug-fitting, grounded ESD wrist strap.
Make sure you align the cache module in the appropriate guide rails. If
you do not align the cache module correctly, damage to the backplane
can occur.
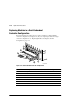
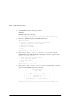
1. Insert the DIMM straight into the socket of the cache module and ensure that the
notches in the DIMM align with the tabs in the socket (see Figure 2–9).
2. Press the DIMM gently until it’s seated in the socket.
3. Double-check to ensure both ends of the DIMM are firmly seated in the slot and
both retaining clips engage the DIMM.
4. Insert the new cache module into its slot and engage its retaining levers.
CAUTION: The ECB must be disabled—the status light is not lit and is
not blinking—before connecting the ECB cable to the cache module.
Failure to disable the ECB could result in ECB damage.
5. Connect the ECB cable to the new cache module.