Notice © Copyright 2001 Compaq Computer Corporation COMPAQ and the Compaq logo Registered in U.S. Patent and Trademark Office. Microsoft and Windows are trademarks of Microsoft Corporation. All other product names mentioned herein may be trademarks or registered trademarks of their respective companies. Compaq shall not be liable for technical or editorial errors or omissions contained herein. The information in this document is subject to change without notice.
Setup Getting Started Guide This booklet guides you step by step from setup through printing your first document using Windows 98, Windows Me, or Windows 2000. Setup See page 13 for information about contacting Compaq and locating your printer warranty.
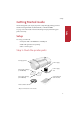
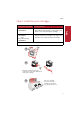
Getting Started Guide Step 2: Connect the power supply 3 1 2 If the Power light doesn’t come on: 1 Check the power supply connections. 2 Press the Power button.
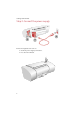
Setup Step 3: Install the print cartridges You can print with: Color print cartridge only (P/N 10N0026) > Only the color print cartridge in the left carrier > Only a black print cartridge* in the right carrier > Both a color and a black print cartridge* Color print cartridge (P/N 10N0026) and a Black print cartridge (P/N 10N0016) > Only the color print cartridge in the left carrier > Only the black print cartridge in the right carrier > Both the color and the black print cartridge * You must purchase
Getting Started Guide If your printer came with: One Cartridge: Two Cartridges: 4 4 5 5 Note: Place color cartridge in left carrier.
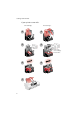
Setup Step 4: Connect the USB cable Setup The location and orientation of the USB port on your computer may be different from the one shown. Step 5: Load up to 100 sheets of plain paper 2 1 Make sure you fully extend the paper support. 3 5 To avoid paper misfeeds, slide the paper guide to the left side of the paper. 4 Letter size paper should align with the top of the paper support. A4 size paper should extend slightly above the top.
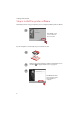
Getting Started Guide Step 6: Install the printer software Now that you have set up your printer, you are ready to install the printer software. 1 Click Cancel on any screens similar to the one shown. Cancel If your computer is not already on, please turn it on now. 2 3 Wait for the Compaq printer software installation screen shown in to appear. If it doesn’t, see page 11. 4 Click Next and follow the instructions until the installation is complete.
Congratulations! You have finished setting up your printer.
Getting Started Guide 8
Printing Printing Now that you have set up your printer and installed the printer software, you are ready to print your first document. Basic printing Basic printing is as easy as: 1 Load the paper. 2 Open the file you want to print. 3 Customize the printer settings. (For help, see the section below, “Using the printer software.”) Printing 4 Print your document.
Getting Started Guide b To learn more: > Explore the other tabs in the Printer Properties. > Explore the menus. > Click Help to view the printer software Help. From the File menu, click Exit when you are finished viewing the Help. c Click OK to apply the settings and close the Printer Properties. 4 In the Print Range area of the Print dialog box, select Current Page. 5 Click OK to print the current page of the Getting Started Guide. Printing photos To print the best looking photos: 1 Use photo paper.
Printing Printing banners To print a banner, you should have banner paper and software that supports banner printing. > Place the banner paper behind the printer. > Bring the unattached edge of the first page over the printer and into the sheet feeder. > Place the paper guide against the side of the paper. > Select Banner or Banner A4 on the Paper tab of the Printer Properties. > Print your banner.
Getting Started Guide 12
Help Help This section will help you when you have problems setting up your printer, or you need general printing help. For additional help, press the Help button on the Printer Properties dialog. The installation screen did not appear 1 Make sure you click Cancel on any screens similar to in step 6 on page 6. 2 Make sure the Compaq printer software CD is in your CD-ROM drive. 3 From the desktop, double-click My Computer. 4 Double-click the CD-ROM drive icon. 5 If necessary, double-click setup.exe.
Getting Started Guide > Check the printer port: a From the File menu of a software application, click Print or Printer Setup. b In the Where area, make sure your printer port is set to USB. > Make sure you have not installed multiple copies of the printer software: a From the Start menu, click Settings Printers. b In the Printers folder, make sure there is only one icon for your printer. c If you have two printer icons for the same printer, try printing a test page from each icon.
Help Paper Jams Try removing the paper from the sheet feeder. If the paper is lodged too far into the printer and can’t be removed: 1 Press the Power button to turn the printer Off. 2 Pull firmly on the paper to remove it. Raise the front cover and pull the paper from the front if necessary. 3 Close the front cover. 4 Press the Power button to turn the printer On. 5 Print your document again. Pages have poor print quality > Check the ink level graphic on the Cartidges tab of your Printer Properties.
Getting Started Guide 16
Compaq Warranty Information How do I obtain warranty service? What is not covered by this limited warranty? > Product purchased from anyone other than Compaq or a Compaq authorized reseller You may access product technical support on Compaq’s website at www.compaq.com or you may call Compaq’s Technical Support Center. Compaq’s highly trained technicians will first try to resolve the problem through our online services or by telephone.
Getting Started Guide or workmanship under normal use during the warranty period. The warranty period commences on the date of purchase. Please retain a copy of your sales receipt. Your sales receipt is your proof of the date of purchase. This warranty extends only to you, the original Purchaser. It is non- transferable. It excludes expendable parts.
U.S.A. State Laws Some states do not allow limitation on how long an implied warranty lasts. In such states, the limitations or exclusions of this Limited Warranty may not apply to you. Some states do not allow the exclusion or limitation in incidental or consequential damages for consumer products. In such states, the exclusion or limitation of this Limited Warranty may not apply to you. This Limited Warranty gives you specific legal rights. You may also have other rights that may vary from state to state.
Getting Started Guide
Notices This section contains information about: > Notices > Safety information Electronic emission notices Federal Communications Commission (FCC) compliance information statement This equipment has been tested and found to comply with the limits for a Class B digital device, pursuant to Part 15 of the FCC Rules.
Getting Started Guide European Community (EC) directives conformity This product is in conformity with the protection requirements of EC Council directives 89/336/EEC and 73/23/EEC on the approximation and harmonization of the laws of the Member States relating to electromagnetic compatibility and safety of electrical equipment designed for use within certain voltage limits.