Quick Setup & Users Guide Compaq iPAQ Desktop Personal Computer 221340-001
QuickSetup_UsersGuide.book Page 1 Wednesday, May 30, 2001 9:36 AM NOTICE © 2001 Compaq Computer Corporation. Except for use in connection with the accompanying Compaq product, no part of this guide may be photocopied or reproduced in any form without prior written consent from Compaq Computer Corporation. COMPAQ, the Compaq logo, and Armada Registered in U.S. Patent and Trademark Office. iPAQ is a trademark of Compaq Information Technologies Group, L.P.
QuickSetup_UsersGuide.
QuickSetup_UsersGuide.book Page 1 Wednesday, May 30, 2001 9:36 AM Contents Quick Setup Step 1: Unpack the Compaq iPAQ Desktop Personal Computer. . . . . . . . . . . . . .1 Step 2: Identify Rear Panel Components and Confirm Voltage Setting . . . . . . . . .2 USB Connectors. . . . . . . . . . . . . . . . . . . . . . . . . . . . . . . . . . . . . . . . . . . . . . .3 Legacy Module . . . . . . . . . . . . . . . . . . . . . . . . . . . . . . . . . . . . . . . . . . . . . . .3 Step 3: Connect External Devices .
QuickSetup_UsersGuide.book Page 2 Wednesday, May 30, 2001 9:36 AM Contents Uninstalling the iPAQ Desktop Security Bar. . . . . . . . . . . . . . . . . . . . . . . . . . . 3-1 Removing and Replacing the Side Access Panels . . . . . . . . . . . . . . . . . . . . . . 3-2 Adding System Memory . . . . . . . . . . . . . . . . . . . . . . . . . . . . . . . . . . . . . . . . . 3-4 Adding or Removing a Memory Module . . . . . . . . . . . . . . . . . . . . . . . . . . . 3-4 Upgrading the Primary Hard Drive . . . . .
QuickSetup_UsersGuide.book Page 3 Wednesday, May 30, 2001 9:36 AM Contents Entering a DriveLock Password on a MultiBay Hard Drive . . . . . . . . . . . . 6-11 Changing a DriveLock Password on a MultiBay Hard Drive. . . . . . . . . . . . 6-11 National Keyboard Delimiter Characters . . . . . . . . . . . . . . . . . . . . . . . . . . 6-12 Clearing Passwords . . . . . . . . . . . . . . . . . . . . . . . . . . . . . . . . . . . . . . . . . 6-12 Installing the iPAQ Desktop Security Bar . . . . . . . . . . . . .
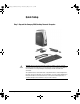
QuickSetup_UsersGuide.book Page 1 Wednesday, May 30, 2001 9:36 AM Quick Setup Step 1: Unpack the Compaq iPAQ Desktop Personal Computer Å WARNING: Misuse of your Personal Computer or failure to establish a safe and comfortable workstation may result in discomfort or serious injury. Refer to your Safety & Comfort Guide for more information on choosing a workspace and creating a safe and comfortable work environment.
QuickSetup_UsersGuide.
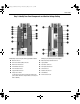
QuickSetup_UsersGuide.book Page 3 Wednesday, May 30, 2001 9:36 AM Quick Setup USB Connectors The iPAQ Desktop Personal Computer features two internal USB controllers, each providing data transfer rates up to 12 megabits per second (Mbps). One of these controllers is dedicated exclusively to a new, full-speed Universal Serial Bus (USB) connector (shown on the previous page). The other five USB connectors share the second controller.
QuickSetup_UsersGuide.book Page 4 Wednesday, May 30, 2001 9:36 AM Quick Setup Step 3: Connect External Devices Connect the monitor, mouse, and keyboard cables. If you use a network, connect the network cable to the Ethernet RJ-45 Connector. For easy setup, Compaq has color-coded the cables and rear panel connectors.
QuickSetup_UsersGuide.book Page 5 Wednesday, May 30, 2001 9:36 AM Quick Setup Step 4: Connect the Power Cords Connect the power cords as shown below. Å 5 WARNING: To reduce the risk of electric shock or damage to the equipment: ■ Do not disable the power cord grounding plug. The grounding plug is an important safety feature. ■ Plug the power cord into a grounded (earthed) electrical outlet that is easily accessible at all times.
QuickSetup_UsersGuide.
QuickSetup_UsersGuide.book Page 7 Wednesday, May 30, 2001 9:36 AM Quick Setup Step 6: Turn On the Personal Computer and Install the Operating System Press the power button to turn on the personal computer. Refer to “Step 2: Identify Rear Panel Components and Confirm Voltage Setting” on page 2 for the location of the power button. The first time you turn on the Personal Computer, the operating system is installed automatically.
QuickSetup_UsersGuide.book Page 8 Wednesday, May 30, 2001 9:36 AM Quick Setup Ä ✎ CAUTION: To prevent loss of data, before using the Compaq Restore CD, be sure to back up any data files and software application files created or installed after unbundling the factory-installed software. The Restore CD will erase all files from the hard drive before restoring the original operating system, Internet browser, and NIC or modem drivers.
QuickSetup_UsersGuide.
QuickSetup_UsersGuide.book Page 1 Wednesday, May 30, 2001 9:36 AM chapter 1 Working with the Compaq Easy Access Keyboard In addition to the standard keyboard keys, the Compaq Easy Access Keyboard offers eight Easy Access Buttons that make accessing your favorite Web sites, services, and applications easier and faster.
QuickSetup_UsersGuide.book Page 2 Wednesday, May 30, 2001 9:36 AM Working with the Compaq Easy Access Keyboard To reprogram your Easy Access Buttons, complete the following steps: 1. Click the Easy Access Button icon located in the status area (lower right corner) of the Windows taskbar. The Easy Access Button dialog is displayed. 2. On the dialog, click the icon representing the Easy Access Button you want to program. 3.
QuickSetup_UsersGuide.book Page 1 Wednesday, May 30, 2001 9:36 AM chapter 2 Working with the MultiBay The MultiBay is located on the left side of the iPAQ Desktop Personal Computer. It is a special drive bay that supports a variety of optional 12.
QuickSetup_UsersGuide.book Page 2 Wednesday, May 30, 2001 9:36 AM Working with the MultiBay “Hot-Plugging” or “Hot-Swapping” MultiBay Drives Ä CAUTION: To prevent damage to the Personal Computer, the drive, and any data stored on the drive: ■ ■ If you are inserting or removing a hard drive, shut down the Personal Computer. Never remove a hard drive while the Personal Computer is on or in Standby. To ensure that the Personal Computer is not in Standby, turn the Personal Computer on, then shut it down.
QuickSetup_UsersGuide.book Page 3 Wednesday, May 30, 2001 9:36 AM Working with the MultiBay Partitioning and Formatting a MultiBay Hard Drive 1. Exit all software applications, shut down the operating system software, and turn off the Personal Computer. 2. Insert the hard drive into the MultiBay as shown in the following section. 3. Turn on the Personal Computer. Follow directions for your operating system, below: Windows 98 and Windows Millennium (FDISK) 1.
QuickSetup_UsersGuide.book Page 4 Wednesday, May 30, 2001 9:36 AM Working with the MultiBay Windows 2000 and Windows NT 4.0 (Disk Administrator) 1. Run Disk Administrator. ❏ Under Windows 2000, right-click the My Computer icon, then click Manage > Disk Management. ❏ Under Windows NT, click Start > Programs > Administrative Tools > Disk Administrator. 2. Select the MultiBay hard drive. 3. On the Partition menu, click Create. Carefully read and respond to any prompts that appear on the screen.
QuickSetup_UsersGuide.book Page 5 Wednesday, May 30, 2001 9:36 AM Working with the MultiBay 3. With the top of the drive facing left and the drive connector facing the Personal Computer, slide the drive into the MultiBay and push firmly to ensure that the electrical connector is properly seated. Inserting a Drive into the MultiBay If the device does not start, ensure that the necessary device drivers are installed on the system.
QuickSetup_UsersGuide.book Page 6 Wednesday, May 30, 2001 9:36 AM Working with the MultiBay 3. Firmly press and hold the eject button 1 to eject the drive from the MultiBay. ✎ 2-6 Removing a Drive from the MultiBay If the Personal Computer did not ship with a drive in the MultiBay, there will be a drive blank in the MultiBay. Follow the above procedure to remove it before inserting a MultiBay drive.
QuickSetup_UsersGuide.book Page 1 Wednesday, May 30, 2001 9:36 AM chapter 3 Adding System Memory and Upgrading the Internal Hard Drive General Precautions Before adding system memory or upgrading the hard drive be sure to carefully read all of the applicable instructions, cautions, and warnings in this guide.
QuickSetup_UsersGuide.book Page 2 Wednesday, May 30, 2001 9:36 AM Adding System Memory and Upgrading the Internal Hard Drive Using the Torx screwdriver 4 (provided), remove the tamper-proof Torx screw 3 and pull the security bar 1 away from the personal computer. Uninstalling the iPAQ Desktop Security Bar Removing and Replacing the Side Access Panels To access system memory or the internal hard drive, you must remove the side access panel as shown below: 1.
QuickSetup_UsersGuide.book Page 3 Wednesday, May 30, 2001 9:36 AM Adding System Memory and Upgrading the Internal Hard Drive 3. Press down on the ribbed middle section at the top of the access panel 1, then pivot and lift the access panel from the Personal Computer. 4. To replace the access panel, ensure that it is aligned on the two tabs on the base of the Compaq iPAQ 2, then pivot it up and toward the Personal Computer until it locks into place.
QuickSetup_UsersGuide.book Page 4 Wednesday, May 30, 2001 9:36 AM Adding System Memory and Upgrading the Internal Hard Drive Adding System Memory The memory sockets on the personal computer can be populated with industry-standard DIMMs. These memory module slots are populated with at least one preinstalled memory module. To achieve the maximum memory support, you may be required to replace the preinstalled DIMM with a higher capacity DIMM.
QuickSetup_UsersGuide.book Page 5 Wednesday, May 30, 2001 9:36 AM Adding System Memory and Upgrading the Internal Hard Drive Accessing the DIMM Slots Å WARNING: To reduce the risk of personal injury from hot surfaces, allow the internal system components to cool before touching. 3. To remove a module, press out on both latches of the DIMM socket at the same time. This releases the module and partially pushes it out of the socket. 4. Lift the module from the socket.
QuickSetup_UsersGuide.book Page 6 Wednesday, May 30, 2001 9:36 AM Adding System Memory and Upgrading the Internal Hard Drive Adding or Removing Memory Modules 5. To install a memory module, press out on both latches of the DIMM socket at the same time 1. Match the notch on the module with the tab on the memory socket 2. Firmly push the module straight into the socket, ensuring that the module is fully inserted and properly seated 3.
QuickSetup_UsersGuide.book Page 7 Wednesday, May 30, 2001 9:36 AM Adding System Memory and Upgrading the Internal Hard Drive ✎ If only one memory module is used in the system, it must be installed in the same socket that held the preinstalled memory module. 6. Replace the right access panel. ✎ Quick Setup & User’s Guide When the Personal Computer starts up, it will recognize the system memory upgrade and automatically reconfigure the system.
QuickSetup_UsersGuide.book Page 8 Wednesday, May 30, 2001 9:36 AM Adding System Memory and Upgrading the Internal Hard Drive Upgrading the Primary Hard Drive The primary hard drive is a 3.5-inch hard drive located on the left side of the Personal Computer, under the MultiBay. 1. Exit all software applications, shut down the operating system software, turn off the Personal Computer and any external devices, then disconnect the power cord from the power outlet. 2. Remove the left access panel.
QuickSetup_UsersGuide.book Page 9 Wednesday, May 30, 2001 9:36 AM Adding System Memory and Upgrading the Internal Hard Drive 6. Disconnect the power cable 4 from the hard drive by pulling up on the connector. ✎ Quick Setup & User’s Guide When removing the signal cable, pull on the tab instead of the cable itself. This will help prevent cable damage.
QuickSetup_UsersGuide.
QuickSetup_UsersGuide.book Page 1 Wednesday, May 30, 2001 9:36 AM chapter 4 Accessing the Internet & Using Network Communications Accessing the Internet Using the Optional USB Modem If you do not have a network connection to the Internet, you will need an Internet service provider and an external USB modem, available from Compaq. Refer to the documentation included with the modem for instructions on installing, configuring, and using the modem.
QuickSetup_UsersGuide.book Page 2 Wednesday, May 30, 2001 9:36 AM Accessing the Internet & Using Network Communications Using Network Communications The personal computer comes with an integrated network interface controller (NIC) and network device drivers. NIC-Based Alerts NIC-based alert support allows a system administrator to remotely monitor personal computers and Personal Computers over the network.
QuickSetup_UsersGuide.book Page 3 Wednesday, May 30, 2001 9:36 AM Accessing the Internet & Using Network Communications If Remote Wakeup is enabled, the link/activity light will remain functional even when power to the Personal Computer is turned off. Disabling the Autosensing Capabilities Autosensing NICs automatically determine the maximum network operating speed of the attached network and configure themselves accordingly.
QuickSetup_UsersGuide.
QuickSetup_UsersGuide.book Page 1 Wednesday, May 30, 2001 9:36 AM chapter 5 Using the Legacy Module The optional Legacy Module (standard on select models) provides connectors for serial and parallel devices, PS/2 mouse, and PS/2 keyboard. ✎ Microsoft Windows 98 and Windows NT 4.0 will not run properly if the Legacy Module is not installed or has been removed from the iPAQ Desktop Personal Computer.
QuickSetup_UsersGuide.
QuickSetup_UsersGuide.book Page 1 Wednesday, May 30, 2001 9:36 AM chapter 6 Desktop Management COMPAQ pioneered desktop manageability in 1995 with the introduction of the industry's first fully manageable desktop personal computers. Since then, Compaq has led an industry-wide effort to develop the standards and infrastructure required to effectively deploy, configure, and manage desktop PCs.
QuickSetup_UsersGuide.book Page 2 Wednesday, May 30, 2001 9:36 AM Desktop Management Initial Configuration and Deployment Compaq personal computers come with a preinstalled system software image. After a very brief software “unbundling” process, the personal computer is ready to be used.
QuickSetup_UsersGuide.book Page 3 Wednesday, May 30, 2001 9:36 AM Desktop Management Altiris eXpress Altiris eXpress allows the system administrator to create and quickly deploy a customized, corporate-standard software image across one or more networked client PCs with an interface as simple to use as Windows Explorer. Altiris eXpress supports Intel's Wired for Management and Preboot Execution Environment (PXE).
QuickSetup_UsersGuide.book Page 4 Wednesday, May 30, 2001 9:36 AM Desktop Management Asset Tracking and Security Compaq AssetControl features incorporated into the Personal Computer provide key asset tracking data that can be managed using Compaq Insight Manager products and Management Solutions Partners products.
QuickSetup_UsersGuide.book Page 5 Wednesday, May 30, 2001 9:36 AM Desktop Management Security Features Overview Feature How It Is Established Prevents booting from the removable media drives. From the Compaq Computer Setup Utilities menu. For more information about Computer Setup, see the Troubleshooting Guide. Serial, Parallel, or USB Interface Control Prevents transfer of data through the integrated serial, parallel, or USB (universal serial bus) interface.
QuickSetup_UsersGuide.book Page 6 Wednesday, May 30, 2001 9:36 AM Desktop Management Security Features Overview Feature Purpose (Continued) How It Is Established Ownership Tag Displays ownership information, as defined by the system administrator, during system startup (protected by setup password). From the Compaq Computer Setup Utilities menu. iPAQ Desktop Security Bar Prevents removal of the side panels to protect the internal hard drive and memory modules.
QuickSetup_UsersGuide.book Page 7 Wednesday, May 30, 2001 9:36 AM Desktop Management A network-wide setup password can be established to enable the system administrator to log in to all network systems to perform maintenance without having to know the power-on password, even if one has been established. The DriveLock feature prevents unauthorized access to data stored on MultiBay hard drives.
QuickSetup_UsersGuide.book Page 8 Wednesday, May 30, 2001 9:36 AM Desktop Management 3. Select Security, then Power-On Password and follow the instructions on the screen. 4. Before exiting, click File > Save Changes and Exit. Entering a Power-On Password To enter a power-on password, complete the following steps: 1. Turn on or restart the Personal Computer. If you are in Windows, click Start > Shut Down > Restart the Computer. 2.
QuickSetup_UsersGuide.book Page 9 Wednesday, May 30, 2001 9:36 AM Desktop Management If you enter the password incorrectly, a broken key icon appears. Try again. After two unsuccessful tries, the system will restart, but you will be unable to access the Computer Setup utilities. Changing a Power-On or Setup Password 1. Turn on or restart the Personal Computer. If you are in Windows, click Start > Shut Down > Restart the Computer. To change the setup password, run Computer Setup. 2.
QuickSetup_UsersGuide.book Page 10 Wednesday, May 30, 2001 9:36 AM Desktop Management ✎ Refer to “National Keyboard Delimiter Characters” on page 12 for information about the alternate delimiter characters. The power-on password and setup password may also be changed using the Security options in Computer Setup.
QuickSetup_UsersGuide.book Page 11 Wednesday, May 30, 2001 9:36 AM Desktop Management Entering a DriveLock Password on a MultiBay Hard Drive When DriveLock is enabled, the DriveLock User or Master password must be entered to unlock the drive. To enter a DriveLock password, complete the following steps: 1. Turn on or restart the Personal Computer. If you are in Windows, click Start > Shut Down > Restart the Computer. 2.
QuickSetup_UsersGuide.book Page 12 Wednesday, May 30, 2001 9:36 AM Desktop Management ✎ Refer to “National Keyboard Delimiter Characters” on page 12 for information about the alternate delimiter characters. The power-on password and setup password may also be changed using the Security options in Computer Setup. The Master password can only be changed in Setup if it was used to unlock the device during POST.
QuickSetup_UsersGuide.book Page 13 Wednesday, May 30, 2001 9:36 AM Desktop Management 1. Insert the posts 1 on the Security Bar into the openings 2 on the rear of the side panels. Installing the iPAQ Desktop Security Bar ✎ If the metal extension (provided with the Security Bar) is inserted into the post that goes into the right rear hole on the personal computer, the MultiBay eject button will be disabled. A drive installed in the MultiBay cannot be removed until the Security Bar is removed.
QuickSetup_UsersGuide.book Page 14 Wednesday, May 30, 2001 9:36 AM Desktop Management Installing a Compaq Security Lock The rear panel of the personal computer features a cable lock provision that accommodates the optional Compaq Security Lock, so that the Personal Computer can be physically secured to a work area. If the Security Bar is installed, the Compaq Security Lock can be used to secure it to the Personal Computer, as well. 1.
QuickSetup_UsersGuide.book Page 15 Wednesday, May 30, 2001 9:36 AM Desktop Management 3. Insert the lock into the cable lock provision on the rear of the computer and lock it with the key. Installing a Cable Lock Fingerprint Identification Technology Eliminating the need to enter end-user passwords, Compaq Fingerprint Identification Technology tightens network security, simplifies the login process, and reduces the costs associated with managing corporate networks.
QuickSetup_UsersGuide.book Page 16 Wednesday, May 30, 2001 9:36 AM Desktop Management Fault Notification and Recovery Fault Notification and Recovery features combine innovative hardware and software technology to prevent the loss of critical data and minimize unplanned downtime. When a fault occurs, the Personal Computer displays a Local Alert message containing a description of the fault and any recommended actions. You can then view current system health by using the Compaq Management Agent.
QuickSetup_UsersGuide.book Page 17 Wednesday, May 30, 2001 9:36 AM Desktop Management Introducing the Drive Protection System The Compaq Drive Protection System (DPS) is a diagnostic tool built into the internal hard drive. DPS is designed to help diagnose problems that might result in unwarranted hard drive replacement. When Compaq personal computers are built, each installed hard drive is tested using DPS and a permanent record of key information is written onto the drive.
QuickSetup_UsersGuide.book Page 18 Wednesday, May 30, 2001 9:36 AM Desktop Management Software Updating and Management Compaq provides several tools for managing and updating software on Compaq Personal Computers-Altiris eXpress, Insight Manager LC, System Software Manager, and Remote Management Setup Utilities.
QuickSetup_UsersGuide.book Page 19 Wednesday, May 30, 2001 9:36 AM Desktop Management Remote ROM Flash Your Personal Computer comes with reprogrammable flash ROM (read only memory). By establishing a setup password in Security Management, you can protect the ROM from being unintentionally updated or overwritten. This is important to ensure the operating integrity of the Personal Computer. Should you need or want to upgrade your ROM, you may: Ä ■ Order an upgraded ROMPaq diskette from Compaq.
QuickSetup_UsersGuide.book Page 20 Wednesday, May 30, 2001 9:36 AM Desktop Management Remote Security Management Remote Security Management allows the system administrator to safely set or modify security features on remote Compaq personal computers, directly from the centralized network management console. Enabling the system administrator to perform these tasks remotely, on multiple computers, results in consistent deployment of and greater control over PC security parameters over the network.
QuickSetup_UsersGuide.book Page 21 Wednesday, May 30, 2001 9:36 AM Desktop Management 4. Select Remote Wakeup. 5. Change the value to ON. 6. Click OK to save and apply changes, then click OK to exit the Network dialog. For more information on using Remote Wakeup and Remote Shutdown, refer to the online Remote Management Administrators Guide. The Remote Management Administrators Guide is included with the Remote Management Setup Utilities, and is available on the Compaq Web site at www.compaq.com.
QuickSetup_UsersGuide.book Page 22 Wednesday, May 30, 2001 9:36 AM Desktop Management Altiris eXpress and PC Transplant make it easy to replicate the configuration and custom settings of one PC and copy it to one or more PCs. For more information, visit the Compaq Web site at www.compaq.com.
QuickSetup_UsersGuide.book Page 23 Wednesday, May 30, 2001 9:36 AM Desktop Management Power Management Power Management is a feature that saves energy by shutting down certain components of the Personal Computer when they are not in use, saving energy without having to shut down the Personal Computer. Timeouts (the period of inactivity allowed before shutting down these components) can be enabled, customized, or disabled using Computer Setup. 1. Access the Computer Setup menu. 2.
QuickSetup_UsersGuide.book Page 24 Wednesday, May 30, 2001 9:36 AM Desktop Management Compaq has made the task of locating, accessing, evaluating, and installing the latest support software easier. You can download the software from the Compaq World Wide Web site at www.compaq.com. The Web site contains the latest device drivers, utilities, and flashable ROM images needed to run Windows 98, Windows Millenium, Windows 2000, and Windows NT Workstation on your Compaq commercial desktop product.
QuickSetup_UsersGuide.book Page 25 Wednesday, May 30, 2001 9:36 AM Desktop Management generation power management. But Compaq doesn't stop with these baseline features. Additional capabilities have been incorporated into Intelligent Manageability to provide an extensive solution for managing networked computing environments. Wired for Management technologies include: ■ Desktop Management Interface (DMI) 2.
QuickSetup_UsersGuide.
QuickSetup_UsersGuide.book Page 1 Wednesday, May 30, 2001 9:36 AM chapter 7 For More Information Using the Compaq iPAQ Reference Library CD Refer to the Compaq iPAQ Reference Library CD for additional product documentation.
QuickSetup_UsersGuide.book Page 2 Wednesday, May 30, 2001 9:36 AM For More Information Insert the compact disc into the CD-ROM drive. There may be a slight delay while the software checks the Windows Regional Settings. A menu of the books available on the compact disc is automatically displayed. Click the title of the book you want to read.
QuickSetup_UsersGuide.book Page 1 Wednesday, May 30, 2001 9:36 AM appendix A Specifications Compaq iPAQ Desktop Personal Computer Desktop Dimensions Height 11.8 in 30.0 cm Width 5.7 in 14.4 cm Depth 9.4 in 24.0 cm Approximate Weight 10.7 lb 4.8 kg Temperature Range (values subject to change with increasing altitude) Operating 50* to 95*F 10* to 35*C Nonoperating -22* to 140*F -30* to 60*C Relative Humidity (noncondensing) Operating 10-90% (28*C max wet bulb) Nonoperating 5-95% (38.
QuickSetup_UsersGuide.book Page 2 Wednesday, May 30, 2001 9:36 AM Specifications Compaq iPAQ Desktop Personal Computer (Continued) A-2 Rated Input Current (maximum) Power Dissipation 2.5 A 1.25 A Maximum 400 BTU/hr. 117 watts Typical 70 BTU/hr.
QuickSetup_UsersGuide.book Page i Wednesday, May 30, 2001 9:36 AM Index A access panels. See side access panels Altiris eXpress 6-3 Altiris, Inc.
QuickSetup_UsersGuide.
QuickSetup_UsersGuide.
QuickSetup_UsersGuide.book Page iv Wednesday, May 30, 2001 9:36 AM Index U Universal Serial Bus (USB) 3 upgrading the personal computer 3-1 USB interface control 6-5 USB.