Multimedia User Guide
© Copyright 2006 Hewlett-Packard Development Company, L.P. Microsoft and Windows are U.S. registered trademarks of Microsoft Corporation. The information contained herein is subject to change without notice. The only warranties for HP products and services are set forth in the express warranty statements accompanying such products and services. Nothing herein should be construed as constituting an additional warranty. HP shall not be liable for technical or editorial errors or omissions contained herein.
Table of contents 1 Multimedia hardware Using the optical drive .......................................................................................................................... 1 Identifying the installed optical drive .................................................................................... 1 Inserting an optical disc ....................................................................................................... 2 Removing an optical disc (with power) .........................
iv ENWW
1 Multimedia hardware Using the optical drive The optical drive allows you to play, copy, and create CDs or DVDs, depending on the type of installed drive and installed software. Identifying the installed optical drive To view the type of optical drive installed in the computer: ▲ Select Start > My Computer. The type of optical drive installed in the computer is displayed under Devices with Removable Storage.
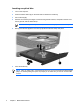
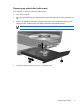
Inserting an optical disc 1. Turn on the computer. 2. Press the release button (1) on the drive bezel to release the media tray. 3. Pull out the tray (2). 4. Hold the CD or DVD by the edges to avoid touching the flat surfaces, and position the disc over the tray spindle, with the label-side up. NOTE If the tray is not fully accessible, tilt the disc carefully to position it over the spindle. 5. Gently press the disc (3) down onto the tray spindle until the disc snaps into place. 6.
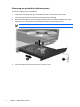
Removing an optical disc (with power) If the computer is running on external or battery power: 1. Turn on the computer. 2. Press the release button (1) on the drive bezel to release the media tray, and then pull out the tray (2). 3. Remove the disc (3) from the tray by gently pressing down on the spindle while lifting the outer edges of the disc. Hold the disc by the edges and avoid touching the flat surfaces. NOTE If the tray is not fully accessible, tilt the disc carefully as you remove it. 4.
Removing an optical disc (without power) If external or battery power is unavailable: 1. Insert the end of a paper clip (1) into the release access in the front bezel of the drive. 2. Press in gently until the tray is released, and then pull out the tray (2). 3. Remove the disc (3) from the tray by gently pressing down on the spindle while lifting the outer edges of the disc. Hold the disc by the edges and avoid touching the flat surfaces.
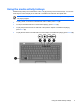
Using the media activity hotkeys Media activity hotkeys are combinations of the fn key (1) and any of the 4 function keys. You can use these keys to control the play of an audio CD or a DVD that is inserted in the optical drive. NOTE To control the play of an inserted video CD, use the media activity controls in your video CD player program. ENWW ● To play, pause, or resume an inserted audio CD or a DVD, press fn+f9 (2). ● To stop an inserted audio CD or a DVD that is playing, press fn+f10 (3).
Using the media button NOTE The media button functions vary, depending on the software installed on your computer. Refer to the QuickPlay online Help for details. If QuickPlay is installed and the computer is ● On, the media button opens a music program or the Media Menu allowing you to select a multimedia program. ● Off, the media button opens a music program or the Media Menu allowing you to select a multimedia program. NOTE Press the power button to exit the multimedia program.
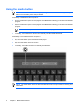
Using the audio features The following illustration and table describe the audio features of the computer. NOTE Your computer may look slightly different from the illustration in this section. ENWW Component Description (1) Speakers (2) Produce computer sound. (2) Volume mute button Mutes and restores computer sound. (3) Volume scroll zone Adjusts speaker volume. Slide your finger to the left to decrease volume and to the right to increase volume.
Using the audio-in (microphone) jack The computer is equipped with a microphone jack that supports an optional monaural (single sound channel) microphone. Select models support a stereo (dual sound channel) microphone. When connecting a microphone to the microphone jack, use a microphone with a 3.5-mm plug. Using the audio-out (headphone) jack WARNING! To reduce the risk of personal injury, adjust the volume before putting on headphones, earbuds, or a headset.
● c. Select the Place volume icon in the taskbar check box. d. Click Apply. Program volume control: Volume can also be adjusted within some programs.
Using the S-Video-out jack The 7-pin S-Video-out jack connects the computer to an optional S-Video device such as a television, VCR, camcorder, overhead projector, or video capture card. The computer can support one S-Video device connected to the S-Video-out jack, while simultaneously supporting an image on the computer display or any other supported external display. NOTE To transmit video signals through the S-Video-out jack, you need an S-Video cable, available from most electronics retailers.
2 Multimedia software The computer includes preinstalled multimedia software. Some models may be shipped with additional multimedia software on an optical disc.
Identifying preinstalled multimedia software To view and access the preinstalled multimedia software on the computer: ▲ Select Start > All Programs. NOTE You can also reinstall multimedia software on the computer. Select Start > All Programs > Software Setup. Installing multimedia software from a CD (select models only) To install multimedia software from a CD included with the computer: 1. Insert the multimedia software CD into the optical drive. 2.
Protecting playback To prevent the loss of playback or playback quality: ● Save your work and close all open programs before playing a CD or a DVD. ● Do not connect or disconnect hardware while playing a disc. To prevent the loss of playback while the computer is in Windows, do not initiate standby or hibernation while playing a disc. If standby or hibernation is initiated while a disc is in use, you may see the warning message “Putting the computer into hibernation or standby might stop the playback.
Changing DVD region settings Most DVDs that contain copyrighted files also contain region codes. The region codes help protect copyrights internationally. You can play a DVD containing a region code only if the region code on the DVD matches the region setting on your DVD drive. If the region code on a DVD does not match the region setting on your drive, the following message is displayed when you insert the DVD: “Playback of content from this region is not permitted.
Index A audio features 7 audio-in (microphone) jack 8 audio-in (microphone) jack, identifying 7 audio-out (headphone) jack 8 audio-out (headphone) jack, identifying 7 H headphones J jacks audio-in (microphone) 7, 8 audio-out (headphone) 7, 8 S-Video-out 10 Q QuickPlay 6 B buttons Media 6 volume mute 7, 8 M media activity hotkeys, identifying 5 Media button, identifying 6 microphones, supported 8 monitor, connecting 9 multimedia software described 11 identifying 12 installing 12 using 12 mute button 7,
16 Index ENWW