
Operation Manual
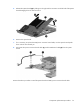


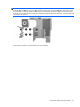


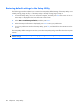
Table Of Contents
- Product description
- External component identification
- Illustrated parts catalog
- Removal and replacement procedures
- Setup Utility
- Specifications
- Computer specifications
- 15.4-inch, WXGA, BrightView display specifications
- Hard drive specifications
- DVD±RW and CD-RW SuperMulti Double-Layer Combo Drive specifications
- HD DVD-ROM Drive with SuperMulti DVD±R/RW Double Layer support specifications
- Blu-ray Disc ROM Drive with SuperMulti DVD±R/RW Double-Layer (DL) support specifications
- System DMA specifications, Intel
- System DMA specifications, AMD
- System interrupt specifications, Intel
- System interrupt specifications, AMD
- System I/O address specifications, Intel
- System I/O address specifications, AMD
- System memory map specifications, Intel
- System memory map specifications, AMD
- Screw listing
- Phillips PM2.0×5.0 captive screw
- Phillips PM3.0×3.0 screw
- Phillips PM2.0×3.0 screw
- Phillips PM2.5×7.0 screw
- Phillips PM2.5×10.0 screw
- Phillips PM2.5×4.0 screw
- Phillips PM2.5×3.0 screw
- Hex HM5.0×9.0 standoff
- Phillips PM2.0×2.0 screw
- Phillips PM2.0×7.0 screw
- Phillips PM2.5×5.0 captive screw
- Phillips 2.5×4.0 captive screw
- Backup and recovery
- Connector pin assignments
- Power cord set requirements
- Recycling
- Index

Audio board
Description Spare part number
For use only in computer models with Intel processors:
●
In models that include consumer infrared
449453-001
●
In models that do not include consumer infrared lens
431443-001
For use only in computer models with AMD processors:
●
In full-featured models equipped with consumer infrared
454176-001
●
In defeatured models equipped with consumer infrared 449967-001
Before removing the audio board, follow these steps:
1.
Shut down the computer. If you are unsure whether the computer is off or in Hibernation, turn the
computer on, and then shut it down through the operating system.
2.
Disconnect all external devices connected to the computer.
3.
Disconnect the power from the computer by first unplugging the power cord from the AC outlet and
then unplugging the AC adapter from the computer.
4.
Remove the battery (see
Battery on page 41).
5.
Remove the following components:
a.
Hard drive (see
Hard drive on page 42)
b.
Optical drive (see
Optical drive on page 50)
c.
Switch cover (see
Switch cover on page 52)
d.
Keyboard (see
Keyboard on page 54)
e.
Display assembly (see
Display assembly on page 58)
f.
Top cover (see
Top cover on page 64).
Remove the audio board:
1. Remove the two Phillips PM2.5×4.0 screws (1) that secure the audio board to the computer.
2. Release the audio board (2) by sliding it back to disengage the audio connectors from the base
enclosure.
74 Chapter 4 Removal and replacement procedures