
Interconnect Switch User Guide


Configuring the GbE Interconnect Switch Using the Console Management Interface
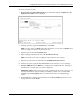
Compaq ProLiant BL p-Class GbE Interconnect Switch User Guide 3-11
COMPAQ CONFIDENTIAL Codename: Vanilla Part Number: 263680-001 Last Saved On: 4/23/02 9:59 AM
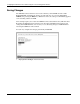
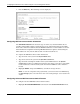
— Manual—This option allows the entry of an IP address, subnet mask, and default
gateway for the GbE Interconnect Switch. The data in these fields should be of the
form xxx.xxx.xxx.xxx, where each xxx is a number between 0 and 255. This address
should be a unique address on the network assigned for use by the Network
Administrator. The fields that require entries under this option include:
— Subnet Mask—A Bitmask that determines the extent of the subnet that the GbE
Interconnect Switch is on. The value should be 255.0.0.0 for a Class A network,
255.255.0.0 for a Class B network, and 255.255.255.0 for a Class C network, but
custom subnet masks are allowed.
— Default Gateway—An IP address that determines where packets with a
destination address outside the current subnet should be sent. This is usually the
address of a router or a host acting as an IP gateway. If your network is not part
of an intranet, or you do not want the GbE Interconnect Switch to be accessible
outside your local network, you can leave this field unchanged.
If you select Manual, type the appropriate data into the IP Address, Subnet Mask, and
Default Gateway fields.
4. Type the VLAN ID (VID) of a VLAN that will have access to the Telnet manager in the
Management VID field. This ID will be the VID of the VLAN on which a management
station is located.
5. Highlight APPLY and press the Enter key to make the change effective.
NOTE: To save the configuration settings permanently, you must enter them into NVRAM using
the Save Changes option on the main menu. Refer to the “Saving Changes” section earlier in this
chapter.
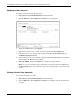
Configuring the GbE Interconnect Switch Information and Advanced Settings
To configure the GbE Interconnect Switch information and advanced settings:
1. Highlight Configure Switch Information and Advanced Settings from the
Configuration menu.