
User guide
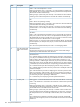
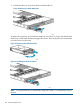
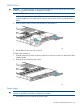

2. Pull the hard drive (3) out of the node by the latch handle (2).
Figure 28 Removing a Node Hard Drive
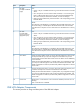
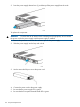
To replace the component, pull out the latch handle (2) out as far as it can go and slide the drive
into the bay until the latch mechanism engages the chassis. Then, firmly push in the latch handle
to lock the drive in the drive bay.
Figure 29 Preparing the Node Hard Drive
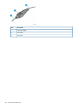
Figure 30 Installing the Node Hard Drive
NOTE: The replacement drive is automatically configured to RAID 1; no administrator action is
required.
168 Component Replacement