
User guide


Configuring Storage Pools
VLS automatically creates one storage pool. HP recommends that a single storage pool is used
even for multiple arrays. However, if additional pools are needed, you must create them. To do
so:
NOTE: The VLS Gateway can have either one storage pool for all LUNs, or one storage pool
for each array. Refer to the solutions guide for details.
1. Create a storage pool(s):
a. Open a Command View VLS session and log in as the administrator. See Opening a
Command View VLS Session from a Web Browser (page 77).
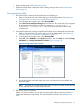
b. In the Storage tab navigation tree, select Storage Pools.
c. From the task bar, select Create Storage Pool. The Create Storage Pool Wizard is displayed.
d. Click Finish. CREATE STORAGE POOL COMPLETED is displayed.
e. Click Return.
f. If you are creating a separate storage pool for each array, repeat this process for each
storage pool.
2. Add the array LUNs to the storage pool(s).
a. Open a Command View VLS session and log in as the administrator. See Opening a
Command View VLS Session from a Web Browser (page 77).
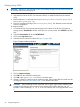
b. In the Storage tab navigation tree, under Storage Pools, select a storage pool.
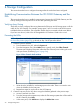
c. From the task bar, select Add External LUN. The Add External LUN Wizard is displayed.
NOTE: This task does not appear if there are no licenses available.
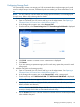
d. From the list of available unconfigured LUNs, select the LUNs to add to the pool. (By
default, all LUNs are selected.)
NOTE: View the World Wide Unique Lun ID on the storage LUN list (on the System
screen) to identify which LUNs are associated with each array.
e. Use the Format check box to indicate whether the selected LUNs are initialized (formatted)
when added to the pool.
Managing VLS Gateway Capacity 29