User’s Guide Compaq TFT5030 Flat Panel Monitor June 2001 Enhanced for accessibility
© 2001 Compaq Computer Corporation. Compaq and Compaq logo Registered in U. S. Patent and Trademark Office. Microsoft, MS-DOS, Windows, Windows NT are trademarks of Microsoft Corporation in the United States and other countries. All other product names mentioned herein may be trademarks of their respective companies. Compaq shall not be liable for technical or editorial errors or omissions contained herein.
Product Features The Compaq TFT5030 Flat Panel Monitor has an active matrix, thin-film transistor (TFT), liquid crystal display (LCD). The monitor features include: ■ 15-inch (38.
Product Features ■ Compliance with the following regulated specifications: ❏ EPA ENERGY STAR ❏ European Union CE Directives ❏ Swedish MPR II 1990 ❏ Swedish TCO '99 Universal Driver Manager This monitor may require a graphics driver (and/or .INF file) that is compatible with your computer’s graphics adapter. The CDROM included with this monitor contains an .INF file (see the section on Information Files).
Product Features Information Files This monitor includes a CD-ROM with two information files to be installed onto your computer—an .INF file and an .ICM file. ■ The .INF file defines monitor resources and provides specifications used by most operating systems to install support software for certain hardware devices. The .INF file ensures monitor compatibility and optimization with your computer’s graphics adapter. ■ The .
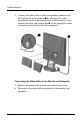
Product Features Setting Up the Monitor To set up the monitor, ensure that the power is turned off to the monitor, computer system, and other attached devices, then follow these steps: 1. Place the monitor in a convenient, well-ventilated location near your computer. 2. Connect the signal and power cables to the monitor 1. 3. Connect the DC connector of the AC adapter to the DC power cable that extends from the monitor base. 4. Connect the AC cable 3 to the AC receptacle on the AC adapter. 5.
Product Features Connecting the Monitor Cables CAUTION: When connecting the monitor, be sure to use the AC adapter supplied with the monitor. Failure to use this AC adapter may result in damage to the monitor. WARNING: To reduce the risk of electric shock or damage to your equipment: ■ Do not disable the power cord grounding plug. The grounding plug is an important safety feature. ■ Plug the power cord into a grounded (earthed) electrical outlet that is easily accessible at all times.
Product Features Note: For security purposes, this monitor has been fitted with a slot for use with a security cable lock that can be purchased separately at most computer stores. Note: After you turn on the monitor, install the Compaq LCD Display Assistant utility included on the CD-ROM. Use the onscreen instructions to adjust the picture quality of your monitor.
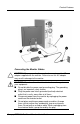
Product Features Connecting the Video Signal Cable To connect the VGA analog or DVI-D (Digital Visual InterfaceDigital) cable to the corresponding connector on the back of the monitor, you must first remove the monitor base cover. Note: For the digital input to function, the VGA cable must be disconnected from the monitor. If both VGA and DVI-D cables are attached, the monitor will default to the VGA input.
Product Features 4. Connect the video cable to the corresponding connector on the back panel of the monitor 1 by threading the cable through the neck on the monitor base to the connector, then connect the other end of the cable 2 to the appropriate video connector on the back panel of the computer. Connecting the Video Cable to the Monitor and Computer 5. Replace the monitor back panel and monitor base cover. 6. Reconnect the power cable and power on the monitor and computer.
Product Features The DVI-D connector on this monitor uses digital video information to provide higher speed for higher display resolution. The results are more precise video displays without manually adjusting screen display quality. Signal Cables Included: ■ VGA (Analog) to VGA Connector (15 pin) ■ DVI-D Cable (Digital only) to DVI Digital Connector Removing the Monitor Base Before you can mount the monitor onto a swing arm or other mounting fixture, you must remove the monitor from the base.
Product Features 2. Remove the cover plate 1 from the monitor base by placing your fingers in the opening on the bottom of the base and pulling upward, then pulling out to remove the cover. 3. Remove the back panel 1 from the monitor by pushing the bottom tabs upward and pulling out to remove the back panel. 4. Disconnect and remove the signal and power cables from the back of the monitor. 5. Remove the four screws 3 as shown in the following illustration.
Product Features When the base is removed, four threaded mounting holes are exposed on the monitor panel to be used for mounting purposes. These mounting holes are spaced 75 mm apart and are compliant with the Video Electronics Standards Association (VESA) standard for mounting flat panel displays. To mount the monitor on a swing arm or other mounting fixture, follow the instructions included with the mounting fixture to be used.
Product Features Front Panel Controls No. Icon Control Menu button 1 2 - Minus button 3 + Plus button 4 Power switch 5 Power LED Function 1. Launches 1st and 2nd level on-screen menus. 2. Exits menus and on-screen display. 1. Selects and adjusts the functions. 2. Activates Auto Adjusts when the OSD menu is inactive. Selects and adjusts the functions. Turns the monitor on and off. 1. Green indicates monitor is turned on. 2 Amber indicates Sleep mode. 3 Blinking amber indicates Sleep timer*.
Product Features On-Screen Display Settings The adjustments for screen settings are located in the on-screen display (OSD) and can be viewed in one of six available languages.
Product Features Main Menu Menu Level 1 Color Menu Level 2 Menu Level 3 o 9300 K o 6500 K Custom Color Cancel Save and Return Deutsch Language English Espanol Francais Italiano Nederlands Cancel Save and Return Management Power Saver Power On Recall Mode Display Serial No. Sleep Timer Default Video Input Color adjustment On/Off Selection On/Off Selection On/Off Selection Displays Serial No.
Product Features Main Menu Menu Level 1 Menu Level 2 OSD Control Horizontal Position Menu Level 3 Adjustment Scale Vertical Position Adjustment Scale OSD Timeout Adjustment Scale OSD Transparency Adjustment Scale Cancel Save and Return Factory Reset Yes/No Exit Compaq TFT5030 Flat Panel Monitor User’s Guide 15
Product Features How to Adjust Settings 1. Launching the on-screen display Menus: ❏ To display the Basic Menu on the monitor screen: Press the Menu button on the monitor front panel. ❏ To display the Advanced Menu: Press the Menu button on the monitor front panel to display the Basic Menu, use the Minus or Plus buttons to scroll to and highlight the Advance Menu selection, then press the Menu button again.
Product Features 2. To select an item from the Main Menu, scroll down and highlight an item by pressing the Minus (-) button 2 located on the monitor front panel. To reverse or back up, press the Plus (+) button 3. 3. Highlight your choice and press the Menu button 1 again. 4. Adjust the second-level menu displays using the same procedures as the first level. Note: The second-level menus for Brightness and Contrast displays an adjustment screen.
Product Features ■ Check Video Cable—Indicates the video cable may not be plugged into the computer or the computer may not be turned on. Sleep Timer Mode The Sleep Timer mode is an energy-saving feature that enables you to set a time for the monitor to power on and off at the same time every day. This also extends the life of the backlight bulbs in the monitor. The Sleep Timer has five settings: ■ Set Current Time ■ Set Sleep Time ■ Set On Time ■ Timer: On/Off ■ Sleep Now To set the timer: 1.
Product Features 8. Press the Minus or Plus buttons to adjust the minutes. 9. Press the Menu button to lock in the time chosen. 10. After setting the current time, the highlight automatically skips to Set Sleep Time "hours." Repeat steps 6 through 9 to set Sleep Time. 11. If you do not want to set Sleep Time, press the Menu button twice, then select Save and Return to exit the menu. 12. After setting Sleep Time, the highlight automatically skips to Set On Time "hours.
Product Features Note: The Compaq LCD Display Assistant utility is used to adjust the screen quality of your monitor. This utility provides onscreen instructions. To install this utility onto your computer, follow the instructions on the "Configuring Your Compaq LCD Monitor" card located in the Program License Agreement packet. Optimizing Digital Conversion This monitor contains advanced circuitry that allows the flat panel screen to function like a standard monitor.
Product Features Display Resolutions Preset Modes Resolutions 1. Industry Standard 640 × 350 at 31.5 kHz/70 Hz 2. Industry Standard 640 × 480 at 31.5 kHz/60 Hz 3. VESA 640 × 480 at 37.5 kHz/75 Hz 4. Industry Standard 720 × 400 at 31.5 kHz/70 Hz 5. VESA 800 × 600 at 37.9 kHz/60 Hz 6. VESA 800 × 600 at 46.9 kHz/75 Hz 7. Macintosh-compatible 832 × 624 at 49.7 kHz/75 Hz 8. VESA 1024 × 768 at 48.4 kHz/60 Hz 9. VESA 1024 × 768 at 56.5 kHz/70 Hz 10.
Product Features Energy Saver Feature When the monitor is in its normal operating mode, the monitor utilizes less than 45 watts of power and the Power LED is green. The monitor also supports a reduced power state. The reduced power state will be entered into if the monitor detects the absence of either the horizontal sync signal and/or the vertical sync signal. Upon detecting the absence of these signals, the monitor screen is blanked, the backlight is turned off, and the Power LED is turned amber.
Product Features ■ ■ ■ ■ ■ ■ ■ ■ ■ ■ Use only a power source and connection appropriate for this monitor, as indicated on the marking label/back plate and the AC adapter. If an extension cord or power strip is used, make sure that the cord or strip is rated for the product and that the total ampere ratings of all products plugged into the extension cord or power strip do not exceed 80% of the extension cord or strip ampere ratings limit.
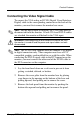
Product Features Cleaning the Monitor To clean the monitor, follow these steps: 1. Turn off the monitor and the computer. 2. Dust the monitor by wiping the screen and the cabinet with a soft, clean cloth. If the screen requires additional cleaning, use a clean cloth dampened with isopropyl alcohol. CAUTION: Do not use benzene, thinner, ammonia, or any volatile substance to clean the monitor screen or cabinet. These chemicals may damage the monitor. Never use water to clean an LCD screen.
Agency Regulatory Notices Federal Communications Commission Notice This equipment has been tested and found to comply with the limits for a Class B digital device, pursuant to Part 15 of the FCC Rules. These limits are designed to provide reasonable protection against harmful interference in a residential installation.
Agency Regulatory Notices Cables Connections to this device must be made with shielded cables with metallic RFI/EMI connector hoods to maintain compliance with FCC Rules and Regulations. Declaration of Conformity for Products Marked with FCC Logo, United States Only This device complies with Part 15 of the FCC Rules.
Agency Regulatory Notices Avis Canadien Cet appareil numérique de la classe B respecte toutes les exigences du Règlement sur le matériel brouilleur du Canada. European Notice Products with the CE Marking comply with both the EMC Directive (89/336/EEC) and the Low Voltage Directive (73/23/EEC) issued by the Commission of the European Community.
Agency Regulatory Notices EPA Energy Star Compliance Monitors that are marked with the Energy Star Logo meet the requirements of the EPA Energy Star program. As an Energy Star Partner, Compaq Computer Corporation has determined that this product meets the Energy Star guidelines for energy efficiency. Specific details on using the Energy Saving features can be found in the energy saver or power management section of the computer manual.
Agency Regulatory Notices Compaq TFT 5030 Flat Panel Monitor User’s Guide 29