
Service manual


Ultraview 1030/1050 Monitors — Service Manual
4-8
Capnography
Calibration
Required Equipment:
•O
2
sensor (P/N 015-0285-00)*
•O
2
cable (P/N 175-0877-01 or 175-0996-00)*
•O
2
airway adapter (P/N 025-0040-00)*
•CO
2
sensor assembly (P/N 011-0710-00 for -G or 704-0001-00 for -H)
•CO
2
airway adapter (P/N 025-0033-00 or 025-0035-00 for -G or 704-0002-00,
704-0003-00, 704-0004-00, or 704-0005-00 for -H)
• Calibration gas bottle (P/N 006-0382-00 or 006-0179-00)
• A flowmeter
• A pressure regulator for the calibration gas bottle
* Some models do not include O
2
capability.
Setup:
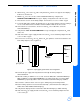
Use the setup as illustrated in Figure 4-2 on page 4-9.
Procedure:
Perform the following procedure to ensure proper performance of the capnography option using
the equipment and setup listed above:
1 Place an airway adapter into the transducer head of the CO
2
sensor and plug it into the
capnography connector on the side of the monitor.
2 Verify that gas graphics are displayed in the waveform zone and that the WARMING UP
message appears.
Note:
In less than five minutes, the WARMING UP message disappears and a flat line waveform is
presented.
1 Breathe through the airway adapter for five slow breaths. Verify that the waveform displayed
rises and falls accordingly.
2 Touch the GAS key to verify that the green module LED on the capnograph lights up when the
key is active.
3 If the O
2
option is provided, continue with step 6. If the O
2
option is not provided, continue with
step 15.
4 Connect the O
2
cable to the O
2
connector on the front panel of the module.
5 Without connecting the O
2
sensor, touch the GAS, CAL, and O2 CAL keys, then touch the
ZERO key and verify that the O2 ZERO COMPLETE message is displayed.