USER MANUAL Models: CVG-3AVR, 1:3 Audio/Video DA CVG-3AVB, 1:3 Audio/Video DA For maximum results, use Comprehensive Brand Premium High Resolution cables and connectors.
Contents 1 2 3 4 5 5.1 5.
1 Introduction Congratulations on purchasing your CVG-3AVR and/or CVG-3AVB 1:3 Audio/Video DA, which are ideal for the following applications: Video/Audio duplication studios Retail outlets and home theater systems The package includes the following items: CVG-3AVR and/or CVG-3AVB 1:3 Audio/Video DA Power adapter(s) This user manual 2 Getting Started We recommend that you: Unpack the equipment carefully and save the original box and packaging materials for possible future shipment Review the contents of
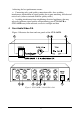
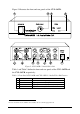
Achieving the best performance means: Connecting only good quality connection cables, thus avoiding interference, deterioration in signal quality due to poor matching, and elevated noise levels (often associated with low quality cables) Avoiding interference from neighboring electrical appliances that may adversely influence signal quality and positioning your CVG-3AVR or CVG-3AVB away from moisture, excessive sunlight and dust 4 Your Audio/Video DA Figure 1 illustrates the front and rear panels of the CV
Figure 2 illustrates the front and rear panels of the CVG-3AVB: Figure 2: CVG-3AVB 1:3 Audio/Video DA Table 1 and Table 2 define the front and rear panels of the CVG-3AVR and the CVG-3AVB, respectively. Table 1: Front Panel CVG-3AVR and CVG-3AVB 1:3 Audio/Video DA Features # Feature Function 1 2 POWER Switch Audio Level Knob Illuminated switch supplying power to the unit Adjusts the audio output signal level 3 Video EQ. Trimmer Adjusts1 the video EQ.
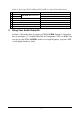
Table 2: Rear Panel CVG-3AVR and CVG-3AVB 1:3 Audio/Video DA Features # 1 2 3 4 5 6 7 5 Feature Video INPUT CVG-3AVR: RCA Connectors CVG-3AVB: BNC Connectors Video OUT Audio INPUT (L) RCA Connector Audio INPUT (R) RCA Connector Audio OUT (L) RCA Connector Audio OUT (R) RCA Connector 12 VDC 70mA Function Connects to the video source Connects to the video acceptor (from 1 to 3) Connects to the left audio source Connects to the right audio source Connects to the left audio acceptor (from 1 to 3) Connects to
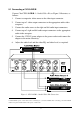
5.1 Connecting a CVG-3AVR/B Connect1 the CVG-3AVR/B 1:3 Audio/Video DA, as Figure 3 illustrates, as follows: 1. Connect a composite video source to the video input connector. 2. Connect up to 3 video output connectors to the appropriate audio video acceptors. 3. Connect the audio source to the right and left audio input connectors. 4. Connect up to 3 right and left audio output connectors to the appropriate audio video acceptors. 5.
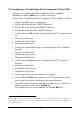
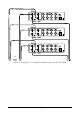
5.2 Configuring a 1:3 Audio/Video DA for Component (YUV) or RGB Configure a 1:3 Audio/Video DA for component (YUV) or RGB by combining 3 CVG-3AVR/B units, as Figure 4 illustrates. Connect1 the 1:3 Audio/Video DA for component (YUV) or RGB, as follows: 1. Connect the RGB source, by connecting: The R cable to the first unit’s INPUT connector The G cable to the second unit’s INPUT connector The B cable to the third unit’s INPUT connector 2.
Figure 4: Configuring a 1:3 Audio/Video DA for Component (YUV) or RGB 7
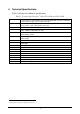
6 Technical Specifications Table 3 includes the technical specifications. 1 Table 3: Technical Specifications of the CVG-3AVR and CVG-3AVB Inputs: Outputs: Coupling: Bandwidth: Gain Range: Maximum Output: Video Equalization: S/N Ratio: Video Non-linearity: Differential: THD (Audio)/Noise: 2nd Harmonic: K-Factor: Dimensions: Power Source: Weight: Accessories: 1 composite video 1 Vpp/75 : RCA connector (CVG-3AVR); BNC connector (CVG-3AVB) 1 stereo audio, 4.