VideoMate X800 PCI TV Tuner Card Start Up Guide Compro Technology, Inc. www.comprousa.
Copyright © 2001-2005. Compro Technology, Inc. No part of this document may be copied or reproduced in any form or by any means without the prior written consent of Compro Technology, Inc. Compro, VideoMate, Poladyne, Play with Power, and the Compro logo are trademarks of Compro Technology, Inc. Other names and marks are trademarks of their respective owners.
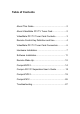
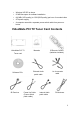
Table of Contents About This Guide ...................................................... 2 About VideoMate PCI TV Tuner Card....................... 2 VideoMate PCI TV Tuner Card Contents.................. 3 Remote Control Key Definition and Use ................... 4 VideoMate PCI TV Tuner Card Connectors.............. 6 Hardware Installation ................................................ 7 Software Installation................................................ 11 Remote Wake Up............................
About This Guide This manual tells you how to install and use your VideoMate PCI TV Tuner Card. For more information on using applications, please see the User’s Guides in the programs, on the CDs, or at our website for the latest manuals http://www.comprousa.com/download. About VideoMate PCI TV Tuner Card VideoMate TV lets you watch and record TV on your PC. It features an analog TV tuner, 3D Y/C Separation, FM Tuner, Remote Wake Up, and Power Up Scheduling.
• • • • • Windows XP SP2 or above 50 MB free space for software installation 600 MB (VCD-quality) to 3 GB (DVD-quality) per hour of recorded video ATX power supply A computer case with a separate power switch cable from power on button.
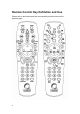
Remote Control Key Definition and Use Please refer to the buttons and their corresponding function listed on the opposite page.
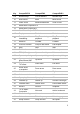
Key ComproPVR 2 ComproFM 2 ComproDVD 2 0-9 Number keys Pre-set stations Number keys 10 Mute sound Mute Mute sound 11 Zoom In/Out Minimize/Maximize Zoom In/Out 12 Start/Close ComproDVD 2 13 Start/Close ComproFM 2 14 Start/Close ComproPVR 2 15 Replay Rewind Rewind 16 Pause or enable timeshifting Play/Pause during playback Play/Pause during playback 17 Advance Forward Forward 18 Previous channel Jump to last station Last chapter 19 Stop Stop Stop 20 Tab function Not
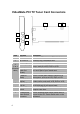
VideoMate PCI TV Tuner Card Connectors 5 6 7 1 2 3 4 Item Function 1 TV Tuner-In 2 FM Tuner-In 3 IR 4 Audio-In (Blue) (1 to 4 converter External cable) Audio-Out (Green) S-Video-In (Black) Composite-In (Yellow) 5 To Sound Card AUX-IN 6 To Case Power Switch 7 To Mainboard Power Switch Connector 6 Description Connect to a TV antenna or TV cable feed. Connect to an FM antenna feed. Connect the IR receiver here. Use an audio patch cable to connect to an audio source, such as a VCR, DVD or VCD.
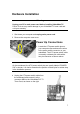
Hardware Installation Warning Unplug your PC’s main power cord before installing VideoMate TV. Failure to do so may cause damage to your VideoMate TV tuner card and void your warranty. 1. Shut down your computer and unplug main power cord. 2. Remove the computer case cover. Power Up Connections 3. Locate the ATX power switch pins on your computer case and trace the wires to the power switch connector on your mainboard.
5. Connect the black socket of Power Up power patch cable to the power switch connector on the mainboard. 6. Connect the white socket of Power Up patch cable to the connector JS2 on the VideoMate PCI TV Tuner card. Note Double check your work. If you plug the cables into the incorrect pins, your PC may not start or otherwise function improperly. Connect the white end of the Power Up patch cable to the TV tuner card and the black end to the mainboard.
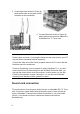
External Audio Connection 7. The external audio patch cable is color-coded. Connect the green plug to the green Audio-Out port on the 1 to 4 converter cable of VideoMate PCI TV Tuner card and the blue plug to the “Line-In” port of your sound card. Internal Audio Connection 8. Plug one end of the internal audio patch cable to the green internal Audio-Out port on the VideoMate PCI TV Tuner card. 9.
Note If the computer cannot be turned on, verify the position of the power patch cable on the mainboard. Consult the mainboard documentation to determine the position of the ATX power switch connector. Also, double check that the AC power cable is properly connected to your PC. Power Up will start your computer 5 minutes in advance of the scheduled recording time, for example, if you have set ComproPVR to record a program at 4 o’clock, it will start your computer at 3:55.
Software Installation After installing the PCI card and cables in your computer, you should restart it and follow these steps to install the software. Step 1. After restarting, Windows will detect your VideoMate TV card and start the Add/Remove Hardware Wizard, prompting you to install the VideoMate TV drivers. Please press Cancel and go to the next step. Step 2. Insert the installation CD into your CD drive. If you have Autorun enabled, the installer will start automatically.
Remote Wake Up Introduction VideoMate X800 feature the Remote Wake Up function for greater convenience. Compro has always focused on developing products with great convenience. Integration of hardware and software support, you can start your computer from the shut down state by pressing a button on the remote keypad. You don’t need to reach over to your computer anymore. You can also shut down the computer by remote control as well. No more mouse clicks on the screen.
Remote Shut Down There are two situations for the operation. When not watching TV, i.e. no ComproPVR running: Just press the SLEEP button on the lower-right corner on the remote keypad, you will see a dialog as shown below. Program will countdown 20 seconds to shutdown the computer. If you don’t want to shut down the computer, please press the SLEEP button again, in other words, pressing the SLEEP key a second time is the same as pressing the “Cancel” button.
ComproDVD 2 Introduction Stability, simplicity, and superiority. ComproDVD epitomizes these traits to the maximum and gives users all they wish for in a DVD player. Note This section provides basic information for ComproDVD. For more details, please check the help file of ComproDVD or the manual in the installation CD. Control Panel The following describe the ComproDVD control panel functions, and tips for using ComproDVD. The following figure gives you the function of the button with (Hot Key.
Compro 3D Y/C Separation User’s Guide Introduction of 3D Y/C Separation Television signals actually contain two signals, Luminance and Chrominance. By convention, Y represents Luminance and C represents Chrominance. The Y signal describes the brightness of the picture and C represents the color information. Black and white TV signals contain only the Y signal. When color TV was introduced many years ago, the Y and C signals were combined into a composite video signal.
Using the Y/C Separation program Compro Y/C Separation program provides three preset profiles that let you quickly adjust the picture to your preferences without knowing the details of Y/C separation. Additionally, TV enthusiasts can configure the Y/C separation settings, in minute detail, to achieve ultimate picture quality. TV Mode This is the standard mode. In this mode, the appropriate Y/C separation algorithm is automatically selected. This is a good setting for most people.
Detail Mode (3D Y/C Separation) This mode enables the 3D Y/C separation algorithm. This mode gives you crystal clear text and beautiful color on videos with little motion and complex scenes. This mode is recommended when you have a strong video signal and are watching programs with lots of detail, such as financial programs or news. However, 3D Y/C separation algorithm is not available in SECAM system. Custom Mode The video enthusiast can control every nuance of the Y/C separation chip in Custom Mode.
Without Y/C separation In these pictures, the texts should be very clear and sharp. Without Y/C separation, however, the text displays the Cross-Color Artifact phenomenon. Also, the line between the black and white bars shows the vertical or horizontal dot lines color as known as the Cross-Luminance phenomenon. This error is also avoided by the Y/C Separation process. Y/C Separation returns sharpness to edges and clarifies text. You no longer need to suffer from blurry pictures.
ComproPVR 2 Introduction ComproPVR is a complete digital entertainment solution for your PC. Watch and record TV programs on your PC, in full-screen mode or in a window. Timeshifting lets you watch TV, pause live TV, or review your favorite scenes without missing a minute of the program. Integrated deinterlacing technology assures the highest picture quality. All this, with the universal remote control. Control Panel The ComproPVR control panel resembles the controls on a VCR.
Icon n/a HotKey Description A Enable/Disable Always-on-Top function for TV window.(Oregon circle on the upper-right corner of the TV window) L Sleep function Note: Language select is only available while the program supports it. Watching After installation, just press the PVR/TV button on the remote or double click the ComproPVR icon on the desktop you will be able to watch TV. The first time you start ComproPVR, Autoscan will automatically scan for available TV channels.
Right-Click Mouse Menu If using mouse to right-click on the TV screen, you can see a menu pop up. There are many useful options for your convenience. Zooming image If you would like to see more details on a certain part of a video image, you can press the mouse right button to drag a zone of the screen. You will see the zoomed image. Also you can press the mouse right button and move on the screen to shift the zoomed area of the image. Just click the mouse left button to resume normal mode.
Recording ComproPVR is a digital video recorder. ComproPVR can record full-motion video and audio from your video source and save it to your hard disk. ComproPVR supports MPEG-1, MPEG-2, MPEG-4 encoding, which saves disk space while providing high video quality. To instantly start recording: 1. Press the Record button . ComproPVR starts recording the video source currently showing in the display window. It will save it to a file on your disk. 2. Press the Pause button to pause the recording if you like.
Format: Choose the recording format you like. Device: Choose the CD-R or DVD-R device here. Erase Disk: If the disc is re-writable and not empty, you need to erase it first. Start Burning: Press this button to start burning disc. Stop: Press the button on the control panel to stop burning. Cancel: Press this button to exit the dialog. Note If you can’t see the icon, please check the following: This feature is only available on Windows XP and 2000.
Timeshifting Timeshifting lets you pause, replay, or skip commercials during live TV, without interrupting an ongoing recording session. Timeshifting gives you absolute control over how you watch television, like never before. For example, you watch your favorite sporting event, pause the live action and help yourself to an ice-cold beverage from the fridge. Press the Timeshifting (See below.) button and the Time Monitoring bar will appear.
Note This manual only provides basic information for the ComproPVR 2. For more information on using applications, please see the User’s Guides in the programs, on the CDs, or at our website for the latest manuals.
ComproFM 2 Introduction ComproFM lets you enjoy FM radio programs on your PC. Listen to music or other programs while you work or browse the Internet. Note The hardware needs to have FM tuner in order to use ComproFM. This section provides basic information for ComproFM. For more details, please check the help file of ComproFM or the manual in the installation CD. Control Panel The following describe the ComproFM control panel functions, and tips for using ComproFM.
Troubleshooting OS requirement VideoMate TV has to work on Windows XP / Windows 2000 or above OS. You are welcome to www.WindowsUpdate.com website for the Service Pack update of Microsoft. Driver Installation The most common cause of problems with the TV Tuner Card is incorrect installation of the TV capture and TV tuner drivers. If you have problems watching, recording, or timeshifting live TV, please check the status of the drivers with Device Manager.
If the problem persists, your problem could also be the result of an IRQ conflict. IRQ conflicts happen when other devices, e.g., network card or sound card, in your computer share the same IRQ with your TV tuner card. Use Device Manager to detect IRQ conflicts. In Device Manager, choose "View->Resource by type" and click on the "+" besides Interrupt request (IRQ). You should see the following. For best performance, no device should share an IRQ with the VideoMate TV card.
Why won’t my PC start? Don’t panic. The most common reason for this is because you connected the ATX power switch cable to the wrong pins on the mainboard. Verify the position of the power patch cable on the mainboard. Check the mainboard documentation to verify the position of the connector for ATX power switch cable. If that doesn’t help, remove the TV card and restart your PC. If you still cannot turn the computer on, the problem is not caused by VideoMateTV.
When you set up for scheduled recording, VideoMate TV will issue the Power Up signal to the computer until ComproPVR starts. If your computer cannot start ComproPVR for some reason, the TV tuner card will try to wake up PC even you shut it down. Unplug the main power cord to reset VideoMate TV card. You can shut down the computer normally after that. Other possible causes of this problem include: 1. If you have a multi-Boot system and ComproPVR is not installed and running on the default OS.
Why can’t I record? ComproPVR 2 needs to use components of Ulead PhotoExplorer 8.5. If your computer doesn’t have PhotoExplorer, ComproPVR 2 will fail to record. Please reinstall Ulead PhotoExplorer 8.5 from installation CD. No audio in the recorded file. What's wrong? This may be a result of choosing the wrong record audio source in the System Device in ComproPVR Settings.
CODEC for play back. Therefore, the recorded file cannot be played since an incompatible CODEC is being used for playback. Uninstalling the CODEC software will help. Also reinstalling DirectX usually solves the problem. (See our website for how to reinstall DirectX) How can I choose MPEG-4 format for recording? If you would like to record video in MPEG-4 format, you must supply your own MPEG-4 CODEC. Furthermore, the CODEC must be installed before using ComproPVR 2.
No response to the Settings button? The main reason for this problem usually is the result of installing other CODEC software like Nimo or K-Lite. This kind of software forces applications to use their CODEC for play back. Therefore, it causes corruption. Uninstall the CODEC software will help. Also reinstalling DirectX usually solves the problem. (See our website for how to reinstall DirectX) It' also possible that Windows OS's system files has been damaged by a virus or malicious software.
TV is not clear? TV signal could be reduced by the branching. Please make sure the cable signal is good. Try to move the computer to a TV set and connect the cable which is being used for the TV set. Also directly connecting the cable before the splitter may help. This problem could also come from with static. Once you connect the cable to our TV card, the static interfere the system. It's possible to correct this problem by connecting a wire from the grounding of the cable to ground.