
User's Manual


UHF BI-DIRECTIONAL AMPLIFIER TECHNICAL MANUAL
15
- Antennas should be mounted following the manufactures guild lines for RF connection and being
affixed to the building or location of desired signal.
- All cables used in the DAS system shall be 50 ohms and clamped properly to insure the cables 50 ohm
impedance characteristics. Improper clamps will change the impedance of the cable at that location thus
changing the efficiency of the system.
- Antenna placement through the DAS system is important to impose a balanced distributed signal. The
use of proper valued (dB) decouples, power dividers, and signal taps is important to promote a balanced
system.
BDA Installation
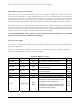
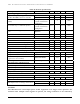
1) Verify that the frequencies listed on the Amplifier Box label agree with the channel assignments
for the Duplexer Box. If they are not the same, contact the factory for advice and instructions.
Please read the Warnings and Notices at the bottom of the next page before proceeding.
2) Mount the BDA system on a grounded rack, in a cabinet or on the wall. The BDA system is all-
metal and the mounting screws on the Filter & Diplexer Housing can be used as attachment
points for a ground wire.
3) Check the isolation between the Donor antenna and the Distribution antennas is 20dB above
the Gain of the Amplifier.
4) Connect the Donor Antenna Port and Antenna Output to Distribution Network port through
the Duplexer Box using solid-shield or double-braided 50 ohm coaxial cable with suitable
connectors.
5) Verify the MSA#1 setting of both Up-link and Down-link VGA. These attenuators should be
set at maximum attenuation (i.e. dial at position “F”).
6) Install the external UPS/Battery system if it is need. Connect the BDA to the AC power
source. Turn on the BDA unit by pressing the power button on the bottom of the BDA box.
Verify if the power button light is on. Inside the BDA box, verify if all power LEDs on the
VGAs and PAs are on (green color). Verify if the PA_OUT_SWR LEDs are on green.
7) After the unit is on, verify the RSSI LEDs on both Down-link and Up-link VGA. At 30dB
attenuation at the input, normally only the LOW LED could be on. Decrease the MSA#1
attenuation gradually (i.e. do not jump directly from “F’ to “0” position) until both LOW and
HI LEDs are on. If the HI LEDs cannot be on even at MSA#1 = 0dB attenuation, verify if
the input signal is present and at the expected level, then just leave the MSA#1 dial at “0”.
8) The BDA output powers are now at its maximum operable level in both up-link and down-link
direction. By mean of the MSA#2 (and if needed, use additional attenuator pads), optimize
the output power to the desired (lower) level, according to the specific distribution system
environment.
Installation is now complete.