COMPUPRINT SP40 Ethernet 10/100Base-T Connection Installation Guide
Ethernet 10/100 Base-T Connection Installation Guide Visit the web site http://www.compuprint.com for the latest information,drivers and firmware.
Ethernet 10/100 Base-T Connection Installation Guide Table of Contents Important - READ ME First .................................................... 2 Table of Contents ....................................................................... 3 Introduction ................................................................................ 5 LAN Interface Port...................................................................... 6 LED Indicators ................................................................
Ethernet 10/100 Base-T Connection Installation Guide Configuring a Remote Printer for the Solaris 7.x Operating System ................................................................................ 46 AS/400 Environment ................................................................ 47 Configuring AS/400 for ASCII (TCP/IP protocol) ................. 47 Configuring with ADDTCPIFC.......................................... 47 Configuring a Router Definition with ADDTCPRTE ........
Ethernet 10/100 Base-T Connection Installation Guide Introduction The following information concerns the specific characteristics of the Compuprint printers using the LAN (Local Area Network) connection. Compuprint printers can be supplied with one Ethernet 10/100Base-T port option for LAN connection providing a simple and efficient network printing solution. For any other printer information, please refer to the printer’s User Manual included in the Documentation & Driver CD-ROM.
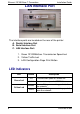
Ethernet 10/100 Base-T Connection Installation Guide LAN Interface Port C 1 2 3 A B The interface ports are located on the rear of the printer: A. Parallel Interface Port B. Serial Interface Port C. LAN Interface Port: 1. Green 10/100Mbit/sec. Transmission Speed Led 2. Yellow Traffic Led 3.
Ethernet 10/100 Base-T Connection Installation Guide P u sh B u tto n Press on the push button, next to the LAN connector, to print the LAN interface configuration page.
Ethernet 10/100 Base-T Connection Installation Guide Configuration Page Sample (in TCP/IP protocol) ************************************************************ Compuprint Network Interface Configuration ************************************************************ Printer Information Product Name: SP40 Product Description: Compuprint SP40 Printer Base Code: V1.77 NIC Code: Version 4.
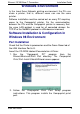
Ethernet 10/100 Base-T Connection Installation Guide Windows Environment In the Local Area Network printing environment, the PCs can share a printer, that is, different users can use the same printer. Software installation must be carried out on every PC requiring access to the Compuprint printer.
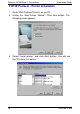
Ethernet 10/100 Base-T Connection Installation Guide TCP/IP Protocol - Printer Installation 1. Go to “Start-Settings-Printers” on you PC. 2. Invoke the “Add Printer Wizard”. Click Next button. The following screen appears: 3. Select “Local printer” and click Next button. You will see the “Printers” list option.
Ethernet 10/100 Base-T Connection Installation Guide 4. If the printer is not listed and the printer comes with the installation disk. Click Have Disk button. The “Install From Disk” screen appears: 5. Insert the CD-ROM labeled Documetation & Driver into the drive. Click Browse button. The “Open” screen appears. Go to the \drivers\microsoft\win98 folders and select the total.inf file. 6. Click OK button.
Ethernet 10/100 Base-T Connection Installation Guide 7. Click OK button. Select “Compuprint SP40” printer. 8. Click Next button. Click the “LPT1” port to use with this printer and then click Next button again.
Ethernet 10/100 Base-T Connection Installation Guide 9. Type the name for this printer in the “Printer Name” screen. Click Next button. 10. The “Print Test Page” screen appears. If you want to print the test page, select Yes, then click Finish button to end the procedure.
Ethernet 10/100 Base-T Connection Installation Guide If there are not installed Windows 98 files useful to continue this procedure in your PC, the following screen appears: Insert the CD-ROM labeled Windows 98 Second Edition into the drive. Click OK button to copy the files. When the files are copied, insert the CD-ROM labeled Documetation & Driver and click OK button.
Ethernet 10/100 Base-T Connection Installation Guide TCP/IP Protocol - Port Configuration Now configure the port to be connected to the printer. 1. Check in “Printers” window if the “Compuprint SP40” printer is installed. Click on “Compuprint SP40” icon, then click on File selection on the menu bar. Select Properties. 2.
Ethernet 10/100 Base-T Connection Installation Guide 3. Click Details button. In the screen that appears you can select the port to be connected to the printer. Click Add Port button. 4. The “Add Port” screen appears. Click “Other” selection. Select “Compuprint Print Port “as the port to use. Click OK button.
Ethernet 10/100 Base-T Connection Installation Guide 5. Select “Compuprint Port 9100”. Click OK button to confirm. 6. In the “Port 9100 settings” screen you can configure this port. To specify the IP-address see the values set in the INIT IP ADDRESS parameter of the LAN INTERFACE item in the Power-On Configuration setup you find in the User Manual included in the Printer Documentation & Drivers CD-ROM. Then enter a Port Name in the Port Name field. Click OK button to confirm.
Ethernet 10/100 Base-T Connection Installation Guide 7. Click Apply button and then OK button to confirm. Port configuration is now complete.
Ethernet 10/100 Base-T Connection Installation Guide NetBEUI Protocol - Printer Installation 1. Go to “Start-Settings-Printers” on you PC. 2. Invoke the “Add Printer Wizard”. Click Next button. The following screen appears: 3. Select “Local printer” and click Next button. You will see the “Printers” list option.
Ethernet 10/100 Base-T Connection Installation Guide 4. If the printer is not listed and the printer comes with the installation disk. Click Have Disk button. The “Install From Disk” screen appears: 5. Insert the CD-ROM labeled Documetation & Driver into the drive. Click Browse button. The “Open” screen appears. Go to the \drivers\microsoft\win98 folders and select the total.inf file. 6. Click OK button.
Ethernet 10/100 Base-T Connection Installation Guide 7. Click OK button. Select “Compuprint SP40” printer. 8. Click Next button. Click the “LPT1” port to use with this printer and then click Next button again.
Ethernet 10/100 Base-T Connection Installation Guide 9. Type the name for this printer in the Printer Name field. Click Next button. 10. The “Print Test Page” screen appears. If you want to print the test page, click Yes, then click Finish button to end the procedure.
Ethernet 10/100 Base-T Connection Installation Guide If there are not installed Windows 98 files useful to continue this procedure in your PC, the following screen appears: Insert the CD-ROM labeled Windows 98 Second Edition into the drive. Click OK button to copy the files. When the files are copied, insert the CD-ROM labeled Documetation & Driver and click OK button.
Ethernet 10/100 Base-T Connection Installation Guide NetBEUI Protocol - Port Configuration Now configure the port to be connected to the printer. 1. Check in “Printers” window if the “Compuprint SP40” printer is installed. Click on “Compuprint SP40” icon , then click on File selection on the menu bar. Select Properties. 2. The “Compuprint SP40 Properties” screen appears.
Ethernet 10/100 Base-T Connection Installation Guide 3. Click Details button. In the screen that appears you can select the port to be connected to the printer. Click Add Port button. 4. The “Add Port” screen appears. Click “Other” selection. Select “Local Port“ as the port to use. Click OK button.
Ethernet 10/100 Base-T Connection Installation Guide 5. The “Port name” screen appears. Enter a port name in the Port Name field (the port name must be present in the local network as hostname, the print queue as prt1). Click OK button to confirm. \\H ostna m e\prin t que ue_ nam e 6. Click Apply button and then OK button to confirm. Port configuration is now complete.
Ethernet 10/100 Base-T Connection Installation Guide Software Installation & Configuration in Windows 2000 Environment Port Installation • Check that the Printer is powered on and the Green Power led of the LAN Interface Port is lit. • Insert the CD-ROM labeled Documetation & Driver. 1. Run the “Compuprint PP” program from the drivers\microsoft\Print Port directory. The Compuprint Print Port Install Shield Wizard screen appears: 2. Follow the Compuprint Print Port Setup program instructions.
Ethernet 10/100 Base-T Connection Installation Guide TCP/IP Protocol - Port Configuration 1. Go to “Start-Settings-Printers” on you PC. 2. Invoke the “Add Printer Wizard”. The following screen is prompted. Click Next button. 3. The “Local or Network Printer” screen appears, select “Local printer”.
Ethernet 10/100 Base-T Connection Installation Guide 4. Click Next button and the following screen appears: Now the wizard detects and installs the new Plug and Play printers if you want to install the printer manually, click Next button. 5. In the “Select the Printer Port” screen, click on Create a new port field to select “Compuprint Print Port” as the port to use.
Ethernet 10/100 Base-T Connection Installation Guide 6. Click Next button. The “Add New Port” screen appears. Select “Compuprint Port 9100”. Click OK button. 7. The “Port 9100 Settings” screen appears: To specify the IP-address, see the values set in the INIT IP ADDRESS parameter of the LAN INTERFACE item in the PowerOn Configuration setup you find in the User Manual included in the Documentation & Drivers CD-ROM. Then enter a Port Name in the Port Name field. Click OK button to confirm.
Ethernet 10/100 Base-T Connection Installation Guide TCP/IP Protocol - Printer Installation Now to install the Compuprint printer to be connected to the new port, click the OK button of the “Port 9100 Settings” screen. 1. You will see the “Printers” list option. If the printer is not listed and the printer comes with the installation disk. Click Have Disk button. The “Install From Disk” screen appears: 2. Insert the CD-ROM Documetation & Driver into the drive.
Ethernet 10/100 Base-T Connection Installation Guide 3. Click OK button. Select “Compuprint SP40”printer. 4. Assign a name for your printer (i.e. Compuprint SP40).
Ethernet 10/100 Base-T Connection Installation Guide 5. To share this printer with the other users, provide a share name. 6. Click Next button. The “Location and Comment” screen appears. Write the Location and the Comment you desire.
Ethernet 10/100 Base-T Connection Installation Guide 7. Click Next button. The “Print Test Page” screen appears. If you want to see the final printer setting configuration, click “Yes”. 8. This is the Test Page: 9. Click Finish button to end the printer installation procedure.
Ethernet 10/100 Base-T Connection Installation Guide NetBEUI Protocol - Port Configuration 1. Go to “Start-Settings-Printers” on you PC. 2. Invoke the “Add Printer Wizard”. The following screen is prompted. Click Next button. 3. The “Local or Network Printer” screen appears, select “Local printer”.
Ethernet 10/100 Base-T Connection Installation Guide 4. Click Next button and the following screen appears: Now the wizard detects and installs the new Plug and Play printers if you want to install the printer manually, click Next button. 5. In the “Select the Printer Port” screen, click on Create a new port to select “Local Port” as the port to use.
Ethernet 10/100 Base-T Connection Installation Guide 6. The “Port name” screen appears. Enter a port name in the Port Name field (the port name must be present in the local network as hostname, the print queue as prt1). Click OK button to confirm.
Ethernet 10/100 Base-T Connection Installation Guide NetBEUI Protocol - Printer Installation Now to install the Compuprint printer to be connected to this new port, click on Next button of the “Port Name” screen. 1. You will see “Add Printer Wizard” screen. If the printer is not listed and the printer comes with the installation disk. Click Have Disk button. The “Install From Disk” screen appears. 2. Insert the CD-ROM Documetation & Driver into the drive.
Ethernet 10/100 Base-T Connection Installation Guide 3. Click OK button. Select “Compuprint SP40”printer. 4. Assign a name for your printer (i.e. Compuprint SP40).
Ethernet 10/100 Base-T Connection Installation Guide 5. To share this printer with the other users, provide a share name. 6. Click Next button. The “Location and Comment” screen appears. Write the Location and the Comment you desire.
Ethernet 10/100 Base-T Connection Installation Guide 7. Click Next button. The “Print Test Page” screen appears. If you want to see the final printer setting configuration, click “Yes”. 8. This is the Test Page: 9. Click Finish button to end the printer installation procedure.
Ethernet 10/100 Base-T Connection Installation Guide Port Installation & Configuration Check that the Printer is powered on and the Green Power led of the LAN Interface Port is lit. It is necessary to be SUPER USER. Insert the Documetation & Driver CD-ROM. 1. From the shell bush, run the “cmpwizard.sh” script from the drivers\unix directory included in the CDROM labeled Compuprint Ethernet LAN. See the following screen: 2. Select the operating system (n.7).
Ethernet 10/100 Base-T Connection Installation Guide 3. Add the IP address. This address must match the IP address selected in the INIT IP ADDRESS parameter of the LAN INTERFACE item in the Power-On Configuration setup you find in the User Manual included in the Printer Documentation & Driver CDROM. 4. Enter the Logical Port Name. The Logical Port Name is “prt1”.
Ethernet 10/100 Base-T Connection Installation Guide 5. Enter the Print Server Name. The printer server name is “ps1”. 6. If this configuration is ok , enter “y” to confirm. The installation is now complete. If you want to print the test file, enter the lpr -Pps1 test command.
Ethernet 10/100 Base-T Connection Installation Guide Linux 7.x & Solaris 7.x Operating Systems To configure the printer for the Linux 7.x and Solaris 7.x operating systems, follow the corresponding procedure described below: Configuring a Remote Printer for the Red Hot Linux 7.x Operating System 1. Open the “/etc/hosts” file as root user in a Terminal windows. 2. Add the IP address and the Printer Name information. Here is an example of an “/etc/hosts” file: Ip-address Printer-name 10.0.128.220.
Ethernet 10/100 Base-T Connection Installation Guide Configuring a Remote Printer for the Solaris 7.x Operating System 1. Open the “/etc/hosts” file as root user in a Terminal windows. 2. Add the IP address and the Printer Name information. Here is an example of an “/etc/hosts” file: Ip-address printer-name 10.0.128.220.3 prt1 10.0.128.220.4 prt2 3. Type “admintool&” in a Terminal windows. 4. Select Browse button and then Printers. 5. Select Edit->Add->Access to Print in the “Admintool Printer Menu”. 6.
Ethernet 10/100 Base-T Connection Installation Guide AS/400 Environment Configuring AS/400 for ASCII (TCP/IP protocol) Configuring with ADDTCPIFC ADDTCPIFC is used to add a TCP/IP interface to AS/400. This step configures the AS/400 for connection to a TCP/IP network. 1. At the AS/400 command line, enter the following command: ADDTCPIFC INTNETADR(′127.000.000.000′)LIND(ETHLAN) SUBNETMASK (′255.255.254.000′) This screen should look like the following one: Internet …………………………….. : address 127.000.000.000.
Ethernet 10/100 Base-T Connection Installation Guide Configuring a Router Definition with ADDTCPRTE If necessary, use the ADDTCPRTE command to create a route definition. This is required if the printer is somewhere other than on a local segment. Configuring a Local Domain and Host Name The AS/400 print commands require a local name and host name. If you have already configured LAN attached TCP/IP printers on the AS/400 system, you will have a local domain name and hostname configured on the system.
Ethernet 10/100 Base-T Connection Installation Guide Configuring AS/400 for Printing The procedure for configuring an AS/400 for printing requires that you: 1. Setup the printing capability 2. Verify the setup with a print job. In order to accomplish this configuration, you need the following information: a) Remote Printer Queue Name Set for any of ‘pr1’ through ‘pr4’. The Remote Printer Queue name must be all lower case.
Ethernet 10/100 Base-T Connection Installation Guide To Use LPR Manually 1. Start TCP/IP, if it not already running, by entering the STRTCP command 2. At the AS/400 command line, enter ‘LPR’. 3. The following example shows only the parameters you need to specify: Remote System RMTSYS Printer Queue PRTQ Destination Type DESTTYP OTHER Transform SCS to ASCII TRANSFORM YES Manufacturer Model Type Internet Address and MFRTYPMDL INTNETADR INTNETADR d1prn IBM6400EP 127.000.000.000 .
Ethernet 10/100 Base-T Connection Installation Guide To Create an Automatic Remote Output Queue 1. From the AS/400 command line, enter CRTOUTQ. 2. The following example shows only the parameters you need to specify: OUTQ Output Queue USERNAME RMTSYS Remote system INTNETADR RMTPRTQ Remote printer queue d1prn Writer to Autostart Connection type Destination type AUTOSRTWTR 1 CNNTYPE IP DESTTYP XAUTOQXAIX Transform TRANSFORM YES Manufacturer type MFRTYPMDL IBM6400EP Internet Address INTNETADR 127.
Ethernet 10/100 Base-T Connection Installation Guide Monitoring Printer & Remote Printer Configuration The following procedure describes the use of the Internet Browser for monitoring the status of the network printer and for the printer remote configuration. Proceed as follows: 1. To browse the printer web page, enter the IP Address as web page address or the Host Name.
Ethernet 10/100 Base-T Connection Installation Guide You can select the Printer Configuration, Printer Status, Printer Reset and Product support screens to see the corresponding pages described in the following sections. Printer Configuration To obtain the Printer Configuration information tables, click on the Printer Configuration button.
Ethernet 10/100 Base-T Connection Installation Guide NIC Setup When pressing the NIC Configuration button the following screen appears : You can now choose the network printer configuration. When the parameters are set as necessary, click on the Submit button at the end of the table. If a password has already been set in the Security item, to enter the remote printer configuration mode, you need to type the network password.
Ethernet 10/100 Base-T Connection Installation Guide SYSTEM Setting Click on the System button. The following page appears: You can now choose between loading the default factory setting overwriting the current parameters and setting the security password. Setting the Security Password In the System page, click on the Security Settings button.
Ethernet 10/100 Base-T Connection Installation Guide Type the User Name (root) and the password (root) and OK button. The following screen appears: It is now possible to indicate a password to protect the setting. Click on the Submit button, the following screen appears: Remind you that is necessary to select Reboot printer in the Reset Printer page to save the changes.
Ethernet 10/100 Base-T Connection Installation Guide FCC Notes This equipment has been tested and found to comply with the limits for a Class A digital device, pursuant to Part 15 of the FCC Rules. These limits are designed to provide reasonable protection against harmful interference when the equipment is operated in a commercial environment.