
Installation manual


30
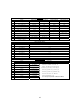
3-10 Valet
– This option changes valet modes.
Default 1: Key on/off five times or remote valet (I + III for 0.5 seconds) with key in the on position.
Option 2: Key on/off five times or remote valet (I+III for 0.5 seconds) – key does not need to be in the on position.
Option 3: Secure valet: RPS Valet or remote valet (I+III for 0.5 seconds) – this option prevents the system from being
put into valet via key on/off five times. To set up the RPS Valet feature, review the “Placement and Use of
Components” section.
3-11 Auxiliary settings
– This option requires the installation of the optional Auxiliary settings module.
The Auxiliary settings adds five additional independent auxiliary outputs for a total of seven. With
this option turned on, auxiliary 2 becomes non functional and Aux 1 becomes the data wire for the
Auxiliary settings. Special Option Group 1 allows for independent timing of these outputs.
3-12 Passive Arming w/Auxiliary settings
– The ability to activate/deactivate Passive Arming
through the remote is lost once Option 3-11 is turned on. This option allows the use of Passive
Arming when using the optional Auxiliary settings.
4-01 Aux 1 Output
- This option determines the duration of the Aux 1 output. Setting IV allows the
output duration to be set for a specific length of time.
4-02 Aux 2 Output
- This option determines the duration of the Aux 2 output. Setting IV allows the
output duration to be set for a specific length of time.
4-05 Secure Aux Output
– On the default setting, button 4 on the remote must be pressed first before
Aux 1 or Aux 2 can be triggered. This prevents accidental triggering of the outputs. Option setting
II turns this feature off.
4-06 Aux 1 Input
– This option changes the input behavior of the pre-warn wire on the Aux Input
Sensor green connector.
Default 1: Will pre-warn with a negative (-) ground input.
Option 2: Will instant trigger with a negative (-) ground input.
Option 3: Will disarm the alarm with a negative (-) ground input. Used when adding an alarm to a factory keyless entry
system.
4-07 Aux 2 Input
– This option changes the input behavior of the instant trigger wire on the Aux Input
Sensor green connector.
Default 1:. Will instant trigger with a negative (-) ground input.
Option 2: Will pre-warn with a negative (-) ground input.
Option 3: Will arm the alarm with a negative (-) ground input. Used when adding an alarm to a factory keyless entry
system.
4-08 Extended Accessory After Ignition Shutoff
– This option keeps the Accessory wire powered
up after the ignition is shut off. This can be used to keep the radio turned on even after the key is
removed from the ignition (similar to GM vehicles).
4-09 Glow Plug or Key Sense
– Default setting sets the wire as a glow plug input. Option setting 2
changes the wire to a key sense input. Key sense can be used to prevent reservation mode from
setting and the system from passive arming while the key is still in the ignition. Key sense also
turns off dome-light supervision when the key is inserted into the ignition.
4-10 Trigger Start or Closed Loop System
– Default setting sets Pin 12 on CN3 as a trigger start
input, which will initiate remote start with a negative (-) trigger. Option 2-04 allows the number of
pulses required to initiate remote start to be changed. Setting 2 changes the wire to a closed
loop input, which makes it an instant alarm trigger when separated from ground - Ideal for
protecting trailers or headlights.