User Manual By Firstech LLC, Version: 1.0 Applicable to the following remote(s); P1WAMR (1 Way AM Remote) - US Only P1WSHR (1 Way SH Remote) - US Only P1WSHR (1 Way SH Remote) - Canada Only P1W900FMR (1 Way 900 MHz Remote ) US Only This device complies with Part 15 of the FCC rules. Operation is subject to the following conditions; (1) This device may not cause harmful interference. (2) This device may accept any interference received, including interference that may cause undesired operation.
Table Of Contents Kit(s) Contents .......................................................................................................................................... 3 Warranty Coverage ................................................................................................................................... 3 Remote Reference .................................................................................................................................... 4 Quick Reference..................
Introduction Thank you for purchasing a CompuStar Pro system for your vehicle. In order to truly enjoy the benefits of this system, we recommend that you fully review the following manual. Please note that this manual applies to all PRO 1-Way Remote systems, regardless of whether you purchased the alarm only, starter only or alarm/starter combination. This manual does not apply to the 1WSHR Fiancé remote in the US.
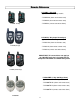
Remote Reference P1WAMR (1 Way AM) Applicable to the following models; - P1WAM-AS (alarm and remote start) - P1WAM-A (alarm w/out remote start) - P1WAM-S (remote start w/out alarm) P1WAMR - US Only P1WSHR (1 Way Super Heterodyne) Applicable to the following models; - P1WSH-AS (alarm and remote start) P1WSHR (US Style) - P1WSH-A (alarm w/out remote start) - P1WSH-S (remote start w/out alarm) IMPORTANT: This manual does not apply to the 1WSHR Fiancé that is included with US CompuStar 2WSHLED and 2WSHLCD S
Quick Reference Valet Mode When servicing or loaning your vehicle to others, the CompuStar Pro system should be in Valet mode. Valet mode prevents the system from remote starting and disables all alarm functions. IMPORTANT: While in Valet mode the CompuStar will still lock and unlock power lock systems. The parking lights will not flash. The system can be put into valet one of two ways; 1. Turn the vehicles key to the ignition “on” position and tap buttons simultaneously for 0.5 seconds.
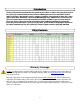
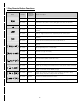
1 Way Remote Button Functions Button Additional Programming Required Function / Description 0.5 seconds no Lock/Arm 3.5 seconds no Panic/vehicle locater (flashes vehicles parking lights and sounds siren and horn). 0.5 seconds no Unlock/Disarm 0.5 seconds no Aux 1. Triggers the auxiliary 1 output (most commonly used for rear defrost or window roll-down). 2.5 seconds no Trunk pop. Triggers the trunk release output and opens the vehicles trunk. 0.5 seconds no Aux 2.
General System Functions The remote transmitter functions have been predetermined and programmed from the factory. The four button configuration allows for many functions to be performed through a series of tapping, holding and / or multiple presses of buttons. Although CompuStar PRO remotes have numerous button functions and capabilities, please keep in mind that the most common functions are performed in one simple step.
IMPORTANT: Your vehicle’s key must be inserted into the ignition and turned to the “on” position prior to driving your vehicle. If the foot brake is depressed prior to the key being in the “on” position, the vehicle will shut off. Manual Transmission Remote Start Function (Reservation Mode) In order to remote start a manual transmission vehicle, the system must first be set in Reservation Mode. Reservation Mode must be set each and every time you want to remote start a manual transmission vehicle.
Trunk Release Hold button for 2.5 seconds to release the trunk or hatch. If you are in range, the vehicle’s parking lights will flash once and/or siren chirp once indicating that the trunk release command has been successfully transmitted. IMPORTANT: Trunk release is an optional vehicle feature that may require additional parts and labor.
Advanced System Functions The following section reviews advanced system functions. Many of these functions require multiple steps or additional programming by your local authorized CompuStar dealer to be active. Drive Lock/Ignition Controlled Door Locks Tap buttons simultaneously for 0.5 seconds to turn drive lock on and off (also known as ignition controlled door locks). The vehicle’s parking lights will flash once and/or siren chirp once to confirm drive lock is off.
STEP 1: Turn on Option 3-10-III. (Dealer programmed option) STEP 2: Turn ignition key to the “on” position. STEP 3: Hold down the valet switch for 1.5 seconds. The LED on the valet switch will begin to flash rapidly with successful completion of this step. STEP 4: Enter the first digit of the desired two digit pass code by depressing the switch the number of times that coordinates with the desired first number. For example, to enter 3, depress the switch 3 times, then wait.
Remote Coding / Programming Routine(s) IMPORTANT: Every CompuStar Pro remote must be coded to the system prior to performing any operations. All remotes must be coded at the same time. Programming Your Remotes STEP 1: Activate Valet/Programming mode by manually turning the ignition key on and off (between the Acc & On positions) five times within 7 seconds. The vehicle’s parking lights will flash once with the successful completion of this step.
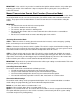
Remote Start Error Diagnostic gnostic If the remote start fails to start the vehicle, the parking lights will flash three times immediately. Following those three flashes the parking lights will flash again corresponding to the error table.
Limited Lifetime Warranty Firstech, LLC Warrants to the original purchaser that this product shall be free of defects in material and workmanship under normal use and circumstances for the period of time that the original owner of this product owns the vehicle in which it is installed; except that the remote controller unit for the period of one year from the date of installation to the original owner of this product.
Notes: ___________________________________________________________________________________ ___________________________________________________________________________________ ___________________________________________________________________________________ ___________________________________________________________________________________ ___________________________________________________________________________________ ___________________________________________________________________________________ _
___________________________________________________________________________________ ___________________________________________________________________________________ ___________________________________________________________________________________ ___________________________________________________________________________________ ___________________________________________________________________________________ ___________________________________________________________________________________ ________
www.compustar.