
User's Manual
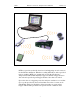

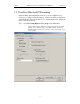

Table Of Contents
- Table of Contents
- 1. Overview
- 2. Quick Installation
- 3. Detailed Installation
- 4. Updates
- 5. Software Overview
- 6. Recording Wizard
- 7. Recording Options
- 8. Display Options
- 9. Reading a CATC Trace
- 10. Decoding Higher Protocols
- 10.1 Introduction
- 10.2 LMP and L2CAP Messages
- 10.3 Decoding and Viewing Higher Protocol Data
- 10.4 Tooltips
- 10.5 Viewing Packets in LMP and L2CAP Messages
- 10.6 Types of LMP and L2CAP Messages
- 10.7 Viewing L2CAP Channel Connections
- 10.8 Viewing Protocol Messages and Transactions
- 10.9 Changing Protocol Assignments
- 11. Other Features
- How to Contact CATC
- Warranty and License
- Index

9
BTTracer Protocol Analyzer User’s ManualCATC Version 1.0
2. Quick Installation
The BTTracer Protocol Analyzer components and software are easily
installed and quickly ready to run on most Windows-based personal
computer systems. You can begin making Bluetooth™ recordings after
following these initial steps. However, if you are new to personal computers
and protocol analyzers, or if you are unsure about what to do after reading
the Quick Installation instructions, or if your analyzer does not work after
you follow these instructions, read through the subsequent sections in this
manual.
2.1 Setting Up the Analyzer
Step 1 Attach the Antenna to the ANT connection point. The
antenna should point up.
Step 2 Connect the AC power cable to the rear of the analyzer.
Step 3 Turn on the power switch on the rear of the analyzer.
Step 4 Insert the BTTracer CD into the CD ROM drive of the PC
that will be administering the Analyzer. If you prefer to
install from diskette, insert the first BTTracer diskette (Disk
1 of 6) into the floppy disk drive.
Step 5 Connect the USB cable between the USB port on the back of
the analyzer and a USB port on the analyzing PC.
Step 6 Follow Windows on-screen Plug-and-Play instructions for
the automatic installation of the BTTracer Analyzer as a
USB device on your analyzing PC (the required USB files
are included on the BTTracer CD and the first BTTracer
diskette).
2.2 Installing the Software
Step 1 From the setup directory, run setup, and follow the on-screen
instructions to install the BTTracer application on the
analyzing PC hard disk.
Step 2 To start the application, launch the CATC BTTracer
program from the Start Menu:
Start>Programs>CATC>BTTracer.