
User's Manual
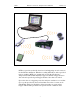

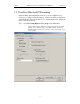

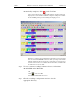
Table Of Contents
- Table of Contents
- 1. Overview
- 2. Quick Installation
- 3. Detailed Installation
- 4. Updates
- 5. Software Overview
- 6. Recording Wizard
- 7. Recording Options
- 8. Display Options
- 9. Reading a CATC Trace
- 10. Decoding Higher Protocols
- 10.1 Introduction
- 10.2 LMP and L2CAP Messages
- 10.3 Decoding and Viewing Higher Protocol Data
- 10.4 Tooltips
- 10.5 Viewing Packets in LMP and L2CAP Messages
- 10.6 Types of LMP and L2CAP Messages
- 10.7 Viewing L2CAP Channel Connections
- 10.8 Viewing Protocol Messages and Transactions
- 10.9 Changing Protocol Assignments
- 11. Other Features
- How to Contact CATC
- Warranty and License
- Index

12
BTTracer Protocol Analyzer User’s ManualCATC Version 1.0
automatically completes, click on the Tool Bar.
After a few moments, the recording will terminate and the results will
display. The screen should look like the sample recording below which
shows the FHS packets generated during the Inquiry process.
When the recording session is finished, the bus traffic is saved to the hard
drive as a file named data.blt or whatever name you assign as the default
filename. While the file is being saved, you should see a brown progress
bar at the bottom of the screen. When the bar turns white, it indicates that
the data has been saved to disk.
Step 6 To save a current recording for future reference, Select Save
As under File on the Menu Bar.
OR
Click on the Tool Bar.
You see the standard Save As screen.
Step 7 Give the recording a unique name and save it to the
appropriate directory.