
User's Manual


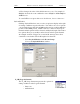

Table Of Contents
- Table of Contents
- 1. Overview
- 2. Quick Installation
- 3. Detailed Installation
- 4. Updates
- 5. Software Overview
- 6. Recording Wizard
- 7. Recording Options
- 8. Display Options
- 9. Reading a CATC Trace
- 10. Decoding Higher Protocols
- 10.1 Introduction
- 10.2 LMP and L2CAP Messages
- 10.3 Decoding and Viewing Higher Protocol Data
- 10.4 Tooltips
- 10.5 Viewing Packets in LMP and L2CAP Messages
- 10.6 Types of LMP and L2CAP Messages
- 10.7 Viewing L2CAP Channel Connections
- 10.8 Viewing Protocol Messages and Transactions
- 10.9 Changing Protocol Assignments
- 11. Other Features
- How to Contact CATC
- Warranty and License
- Index

72
BTTracer Protocol Analyzer User’s ManualCATC Version 1.0
piconet’s master device.
Step 4 Make up an address for BTTracer and enter it into the Page Target
address in the Modes tab in Recording Options. Make sure you do
not select an address for any other local device.
Step 5 Press the REC button on the toolbar in BTTracer to start a recording
session.
Step 6 If necessary, have Master "discover" BTTracer through a General
Inquiry.
Step 7 From the Master device, initiate a page to BTTracer’s address. This
action will enable BTTracer to synchronize to the piconet. However,
the analyzer will not complete the page sequence from the Master.
This will cause the Master to time out in this request.
Step 8 At the end of this sequence, the green Sync light will go on solid,
recording will begin and activity will be displayed on the status bar
in the bottom of the analyzer screen.
Running "Passive Sync and Record" with Private Device Piconets
Because private device networks do not allow other devices to join the
network, BTTracer needs to temporarily assume the identity of a slave in the
network in order to join that network. To do this requires disabling the slave
and beginning the operation without an established piconet. The following
steps show the process.
Step 1 Turn the Master device on and the slave device off. You need the
slave device turned off so that BTTracer can take its place in the
piconet.
Step 2 Enter the slave’s address into BTTracer’s "Page Target" field in the
Modes tab in the Recording Options dialog box.
Step 3 Run "Passive Sync and Record." The Master will then page the
slave’s address and BTTracer will be able to sync.
Step 4 When BTTracer synchronizes to the Master, turn the slave back on.
When the Master re-pages the address the slave will be admitted into
the private network. Since BTTracer is passive in this mode, the
slave and BTTracer do not conflict over the shared address.
BTTracer is then able to record the traffic between the Master and