USER’S GUIDE COLOR MONITOR Model No : 7 d l n CTL S/N : 9978628208
IMPORTANT SAFEGUARDS 1. Read all of these instructions. 2. Save these instructions for later use. 3. Unplug this monitor from the wall outlet before cleaning. Do not use liquid cleaners or aerosol cleaners. Use a damp cloth for cleaning. 4. Do not use attachments not recommended by the monitor manufacturer as they may cause hazards. 5. Do not use this monitor near water, e.g., near a bathtub, washbowl, kitchen sink, or laundry tub, in a wet basement, or near a swimming pool, etc. 6.
CONTENTS Introduction ............................................................................. 1 Product Features ................................................................. 2 Setup ......................................................................................... 3 Installing the Tilt/Swivel Stand ......................................... 3 Connecting the Signal Cable and Power Cord..................... 4 Operation & Adjustment ......................................................
PRODUCT FEATURES • • The convenient and user-friendly on-screen display allows for easy and accurate adjustments of horizontal and vertical screen size and position, geometry and screen color. SETUP INSTALLING THE TILT/SWIVEL STAND 1. Ensure that the power to the monitor is off. The monitor supports a safe working environment in strict compliance with the MPR II standard for low emissions (TCO Optional). 2. Set the monitor face down with the underside facing you.
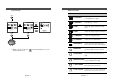
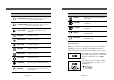
CONNECTING THE SIGNAL CABLE AND POWER CORD OPERATION & ADJUSTMENT Control Panel SELECT 1. Turn off the computer and monitor. ADJUST MENU 2. Connect the 15 pin D-sub connector to the output port of the video card in your computer. 3. Tighten the screws of the connector. MENU 4. Plug the power cord into the AC receptacle located on the back of the monitor. • Launch OSD(On-Screen Display) MENU window. • Select a sub Menu & function. • • • Move a sub Menu & function.
Key Process OSD Functions ICON CONTROL FUNCTION MENU SELECT H. POSITION Adjust the position of the display horizontally (left or right). V. POSITION Adjust the position of the display vertically (up or down). H.SIZE Adjust the display width (horizontal size). V.SIZE Adjust the display height (vertical size). V. LINEARITY Adjust the vertical linearity. H. LINEARITY Adjust the horizontal linearity. PINCUSHION Adjust the left and right margins for more convex or more concave margins.
ICON CONTROL FUNCTION Adjust the side pin corner balance top T. PIN BALANCE when the top sides of the screen are ICON CONTROL STATUS Display horizontal & vertical frequency and polarity. H. MOIRE Adjust the horizontal picture moire cancellation. V. MOIRE Adjust the vertical picture moire cancellation. RECALL Reset the screen to the Factory Preset Display Settings. ROTATION Adjust the rotation when the screen is tilted left or right. bowed towards left or right.
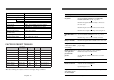
SPECIFICATIONS TROUBLESHOOTING CDT Size Diagonal visible image area Dot Pitch Synchronization Horizontal Vertical Plug and Play Power Saving Power Source Power Consumption Dimension-W x H x D (set with stand) Weight-unpacked (lbs/Kg) Operating Temperature 17-inch 16.2-inch 0.27 mm 30 - 70 KHz 50 - 160 Hz DDC1/2B/CI EPA, VESA DPMS, Nutek Compliant 100-240 Vac, 50/60Hz (Free Voltage) 95W 420 x 453 x 429mm Resolution (dots X lines) H.Freq (KHz) V.Freq(Hz) No picture.