
Product specifications


CDD-562L/564 Demodulator with IP Module Revision 1
Flash Upgrading MN/CDD564L.IOM
4–3
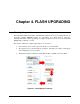
(compressed). Some firewalls will not allow the downloading of *.exe files. In this case,
download the *.zip file instead.
For additional help with "zipped" file types, refer to PKZIP for Windows, WinZip, or
ZipCentral help files. PKZIP for DOS is not supported due to file naming conventions.
4. Unzip the files in the temporary folder on the PC. At least three files should be extracted
(where "X.X.X" is the firmware version):
• FW0000122x.bin, where "x" is the version (bulk image file).
• CDD 56x L X.X.X Release Notes.pdf (or a variation of this filename).
• CDD 56x L X.X.X Upgrade (installation notes).
5. Connect the external PC to the demodulator’s 10/100 Ethernet port via a hub or a switch, or
directly to a PC with a crossover cable.
6. Send a “ping” command to the demodulator to verify the communication and connection.
Determine the IP address of the demodulator either remotely or by using the front panel:
• Using DOS to PING (and FTP): Click “Start” on the Windows toolbar, then select
the “Run...” option. (Alternatively, use the “DOS Prompt” or “Command Prompt”
icons in the Start Menu.)
• Using Win95 or Win98: Type “command”.
• Using WinNT, Win2K or WinXP: Type “cmd”.
Once in DOS, use “cd c:\temp” to change to the temporary directory created earlier in Step 2.
Use the “dir” command to list the downloaded files.
7. Initiate an FTP session with the demodulator (the example uses a DOS window):
a. From the PC, type "ftp xxx.xxx.xxx.xxx" where "xxx.xxx.xxx.xxx" is the IP address
of the demodulator.
b. Enter your admin user name and password to complete login.
c. Verify the FTP transfer is binary by typing "bin".
d. Type "prompt" then type "hash" to facilitate the file transfers.
8. Transfer the files.
Type "put FW0000122*.bin bulk:" to begin the file transfers. The destination “bulk:” must be
all lower case. The process sequences through several blocks – this may take several minutes.
When the upgrade image has been received, the image will be written to flash memory.
9. Verify the file transfer.
a. The PC should report that the file transfer has occurred, and serial console or Telnet
can view the status of the upgrade. The FTP login and the file transfer status will be
displayed.
b. Terminate the FTP session by typing "bye" and closing the DOS window.
c. Verify that the new file loaded, either by Telnet/CLI or Web, using any of the
procedures described in Step 1.
10. Change the desired image to boot. By default, the demodulator will boot to the version with
the latest date (Boot to – Latest).
“Boot to” also can be set to force the demodulator to boot up using either Image #1 or Image
#2. To do this, select the desired image, then reboot the demodulator via the serial console,
Telnet, or Web for the firmware upgrade to become active.