CT-2400_Manual_04.
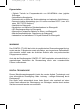
CT-2400_Manual_04.pdf 2 28/4/14 6:03 pm 9 15 DC 6V 500mA DC 6V 500mA 16 17 1. Power ON/OFF Taste 2. Taste auf/ab +/3. Power ON/OFF - Batteriestand Anzeige 4. LED Empfangsanzeige 5. Lautsprecher 6. Anschluss für Netzadapter 7. Power ON-OFF Taste 8. Taste auf/ab +/9. Power ON/OFF Batteriestand-Anzeige 10. Sende Anzeige 11. Schalter für Nachtlicht 12. Mikrofon 13. Anschluss für Netzadapter 14. Nachtlicht 15. Anzeige Nachtlicht sprachgesteuert 16. Anschluss für Netzadapter 17.
CT-2400_Manual_04.pdf 3 28/4/14 6:03 pm Eigenschaften • Digitale Technik im Frequenzbereich von 863-870MHz ohne jegliche Störungen • Automatische Kanalsuche • Reichweite bis zu 600m bei Sichtverbindung und optimalen Verhältnissen • Äusserst niedrige Abstrahlung (nur 10% eines normalen DECT-; bzw.
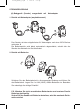
CT-2400_Manual_04.pdf 4 28/4/14 6:03 pm STROMVERSORGUNG (A) Babygerät (Sender) ausgerüstet mit Netzadapter 1. Betrieb mit Netzadapter (empfehlenswert) 6 13 Den Sender mit dem mitgelieferten 6V Netzadapter und einer 220V Buchse verbinden. 6 Die Batteriezufuhr wird dabei automatisch abgeschaltet, sobald sich der Stecker des Netzteils im Gerät befindet. 2. Betrieb mit Batterien Schieben Sie den Batteriedeckel in die angezeigte Richtung und öffnen Sie das Batteriefach.
CT-2400_Manual_04.pdf 5 28/4/14 6:03 pm (B) Elterngerät (Empfänger) ausgerüstet mit wieder aufladbarer Li-Polymer Batterie und Ladestation 1. Betrieb mittels Li-Polymer wieder aufladbarer Batterie Die Li-Polymer wieder aufladbare Batterie ist bereits im Gerät installiert und teilweise aufgeladen. Zum Auswechseln der Batterie öffnen Sie das Batteriefach wie abgebildet, ziehen Sie den Stecker aus der Buchse und setzen einen neuen Akku ein. 2.
CT-2400_Manual_04.pdf 6 28/4/14 6:03 pm Während der Ladung wird die LED Anzeige 3 abwechselnd rot/grün blinken. Nach ca. 4 Stunden ist der Akku vollständig aufgeladen und die LED Anzeige wird konstant grün aufleuchten. Nun kann das Elterngerät für den Betrieb eingeschaltet werden. Entweder nehmen Sie dieses nun aus der Ladestation oder belassen es dort – es kann keine Beschädigung der Batterie durch Überladen erfolgen.
CT-2400_Manual_04.pdf 7 28/4/14 6:03 pm Im sprachgesteuertem Modus wird die Anzeige 15 des Nachtlichtes aufleuchten. Sobald das Mikrofon 12 ein Geräusch erkennt, wird das Nachtlicht 14 leuchten und wird wieder ablöschen, sobald das Mikrofon 12 keine Geräusche mehr übermittelt. Eltern Gerät (Empfänger) 1.Drücken Sie länger auf die Power ON-OFF Taste 1 um das Gerät einzuschalten. Die Power Anzeige 3 wird grün aufleuchten. Wenn die Anzeige zu flackern beginnt, ist die Batterie zu schwach.
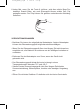
CT-2400_Manual_04.pdf 8 28/4/14 6:03 pm 6.Jedes Mal, wenn Sie die Taste 8 drücken, wird dies mittels Beep-Ton bestätigt. Sowohl Baby- wie auch Elterngerät können mittels Gurt Clip getragen werden. Den Clip können Sie gemäss nachstehender Abbildung entfernen. VORSICHTSMASSNAHMEN • Benützen Sie immer den mitgelieferten Netzadapter. Andere Netzadapter können das Überwachungsgerät möglicherweise beschädigen.
CT-2400_Manual_04.pdf 9 28/4/14 6:03 pm PAAREN Dieser Prozess ermöglicht es, das Eltern- mit dem Babygerät zu paaren, sofern diese nach Inbetriebnahme NICHT miteinander kommunizieren sollten. Baby- und Elterngerät wurden bereits ab Fabrik mit einem Code gepaart und sind grundsätzlich betriebsbereit. 1.Drücken und halten Sie zuerst die (down) Taste 2 des Elterngerätes. up botton down botton 2.Schalten Sie das Gerät ein, indem Sie länger auf die Taste 1 drücken.
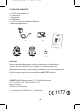
CT-2400_Manual_04.pdf 10 28/4/14 6:03 pm STANDARD ZUBEHÖR a. 6V AC Netzadapter 2 x b. Ladestation c. Babygerät d. Elterngerät e. 3.7V Li-Polymer aufladbare Batterie f. Bedienungsanleitung CT-2400 a. b. Bedienungs anleitung Mode d’e mploi Istruzioni per l’uso Instruction manual 01-11 12-21 22-30 31-40 f. c. d. e. Garantie* Siehe Garantiebedingungen auf der mitgelieferten Garantiekarte. *gilt nur für den Verkauf in der Schweiz.
CT-2400_Manual_04.
CT-2400_Manual_04.pdf 12 28/4/14 FRANCAIS 6:03 pm Composants 9 15 DC 6V 500mA DC 6V 500mA 16 17 1.Power ON/OFF 2.Touche haut/bas +/3.Power ON/OFF – batterie faible 4.Indicateur de réception du son LED 5.Hautparleur 6.Connexion sur le courant 7.Power ON/ FF 8.Touche haut/bas +/9.Power ON-OFF – batterie faible 10.Indicateur de transmission 11.Interrupteur veilleuse 12.Microphone 13.Connexion sur le courant 14.Veilleuse 15.Contrôle de la veilleuse – activé par voix 16.Connexion sur le courant 17.
CT-2400_Manual_04.pdf 13 28/4/14 6:03 pm Caractéristiques • Technique digitale avec une plage de fréquence de 863 – 870MHZ sans aucune perturbation • Recherche de canal automatique • Portée d’émission jusqu’à 600m ceci avec une bonne vue et des conditions optimales • Très peu de radiations (seulement 10% d’un DECT normal ; resp.
CT-2400_Manual_04.pdf 14 28/4/14 6:03 pm SOURCES D’ALIMENTATION (C) EMETTEUR 1. Fonctionnement avec adaptateur de courant (recommandé) 6 13 Branchez l’adaptateur de courant avec la prise secteur, ensuite introduire la fiche dans l’appareil de surveillance 6. Si vous utilisez l’adaptateur, alors il est conseillé de retirer les batteries de l’appareil. Avec l’adaptateur de courant, la portée d’émission de l’émetteur sera supérieur à une utilisation avec batteries.. 2.
CT-2400_Manual_04.pdf 15 28/4/14 6:03 pm (B) RÉCEPTEUR 1. Fonctionnement avec batterie Li-Polymère rechargeable La batterie rechargeable Li-Polymère est déjà installée dans l’appareil, elle est en partie rechargée. Pour changer la batterie, ouvrez le casier de la batterie comme indiquer sur l’illustration, enlevez la fiche de la douille et placez une nouvelle batterie. 2. Recharger la batterie 3 16 17 Raccordez la fiche de 6V de l’appareil d’alimentation avec la douille 16 de la station de charge.
CT-2400_Manual_04.pdf 16 28/4/14 6:03 pm Si l’indication n’est pas allumée, alors contrôler la position correcte de l’appareil des parents sur la station. Pendant la charge, l’indication LED 3 clignote alternativement rouge/vert. Après environ 4 heures, l’accumulateur est complètement rechargé et l’indication LED vert reste constamment allumée. Maintenant, l’appareil des parents peut être enclenché pour la mise en service.
CT-2400_Manual_04.pdf 17 28/4/14 6:03 pm En modus de commandement par la voix, l’indication 15 de la veilleuse sera allumée. Au moment où le microphone 12 enregistre un bruit, la veilleuse de nuit 14 s’allume et elle s’éteint à nouveau au moment ou le microphone 12 ne reçoit plus de transmission de bruit. L’appareil des parents (Récepteur) 1. Pour enclencher l’appareil, pressez longuement sur la touche 1 ON-OFF l’indication 3 Power sera allumée en vert.
CT-2400_Manual_04.pdf 18 28/4/14 6:03 pm PS) Cette alarme se fera également entendre; si l’appareil Baby est déclenché, si les batteries sont trop faibles, en cas de coupure de courant ou encore si l’accord entre les deux appareils n’est pas correcte. 6.Chaque fois que vous pressez sur la touche 8 ceci sera confirmé par un ton Beep. L’appareil Baby comme l’appareil des parents peuvent être portés avec un clip ceinture. Enlevez le clip ceinture selon illustration ci-dessous.
CT-2400_Manual_04.pdf 19 28/4/14 6:03 pm ACCORDEMENT Ce procès rend possible d’accorder l’appareil des parents avec l’appareil Baby, ceci se fait seulement si les deux appareils ne peuvent PAS communiquer ensemble. L’appareil de l’enfant et celui des parents sont par la fabrique avec un code accordé ensemble et sont en principe près à être utilisés. 1.En premier, appuyez et maintenez enfoncé la touche 2 (down) l’appareil des parents. de up botton down botton 2.
CT-2400_Manual_04.pdf 20 28/4/14 6:03 pm Accessoires standards a. 6V AC/DC adaptateur 2 x b. Station de charge c. Emetteur d. Récepteur e. Batterie rechargeable 3.7V Li-Polymère f. Instruction de service allemand/français/italien/anglais CT-2400 a. b. Bedienungs anleitung Mode d’e mploi Istruzioni per l’uso Instruction manual 01-11 12-21 22-30 31-40 f. c. d. e. Garantie* Voir les conditions de garantie sur la carte de garantie livrée avec l’appareil.
CT-2400_Manual_04.pdf Problème Pas de transmission de l‘émetteur 21 28/4/14 6:03 pm Cause possible Solution La sensibilité du microphone est trop faible. Augmentez la sensibilité du microphone La batterie est trop faible ou l’adaptateur d’alimentation n’est pas correctement raccordé. Changez les batteries ou contrôlez le raccordement. L’appareil Baby transmet constamment La sensibilité du microphone est trop haute. Réduire la sensibilité avec la touche 3.
CT-2400_Manual_04.pdf ITALIANO 22 28/4/14 6:03 pm Componenti 9 15 DC 6V 500mA DC 6V 500mA 16 17 1. Power ON/OFF 2.Tasto up/down +/- (volume) 3.Power ON/OFF – batteria scarica 4.Indicatore ricezione suono LED 5.Altoparlante 6.Collegamento alla corrente elettrica 7.Power ON-OFF 8.Tasto up/down +/- (sensibilità microfono) 9.Power ON/OFF – batteria scarica 10.Indicatore di trasmissione 11.Interruttore luce notturna 12.Microfono 13.Collegamento alla corrente elettrica 14.Luce notturna 15.
CT-2400_Manual_04.
CT-2400_Manual_04.pdf 24 28/4/14 6:03 pm Fonti di alimentazione (D) Trasmettitore 1. Funzionamento con adattatore di corrente (consigliato) 6 13 Collegare l’adattatore prima al trasmettitore 6 e poi alla presa di corrente. Se si utilizza la corrente elettrica si raccomanda di rimuovere le pile dal trasmettitore. Il raggio di copertura della trasmissione è maggiore se il trasmettitore viene alimentato tramite la rete elettrica piuttosto che con le pile. 2.
CT-2400_Manual_04.pdf 25 28/4/14 6:03 pm (B) Unità genitori (ricevitore) con batteria ricaricabile Li-Po e base di ricarica (B) Ricevitore 1. Funzionamento con batteria ricaricabile Li-Po La batteria ricaricabile Li-Po è già inserita nell’apparecchio ed è parzialmente carica. Per cambiare la batteria, aprire l’alloggiamento posteriore come indicato nella figura, staccare la spina dalla presa e inserire un nuovo accumulatore. 3 2.
CT-2400_Manual_04.pdf 26 28/4/14 6:03 pm Funzionamento Accensione del trasmettitore (Baby) 1.Per accendere l’unità tenere premuto il tasto 7 Power ON-OFF sulla posizione ON. Si illumina la spia rossa dell’indicatore Power 9. Posizionare l’unità a circa 1m di distanza dal lettino con il microfono rivolto verso il bambino. 2.Regolare la sensibilità del microfono con il tasto 8 (+/-), in modo che il microfono 12 riconosca e trasmetta i suoni a partire dal livello sonoro desiderato.
CT-2400_Manual_04.pdf 27 28/4/14 6:03 pm 2.Posizionare l’unità genitori a una distanza appropriata dall’unità baby per evitare una controreazione. Se la distanza è insufficiente, l’altoparlante 5 emetterà un fischio. 3.Non appena l’unità genitori riceve un segnale, si illumina l’indicatore di ricezione LED 4. Quanto più intensi sono i suoni, tanto più si illuminano le spie LED. Questa funzione è utile se i genitori abbassano il volume dell’apparecchio, per mantenere un ambiente silenzioso. 4.
CT-2400_Manual_04.pdf 28 28/4/14 6:03 pm • L’apparecchio funziona al meglio se tenuto a una temperatura tra -9 C e +50 C. • Non esporre l’apparecchio per lungo tempo alla radiazione solare diretta o a fonti di calore e non utilizzarlo in un ambiente umido o polveroso. • Non aprire il contenitore. Non vi sono parti che richiedono manutenzione.
CT-2400_Manual_04.pdf 29 28/4/14 6:03 pm Dotazione standard a. Adattatore AC/DC da 6V 2 x b. Caricabatteria c. Trasmettitore d. Ricevitore e. Accumulatore ricaricabile da 3.7V Li-Polymer per il ricevitore f. Istruzioni per l’uso in tedesco/francese/italiano/inglese CT-2400 a. b. Bedienungs anleitung Mode d’e mploi Istruzioni per l’uso Instruction manual 01-11 12-21 22-30 31-40 f. c. d. e. Vedere le condizioni di garanzia sul tagliando di garanzia allegato. *vale solo per la vendita in Svizzera.
CT-2400_Manual_04.
CT-2400_Manual_04.pdf 31 28/4/14 6:03 pm ENGLISH Thank you for purchasing our CT-2400 digital baby monitor. Your unit has been manufactured and checked under the strictest possible quality control to ensure that each monitor leaves the factory in perfect condition. In the unlikely event you find any defects or have any problem, please contact our dealer or service center. Please read this manual carefully to obtain maximum performance and extended service life from the unit.
CT-2400_Manual_04.pdf 32 28/4/14 6:03 pm 1. Operation from batteries Slide open the battery door. Insert 4 pieces AAA size (UM-3) alkaline batteries into the compartment. Observe correct polarities indication. N.B. For best performance, do not mix use old and new batteries or alkaline and rechargeable batteries. 6 13 2. Operation using AC adapter The unit can be operated on AC mains using the supplied 6V AC adapter.
CT-2400_Manual_04.pdf 33 28/4/14 6:03 pm To exchange battery pack, slide open the battery door in direction as shown, take out the battery pack and disconnect from socket. 3 16 17 2. Operation from AC mains using the charger stand Connect the output plug of supplied 6V AC adapter to DC jack 16 of charger stand, make sure the polarity is correct. With the unit being switched on, place it into the charger stand. The charging indicator 17 should light up red.
CT-2400_Manual_04.
CT-2400_Manual_04.pdf 35 28/4/14 6:03 pm PAIRING This process is to match the PU with BU so that they can communicate with each other while no other devices (even baby monitor of identical model) can interfere withyou or receiving your signal. The PU and BU are already paired when they are shipped from factory. However, in case you still encounter interference, perform pairing again to achieve better privacy 1. Press and hold the down button 2 of PU. 2. Switch on the unit by long press of button 1.
CT-2400_Manual_04.pdf 36 28/4/14 6:03 pm 3. Once BU is in transmit mode, the transmit indicator 10 will light up red. The unit will return standby mode a few seconds after the microphone 12 stops picking up any sound and the transmit indicator 10 goes off. 4.
CT-2400_Manual_04.pdf 37 28/4/14 6:03 pm When no LED lights up, the speaker 5 is totally muted. Press increase and button to reduce volume. button to 5. Once the PU is beyond the communication range of the BU for over 30 sec, an out of range alarm will be heard together with all LEDs of level meter 4 start flashing to alert the parents. The alarm will only go off when the PU falls back within the communication range of BU. To turn off the alarm sound, press either or of button 2.
CT-2400_Manual_04.pdf 38 28/4/14 6:03 pm STANDARD ACCESSORIES a. 6V AC adapters x 2 b. Charger stand for PU (optional) c. Baby unit d. Parent unit e. 3.7V Li polymer rechargeable battery pack f. User manual CT-2400 a. b. Bedienungs anleitung Mode d’e mploi Istruzioni per l’uso Instruction manual 01-11 12-21 22-30 31-40 f. c. d. e. COMTEL AG, Rotzbergstrasse 7, CH-6362 Stansstad Tel. 041 610 72 72 Fax: 041 610 72 74 www.comtel.ch E-Mail: info@comtel.
CT-2400_Manual_04.
CT-2400_Manual_04.pdf 40 28/4/14 6:03 pm CE-Konformitätserklärung Wir, Comtel AG Rotzbergstrasse 7 6362 Stansstad / Schweiz erklären, dass das Produkt Comtel CT-2400 Babyüberwachungsgerät Den Schutzanforderungen entspricht, die in der Richtlinie des Rates zur Angleichung der Rechtsvorschriften der Mitgliederstaaten über elektromagnetische Verträglichkeit R&TTE (1999/5/EC) festgelegt sind. Zur Beurteilung wurden folgende Normen herangezogen: EN 62311:2008 EN 301 489 -1 V1.9.2:2011 -09 EN 301 489 -3 V1.4.