
User's Manual


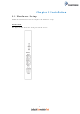

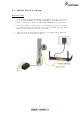

Table Of Contents
- The cardboard box, the plastic contained in the packaging, and the parts that make up this router can be recycled in accordance with regionally established regulations. Never dispose of this electronic equipment along with your household waste; you m...
- Chapter 1 Introduction
- Chapter 2 Installation
- Chapter 3 Web User Interface
- Chapter 4 Status
- Chapter 5 Config
- Chapter 6 Tools
- Chapter 7 System
- Appendix A - Specifications
- Appendix B - AP / Station

6
Power ON
Press the power button to the OFF position (OUT). Connect the power adapter to the
power port. Attach the power adapter to a wall outlet or other AC source. Press the
power button to the ON position (IN). If the Power LED displays as expected then
the device is ready for setup (see section 2.2 LED Indicators).
Caution 1: If the device fails to power up, or it malfunctions, first verify that the
power cords are connected securely and then power it on again. If the
problem persists, contact technical support.
Caution 2: Before servicing or disassembling this equipment, disconnect all power
cords and telephone lines from their outlets.
Ethernet (LAN) Ports
Use 1000-BASE-T RJ-45 cables to connect two network devices to a Gigabit LAN, or
10/100BASE-T RJ-45 cables for standard network usage. These ports are
auto-sensing MDI/X; so either straight-through or crossover cable can be used.
Reset Button
To reboot the device press the Reset button for 1-5 seconds. Restore the default
parameters of the device by pressing the Reset button for more than 5 seconds.
After the device has rebooted successfully, the front panel should display as
expected (see section 2.2 LED Indicators for details).
WPS Button
Press and release the WPS button to start the WPS connection process with the
other device. The connection duration is 2 minutes during which the WPS LED will
blink. If there is no client connection the WPS led will turn off. If connection is
successful the WPS LED will stay on.
AP/Station Switch
Select the desired option.