RocketPort® and RocketModem™ Driver Installation for Novell® NetWare® How to Use this Document You can use the interactive Table of Contents to locate the information you need. Note: All blue underlined text are jumps to the information referenced. Driver Requirements This document discusses installing and configuring the RocketPort/RocketModem series driver for the Novell operating system. • NetWare 4.1x (MPR 3.1A or higher and/or NetWare Connect 2.0.
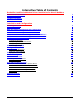
Interactive Table of Contents RocketPort and RocketModem Driver Installation for Novell NetWare How to Use this Document Driver Requirements Locating Information Installation Overview 1 1 1 1 Installation and Configuration Installing the Driver Loading the Driver NWC/Third-Party Initialization and Configuration NetWare Connect Configuration for NetWare 4.x NetWare Connect Configuration for NetWare 5.x NIAS/MPR Installation and Configuration for NetWare 4.
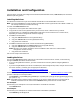
Installation and Configuration Use this section to install and configure the RocketPort/RocketModem driver (AIORCKT.NLM) for the Novell NetWare operating system. Installing the Driver This discussion assumes that you have installed the RocketPort or RocketModem in the server. Note: You must have NetWare Connect or MPR installed before installing the driver files. If NWC or MPR are not already installed, do so before continuing. To install the AIORCKT.NLM driver: 1.
AIORCKT.NLM Parameters Parameter Description IOADDR is required for ISA boards and specifies the hexadecimal I/O address. If you install two or more ISA boards, the IOADDR for the first ISA board must match the DIP switch setting on the board (for example, 180). port=IOADDR For the second, third, and fourth boards, the DIP switches must be set as described in (Required for ISA) the Hardware Installation documentation, but the IOADDR can be any valid address above the first board’s address.
NWC/Third-Party Initialization and Configuration Follow these steps: 1. Load the driver manually, using the command line discussed in Loading the Driver. 2. Add the load commands to the AUTOEXEC.NCF file, so that they are executed each time the system is restarted. 3. At the command prompt, type load install. The Installations Options menu displays. 4. Select NCF files options. The Available NCF Files Options menu displays. 5. Select Edit AUTOEXEC.NCF file. 6. Scroll down until you find the load commands.
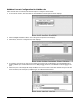
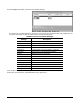
NetWare Connect Configuration for NetWare 4.x After the boards are initialized, follow these steps to configure remote access: 1. At the server console, enter load nwccon. The NetWare Connect Options menu displays: 2. Select Configure NetWare Connect. The Configuration Options menu displays. 3. Select Ports. The Port Configuration screen displays: 4. If necessary, use the cursor keys to scroll down the screen until the RocketPort or RocketModem ports display.
6. To enter or change the modem type, highlight Modem Type and press Enter. The list of valid modem types displays: Scroll through the list to find the appropriate modem name. Press Enter to select a modem. Note: A RocketModem with a “USA” Modem Country Code is initialized slightly differently than the generic RocketModem board, so be sure the RocketModem is an international board before installing it with the “USA” Modem Country Code.
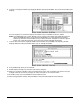
13. Choose Select NetWare Connect Ports. The list of valid NetWare Connect Ports displays: If all ports you configured show up, the ports are set up correctly. Note: The list of ports is sorted alphabetically. If you have changed any Port Names, the ports may appear in different order here than they did on the Port Configuration screen. 14. Press Esc to return to the System Setup Options menu. 15. Next, select Define NetWare Connect Port Usage. The Port Usage Options menu displays: 16.
22. Select Display Port Status. The Port Status window displays: If the status of all configured ports is “Waiting,” you have correctly completed setup and configuration. At this point, the system is ready for users to dial in and access the server. NetWare Connect Port Status Messages Message Description Acquired The port is acquired by an NWC service. Acquired Other The port is acquired by another application. Answering The port is answering an incoming call.
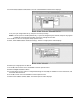
NetWare Connect Configuration for NetWare 5.x After the boards are initialized, follow these steps to configure remote access: 1. Exit the GUI. 2. Load the driver as discussed in NWC/Third-Party Initialization and Configuration. 3. Load the NIASCFG program. 4. Select Configure NIAS. 5. Select Remote Access. 6. Select Configure Ports. The Port Configuration screen displays: 7. If necessary, use the cursor keys to scroll down the screen until the RocketPort or RocketModem ports display.
9. To enter or change the modem type, highlight Modem Type and press Enter. The list of valid modem types displays: Note: The default modem type may appear differently in this screen. Scroll through the list to find the appropriate modem name. Press Enter to select a modem. Note: A RocketModem with a “USA” Modem Country Code is initialized slightly differently than the generic RocketModem board, so be sure the RocketModem is an international board before installing it with the “USA” Modem Country Code.
21. Select Setup, which brings up the System Setup Options menu. 22. Select Select Remote Access Ports. The list of valid NetWare Connect Ports displays: If all ports you configured show up, the ports are set up correctly. Note: The list of ports is sorted alphabetically. If you have changed any Port Names, the ports may appear in different order here than they did on the Port Configuration screen. 23. Press ESC to return to the System Setup Options menu. 24. Select Define Remote Access Port Usage.
33. Select Display Port Status. The Port Status window displays: If the status of all configured ports is “Waiting,” you have correctly completed setup and configuration. At this point, the system is ready for users to dial in and access the server. NetWare Connect Port Status Messages Message Description Acquired The port is acquired by an NWC service. Acquired Other The port is acquired by another application. Answering The port is answering an incoming call.
NIAS/MPR Installation and Configuration for NetWare 4.x This discussion assumes the following: • You have installed the RocketPort or RocketModem board(s) in the server • The board(s) have passed the hardware diagnostic • You have installed the driver (AIORCKT.
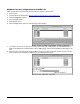
3. Press the Insert key to add a new board. The list of available drivers displays: 4. Scroll down the list, highlight WHSMAIO, and press Enter. 5. Enter a logical board name and press Enter. For example, if this is your first RocketModem, you could type RCKTMDM-1 and press Enter. The WHSMAIO Board Configuration window displays. 6. Highlight AIO Board Options and press Enter: This prompt appears: Should INETCFG automatically load the AIO driver? NIAS/MPR Installation and Configuration for NetWare 4.
7. Select Yes and press Enter. The list of AIO drivers displays: 8. Scroll down the list, highlight AIORCKT, and press Enter. The AIO Board Configuration window displays: Select the appropriate values. Context-sensitive help is available for each field by tabbing to the field and pressing Enter, then F1. a. Select the board bus type: ISA or PCI. b. Enter the I/O address. If it is the first ISA board, the I/O address must match the DIP switch setting used when installing the board.
as an international board, certain harmless console messages may display. 9. Press the Esc key. The WHSMAIO Board Configuration window displays, this time including the board and driver names. 10. If the first AIO port number is not 1, enter the first port number. 11. Enter the number of AIO ports and press Enter. 12. Press the Esc key. 13. When you are asked if you want to save your changes, select Yes and press Enter.
NIAS/MPR Installation and Configuration for NetWare 5.x This discussion assumes the following: • You have installed the RocketPort or RocketModem board(s) in the server • The board(s) have passed the hardware diagnostic • You have installed the driver (AIORCKT.
The list of available drivers displays: 6. Scroll down the list, highlight WHSMAIO, and press Enter. 7. Enter a logical board name and press Enter. For example, if this is your first RocketModem, you could type RCKTMDM-1 and press Enter. The WHSMAIO Board Configuration window displays. 8. Highlight AIO Board Options and press Enter: This prompt appears: Should INETCFG automatically load the AIO driver? NIAS/MPR Installation and Configuration for NetWare 5.
9. Select Yes and press Enter. The list of AIO drivers displays: 10. Scroll down the list, highlight AIORCKT, and press Enter. The AIO Board Configuration window displays: Select the appropriate values. Context-sensitive help is available for each field by tabbing to the field and pressing Enter, then F1. a. Select the board bus type: ISA or PCI. b. Enter the I/O address. If it is the first ISA board, the I/O address must match the DIP switch setting used when installing the board.
installing it with the “USA” Modem country code. If the driver attempts to initialize a generic board as an international board, certain harmless console messages may display. 11. Press the Esc key. The WHSMAIO Board Configuration window displays, this time including the board and driver names. 12. If the first AIO port number is not 1, enter the first port number. 13. Enter the number of AIO ports and press Enter. 14. Press the Esc key. You are asked if you want to save your changes. 15.
Configuring Network Interfaces Follow these steps to configure each port: 1. From the Internetworking Configuration menu, select Network Interfaces. The Network Interfaces status window displays: Each line is a port on your RocketPort or RocketModem. At this point the status of each port should be Unconfigured. 2. Select the first port to configure and press Enter. For example, if you named the board RCKTMDM-1, the first port is RCKTMDM-1_1. You are asked to select a medium. 3. Select PPP and press Enter.
4. Move the cursor to Modem/DCE Type and press Enter. The list of available PPP Modem/DCE Device Types displays: 5. Select the modem or DCE device attached to the port and press Enter.For an international RocketModem board, select the appropriate country. 6. Move the cursor up to Interface Speed and press Enter. The list of interface speeds displays. 7. Set the interface speed to the highest available value and press Enter.
Configuring Protocols Follow these steps to configure the protocols: 1. From the Internetworking Configuration menu, select Protocols. 2. The list of available protocols displays. Select TCP/IP or other protocols as needed. Press Enter. 3. The configuration screen for the protocol you have selected displays. Modify the values as needed. 4. Press Esc to exit the configuration screen. 5. If NetWare 4.x, select Yes and press Enter when you are queried to save your changes. If NetWare 5, save your changes. 6.
Configuring Bindings Follow these steps to configure the bindings: 1. From the Internetworking Configuration menu, select Bindings.The Protocol To Interface/Group Bindings window displays. 2. Press the Insert key to add a new binding. 3. The list of configured protocols displays. Select a protocol (IPX, for example) and press Enter. 4. Select the appropriate interface entity to bind to. Press Enter. 5. Select the configured network interface to bind to.
Adding an ISA-Bus Board Follow these steps: 1. Use the instructions in the Hardware Installation Card to install the board in the server and verify that it passes diagnostics. Pay special attention to the I/O address DIP switch settings. 2. Using this address, add a line to AUTOEXEC.NCF to initialize the new board. Remember, lines initializing PCI boards must come before any lines initializing ISA boards.
Troubleshooting If you are still unable to resolve the problem, try the following: • Check to make sure that you are using the correct cables, and that the cables are connected properly. • If using ISA boards, check to make sure the DIP switches are set to the desired addresses. • Reseat the board in the expansion slot, or try moving the board to another slot of the same bus type. • Make sure that the expansion slot screw is replaced after inserting or moving the board.
Using RCKTTERM Use the following procedure to use RCKTTERM: 1. Load the AIORCKT driver for each of the installed RocketPort/RocketModem boards. 2. Load the RCKTTERM NLM. 3. Select the desired board from the list of boards. 4. Select a port from the available ports on the board. 5. Make a selection from the menu that displays the port capabilities, statistics, current configuration, reconfigure the port or go to terminal mode to preform data transfers.
Forced Reset The force option should be used for specific modems that have already been allocated (acquired) by an application. The application must be able to recognize call termination, and issue the appropriate modem initialization strings, as defined in the AIORKT.MDC descriptor file. Only individual modems can be forced down.